kaede
Posted on March 29, 2022
前提
前回の記事でチャンネルリストを取得できた
今度はチャンネルの中身のメッセージたちを取得したい。
Slack API Doc を読んでチャンネルの中のメッセージの取得方法を確認
https://api.slack.com/messaging/retrieving#conversations
公式によると
GET https://slack.com/api/conversations.history
Authorization: Bearer xoxb-your-token
{
  channel: "CONVERSATION_ID_HERE"
}
conversations.history から GET で
{ channel: "conversation_id" }
を payload で渡せば取れるっぽい
API リクエストの共通ラッパーを作る
前回の記事の
https://qiita.com/seratch/items/2158cb0abed5b8e12809
seratech さんの api ラッパーを参考にして
function callWebApi(token, apiMethod, payload) {
  const response = UrlFetchApp.fetch(
    `https://www.slack.com/api/${apiMethod}`,
    {
      method: "post",
      contentType: "application/x-www-form-urlencoded",
      headers: { "Authorization": `Bearer ${token}` },
      payload: payload,
    }
  );
  console.log(`Web API (${apiMethod}) response: ${response}`)
  return response;
}
API リクエストのラッパーを conversations.hisotry と channel ID で呼び出す
これに
const apiResponse = callWebApi(
  token,
  "conversations.history",
  { channel: "C0385KDLRD5"},
);
conversations.history を渡して
paylaod として 前回の記事で conversations.list から所得した
making-bot チャンネルの id C0385KDLRD5 を入れて実行すると
Web API (conversations.history) response: {"ok":true,"messages":[{"type":"message","subtype":"channel_join","ts":"1648155092.889729","user":"U038DHKP87Q","text":"<@U038DHKP87Q> has joined the channel"}],"has_more":false,"pin_count":0,"channel_actions_ts":null,"channel_actions_count":0}
ここのチャンネルメッセージたちが取得できた。
この記事では "#random" とチャンネル名を渡すように書いてあるが、
これでは動かなかった。
Web API (conversations.history) response: {"ok":false,"error":"channel_not_found"}
general 指定での実行結果の詳細を見てみる
前回 conversations.list を実行するして
{"id":"C038NHHFN3E","name":"general",...},
general の id が取得できた。
この general の id: C038NHHFN3E で実行してみる
Web API (conversations.history) response: {"ok":true,"messages":[
すると、conversations.list のような出だしになるが
{
"type":"message",
"subtype":"channel_purpose",
"ts":"1648513399.644649",
"user":"U038DHKP87Q",
"text":"set the channel description: "Edited 03-29\","
"purpose":"Edited 03-29"
},

{
"client_msg_id":"489452e3-72bb-4276-86da-b41a36ab3bb7",
"type":"message",
"text":"09:47 text",
"user":"U038DHKP87Q",
"ts":"1648169260.574219",
"team":"T038NHHEJJY",
"blocks":[{"type":"rich_text","block_id":"PA+","elements":[{"type":"rich_text_section","elements":[{"type":"text","text":"09:47 text"}]}]}]
},

{
"client_msg_id":"98fd1e24-2b1a-4028-a6d8-4d79980c702c",
"type":"message",
"text":"3rd message",
"user":"U038DHKP87Q",
"ts":"1648168642.874689",
"team":"T038NHHEJJY",
"blocks":[{"type":"rich_text","block_id":"2cN","elements":[{"type":"rich_text_section","elements":[{"type":"text","text":"3rd message"}]}]}]},

{
"type":"message",
"subtype":"channel_join",
"ts":"1648154999.666459",
"user":"U038DHKP87Q",
"text":"<@U038DHKP87Q> has joined the channel"}],

"has_more":false,
"pin_count":0,
"channel_actions_ts":null,
"channel_actions_count":0
}
channel_purpose と言うチャンネルの説明の変更、
channel_join と言うチャンネルの参加者の通知、
などの subtype があるシステムメッセージや
client_msg_id があり text の他に
同じ内容の rich_text のブロックがある
通常のユーザーが投稿したメッセージが
これらが新しい順に並べられる。
結果を JSON でパースする
https://zenn.dev/nariakiiwatani/articles/8ed4a7bb0d5d0b
この nariakiiwatani さんの記事を参考にして
    const JSONParsedResponse = JSON.parse(response)
    console.log(`apiMethod: (${apiMethod})`)
    console.log(`JSONParsedResponse`)
    console.log(JSONParsedResponse)
JSON.parse(response) を使ってみると
{ ok: true,
  messages:
   [ { type: 'message',
       subtype: 'channel_purpose',
       ts: '1648513399.644649',
       user: 'U038DHKP87Q',
       text: 'set the channel description: "Edited 03-29',"
       purpose: 'Edited 03-29' },
     { client_msg_id: '489452e3-72bb-4276-86da-b41a36ab3bb7',
       type: 'message',
       text: '09:47 text',
       user: 'U038DHKP87Q',
       ts: '1648169260.574219',
       team: 'T038NHHEJJY',
       blocks: [Object] },
     { client_msg_id: '98fd1e24-2b1a-4028-a6d8-4d79980c702c',
       type: 'message',
       text: '3rd message',
       user: 'U038DHKP87Q',
       ts: '1648168642.874689',
       team: 'T038NHHEJJY',
       blocks: [Object] },
恐ろしく美しく出力された。
しかし、blocks は省略されてしまった。
配列になっているので、これに
console.log(JSONParsedResponse.messages[2])
中身のメッセージ配列の 2 つめを指定すると
{ client_msg_id: '98fd1e24-2b1a-4028-a6d8-4d79980c702c',
  type: 'message',
  text: '3rd message',
  user: 'U038DHKP87Q',
  ts: '1648168642.874689',
  team: 'T038NHHEJJY',
  blocks: [ { type: 'rich_text', block_id: '2cN', elements: [Object] } ] }
最新から 2 つめのメッセージのみが表示された
メッセージ配列の指定のものだけを取った配列を作る
    const messages = JSONParsedResponse.messages
    newMessages = messages.map(function (v) {
      return [
        v.client_msg_id,
        v.type,
        v.text,
        v.user,
        v.ts,
        v.reply_count || 0,
        v.reply_users_count || 0,
      ];
    });
    console.log(newMessages)
[ [ undefined,
    'message',
    'set the channel description: Edited 03-29',
    'U038DHKP87Q',
    '1648513399.644649',
    0,
    0 ],
  [ '489452e3-72bb-4276-86da-b41a36ab3bb7',
    'message',
    '09:47 text',
    'U038DHKP87Q',
    '1648169260.574219',
    0,
    0 ],
これで JSON オブジェクトから CSV に近い配列になったので
Sheet に書き出しやすくなった
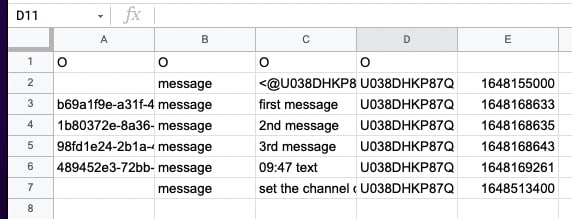
シートに書き込む
    const sheetId = "1SQxrJ0MoC69ExqhiQZtWh7AbFEJ1vZDyYN-QZVdugTw"
    const sheet = SpreadsheetApp.openById(sheetId);
    sheet.getRange('A2:G' + (messages.length+1)).setValues(newMessages.reverse());
シートを id から取得して
getRange で A2 から G{メッセージの長さ}
今回だと G7 まで書き込むことができた
これでシートに書き込めた

Posted on March 29, 2022
Join Our Newsletter. No Spam, Only the good stuff.
Sign up to receive the latest update from our blog.

