Building High Quality Android UI: Embracing Test Driven Development with Jetpack Compose

Alejandro Zurcher
Posted on July 18, 2023

Cover Photo by David Watkis on Unsplash
How can we approach UI development in Android while ensuring we are writing high-quality software from the design spec? Test Driven Development (TDD) is a way of approaching software development that is very handy for both feature writing and bug fixing.
It provides a path for developers to request more information when needed before writing “just in case” software, also known as YAGNI (You Aren’t Gonna Need It), while fostering the creation of optimized code using the KISS principle (Keep It Simple, Stupid), I guess? Additionally, TDD is highly effective for writing code that is easy to update. Introducing a new test is straightforward once the suite is running, and tests are always there for you if you accidentally or intentionally decide to update the behavior of your software.
So, if we all agree that TDD is the way, let’s give it a try and attempt writing our UI with it using Jetpack Compose.
Plan
First, let’s consider a common scenario for a mobile engineer: receiving a new design specification for a brand new screen to be added to our app. For this exercise, I have chosen Taras Migulko’s fantastic work on an E-commerce app design from Dribbble.
Specifically, we will be implementing one of the UI elements of a clothing list of items, as depicted in the following screen:
Keeping this in mind, let’s set up our development environment. In this case, we will start a new project with Compose, assuming that this step has already been completed for the purpose of this sample.
I’ve created a default project using the templates of Android Studio for an Activity + Compose. Let’s make sure our project is including all the required libraries to do TDD in Compose:
Lastly, if we choose to follow a Test-Driven Development (TDD) approach, it is essential to remember and adhere to the three rules of TDD defined by Robert C. Martin, also known as Uncle Bob. These rules serve as our development traffic lights🚦when writing or updating any tests in the app:
- Write production code only to pass a failing unit test.
- Write no more of a unit test than sufficient to fail (compilation failures are failures).
- Write no more production code than necessary to pass the one failing unit test.
By following these rules, we ensure that our development process remains focused and efficient.
🚦Action
The Design Spec is ready and the environment is set, so How do we approach a new piece of UI with a test?
This will depend on each framework used for UI, for this example we’ll be using Jetpack Compose so it becomes relevant to understand how to “Think in Compose”
With Compose is easy to dissect the UI into very small pieces that are described as Composables that will be put together to render the full UI.
So the first thing we’ll need to do Is have a close look into the UI to define how can we divide it and go from small to big.
Taking a first glance I’ve identified (at least) five different Composables that will conform this screen:
- A top Action Bar which includes the Back, Name, Item Count and Filter action.
- A main List of clothing items
- Each Clothing Item
- The Clothing Item Content (display name, price and the add to cart action button)
- The Favourite Button
There’s already some added value in doing this as now we are starting to surface both reusable components such as the top action bar and also starting to think on naming for our composables, without even touching a single line of code.
So let’s go ahead and pick the smallest possible composable from our new screen; the Favourite Button.
Assuming this behaves as any favourite button this will have to support 2 states; filled heart and empty heart. Let’s write our first test:
Worth mentioning at this stage that we’ll be following the suggested documentation on Testing Compose so we also need to add the composeTestRule and initialise our screen using its setContent function:
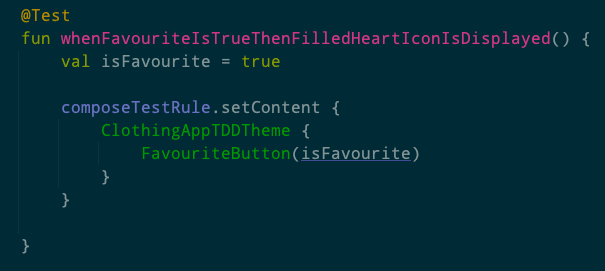
Let’s now bring in our test condition
🔴 And when we write our Composable name (that still does not exist) we brake the second TDD rule; the test no longer compiles
To address this issue we create a new Kotlin file and write our Composable
And we go back to the test
🟢 Compilation issue addressed! We may continue writing the test now
So the test is ready and compiles, next step; let’s run it
🔴 We made it; we have a failing test now. Let’s follow TDD rules 1 and 2 now to make It pass before writing any new tests.
And I know what you are thinking, we are not checking the boolean! We are not supporting the other scenarios, we could write so much more code! But this, this is the exact point where you need to take that hat of and pick the TDD hat If you want to make the switch and only think: Are we following all the TDD rules? Yes, then Its ok, lets keep going.
🟢 Test is going fully green now, this means we are able to write the next test. So let’s try the other scenario our composable needs to support, displaying an empty heart if isFavourite is false.
🔴 And when we run it:
So once again, following TDD rule number 1 & 3 we go back to our composable and add the required logic to make this test pass, being careful enough that our previous test will work too this time.
And we make sure to run the entire suite now so that both tests are ran:
🟢 And we can see all our tests going green now!
Finally we can update our tests to make sure that the other icon is not displayed in the incorrect scenario.
With all of this in place we now have peace of mind that our Composable will do exactly what we need to, so we can take a pause on our Test writing and go to the Composable itself to make sure It looks as it should by adding Its background, colors and right sizing.
Conclusion
As you can see with this process of following just the 3 rules of TDD, stoping when requried 🔴 and moving on when we can 🟢 we can ensure that our UI will work as expected and is fully covered in case we want to update it in the future; a.k.a.: high quality software.
By incorporating Test-Driven Development (TDD) into our development process, we eliminate the guesswork associated with coding and relying on trial-and-error to verify functionality. Instead, our code is designed to precisely meet our requirements. TDD acts as a lighthouse, guiding us to write the necessary code while helping us identify any gaps in the requirements specification through thoughtful consideration.
Moreover, implementing TDD in Jetpack Compose is a straightforward process, as we have seen. This approach resolves any potential issues during the design phase, allowing us to confidently write our user interface (UI) knowing that it will seamlessly integrate with the business logic layers in the future.
In upcoming posts I’ll continue developing this entire screen with TDD for now I encourage you to embrace TDD from the outset rather than writing tests after developing the code. By doing so, you will write less code, think through your implementation thoroughly, and easily identify any missing components in the requirements. Embrace the power of TDD and have a wonderful day!

Posted on July 18, 2023
Join Our Newsletter. No Spam, Only the good stuff.
Sign up to receive the latest update from our blog.
Related

July 18, 2023


