How to Use Dynamic Web TWAIN UI-less API to Build a Web Document Scanning Application

Xiao Ling
Posted on December 13, 2022
Dynamic Web TWAIN is well-known for document scanner programming. It provides a set of JavaScript API to simplify the way of integrating document scan functions into web applications. Most of the time, we use Dynamic Web TWAIN with its built-in UI. However, the default UI may not be suitable for all scenarios. To meet the different requirements, Dynamic Web TWAIN also provides UI-less JavaScript APIs that only operates document data without coupling HTML elements. In this article, we will demonstrate how to use Dynamic Web TWAIN UI-less API to build a web document scanning application step by step.
Where Does Dynamic Web TWAIN Keep Document Data?
Dynamic Web TWAIN allows you to acquire documents from scanners and cameras.
- For scanner access, you need to install a platform-specific Dynamsoft service that communicates with the JavaScript API. All captured document images are stored on the local disk.
- For camera access, no installation is required. The JavaScript API interchanges data with wasm modules. All captured document images are stored in the browser memory.
Decoupling Dynamic Web TWAIN Object from HTML Elements
The classic code snippet for initializing Dynamic Web TWAIN is as follows:
<div id="dwtcontrolContainer"></div>

<script type="text/javascript">
    Dynamsoft.DWT.RegisterEvent('OnWebTwainReady', Dynamsoft_OnReady);
    window.onload = function () {
      Dynamsoft.DWT.Containers = [{ContainerId:'dwtcontrolContainer', Width:600, Height:800}];
      Dynamsoft.DWT.Load();
    };
    var DWObject;

    function Dynamsoft_OnReady() {
      DWObject = Dynamsoft.DWT.GetWebTwain('dwtcontrolContainer');
    }
</script>
After passing the ContainerId to the Dynamsoft.DWT.Containers property, the Dynamsoft.DWT.Load() method will create a Dynamic Web TWAIN object and bind it to the HTML element with the specified ContainerId. The Dynamsoft.DWT.GetWebTwain() method then returns the Dynamic Web TWAIN object.
To create a web TWAIN object without UI binding, we can call the CreateDWTObjectEx() function:
var dwtObject = null;
Dynamsoft.DWT.CreateDWTObjectEx({ "WebTwainId": "container" }, (obj) => {
        dwtObject = obj;
}, (errorString) => { });
With the UI-less web TWAIN object, we can manage the captured documents and customize the UI elements more flexibly.
Acquire Documents from Scanners and Show Them in the Browser
The document acquisition code is the same as the classic code snippet. The only difference is after triggering the success callback function, we need to manually get the document data by calling GetImageURL() method.
var data = [];
var currentURL;

function acquireImage() {
  if (!dwtObject)
    return;
  const onAcquireImageSuccess = () => {
    if (dwtObject) {
      updateImage();
      dwtObject.CloseSource();
    }
  };
  const onAcquireImageFailure = onAcquireImageSuccess;
  dwtObject.OpenSource();
  dwtObject.AcquireImage({}, onAcquireImageSuccess, onAcquireImageFailure);
}

function updateImage() {
  if (dwtObject) {
    let currentLen = data.length;
    let added = dwtObject.HowManyImagesInBuffer - currentLen;
    if (added > 0) {
      for (let i = 0; i < added; i++) {
        let url = dwtObject.GetImageURL(currentLen);
        currentURL = url;
        data.push(url);
        currentLen += 1;
      }
    }
  }
}
The format of the return value is like this:
http://127.0.0.1:18622/dwt/dwt_17300531/img?id=297342469&index=490&t=1670830035678
-
idis the session ID of the current web page. -
indexis the ID of the document image in the buffer. -
tis the timestamp.
We use an array to store image URLs sequentially for further operations. The reason we use a loop to get the image URL is that it may acquire multiple documents at once. The HowManyImagesInBuffer property indicates the number of documents in the buffer. The GetImageURL() method returns the URL of the document image with the specified index.
The image to be displayed is the last one or selected one in the array. The currentURL variable is used to store the URL of the current image. We can dynamically load it into an image element for display.
<img id="document-image">

<script>
  let image = document.getElementById("document-image");
  image.src = url;
</script>
Document File List
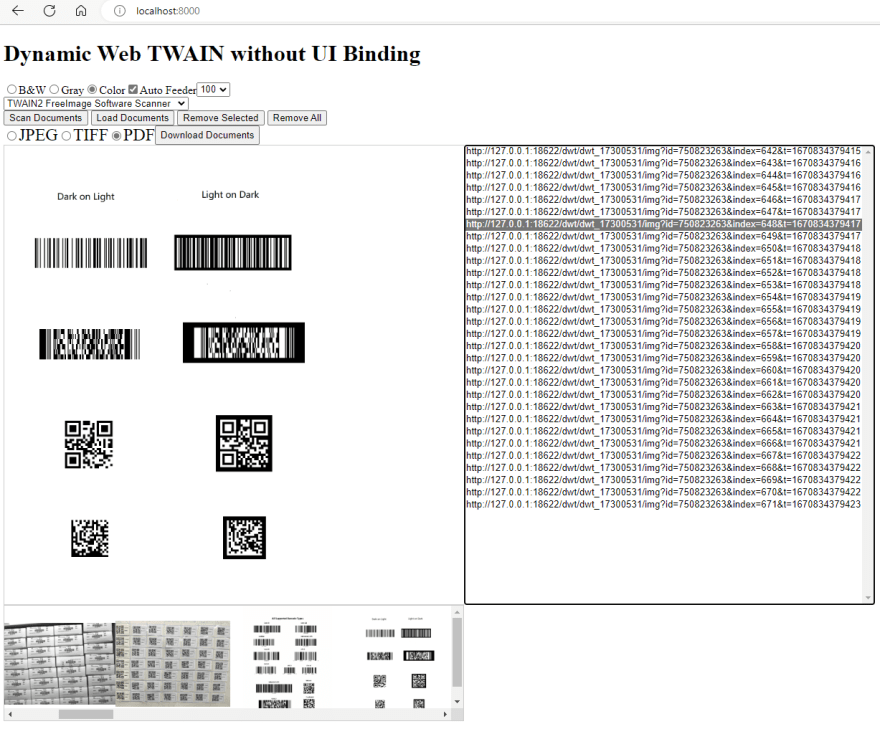
The image element can only display one document at a time. In order to switch between documents conveniently, an easy workaround is to create a document list. In HTML, we can use the select element to create a list.
<select id="image-list" size="2" onchange="onSelectChange(value)">
</select>
Note: The size attribute is used to set the number of visible options. If the number of options is 1, the select element will be displayed as a drop-down list. Back to the document acquisition code, add the following code to create a new option when a new document is acquired.
var imageList = document.getElementById("image-list");
for (let i = 0; i < added; i++) {
    let url = dwtObject.GetImageURL(currentLen);
    let image = document.getElementById("document-image");
    image.src = url;
    currentURL = url;
    data.push(url);

    let option = document.createElement("option");
    option.selected = true;
    option.text = url;
    option.value = url;
    imageList.add(option);
}
Document Thumbnail View
Thumbnail view is a better way to preview and select a document. We can create image elements dynamically and add them to a container element.
<style>
  .thumb-bar {
    display: block;
    width: 640px;
    height: 160px;
    overflow-x: auto;
    border: 1px solid #ccc;
  }

  .thumb-box {
    width: 160px;
    height: 160px;
    cursor: pointer;
    display: flex;
    border: 1px solid #ccc;
  }

  .thumb-box img {
    max-width: 100%;
    max-height: 100%;
    min-width: 100%;
    object-fit: contain;
  }
</style>

<div class="thumb-bar" id="thumb-bar">
    <div class="thumb-box" id="thumb-box">
</div>

<script>
...

for (let i = 0; i < added; i++) {
  let url = dwtObject.GetImageURL(currentLen);
  let image = document.getElementById("document-image");
  image.src = url;
  currentURL = url;
  data.push(url);

  ...

  let thumbnails = document.getElementById("thumb-box");
  let newImage = document.createElement('img');
  newImage.setAttribute('src', url);

  if (thumbnails != null) {
    thumbnails.appendChild(newImage);
    newImage.addEventListener('click', e => {
      if (e != null && e.target != null) {
        let target = e.target;
        image.src = target.src;
        currentURL = target.src;
        imageList[data.indexOf(target.src)].selected = true;
      }
    });
  }

  currentLen += 1;
}
...
</script>
Every image element contains a click event listener for switching the document images.
Remove Documents
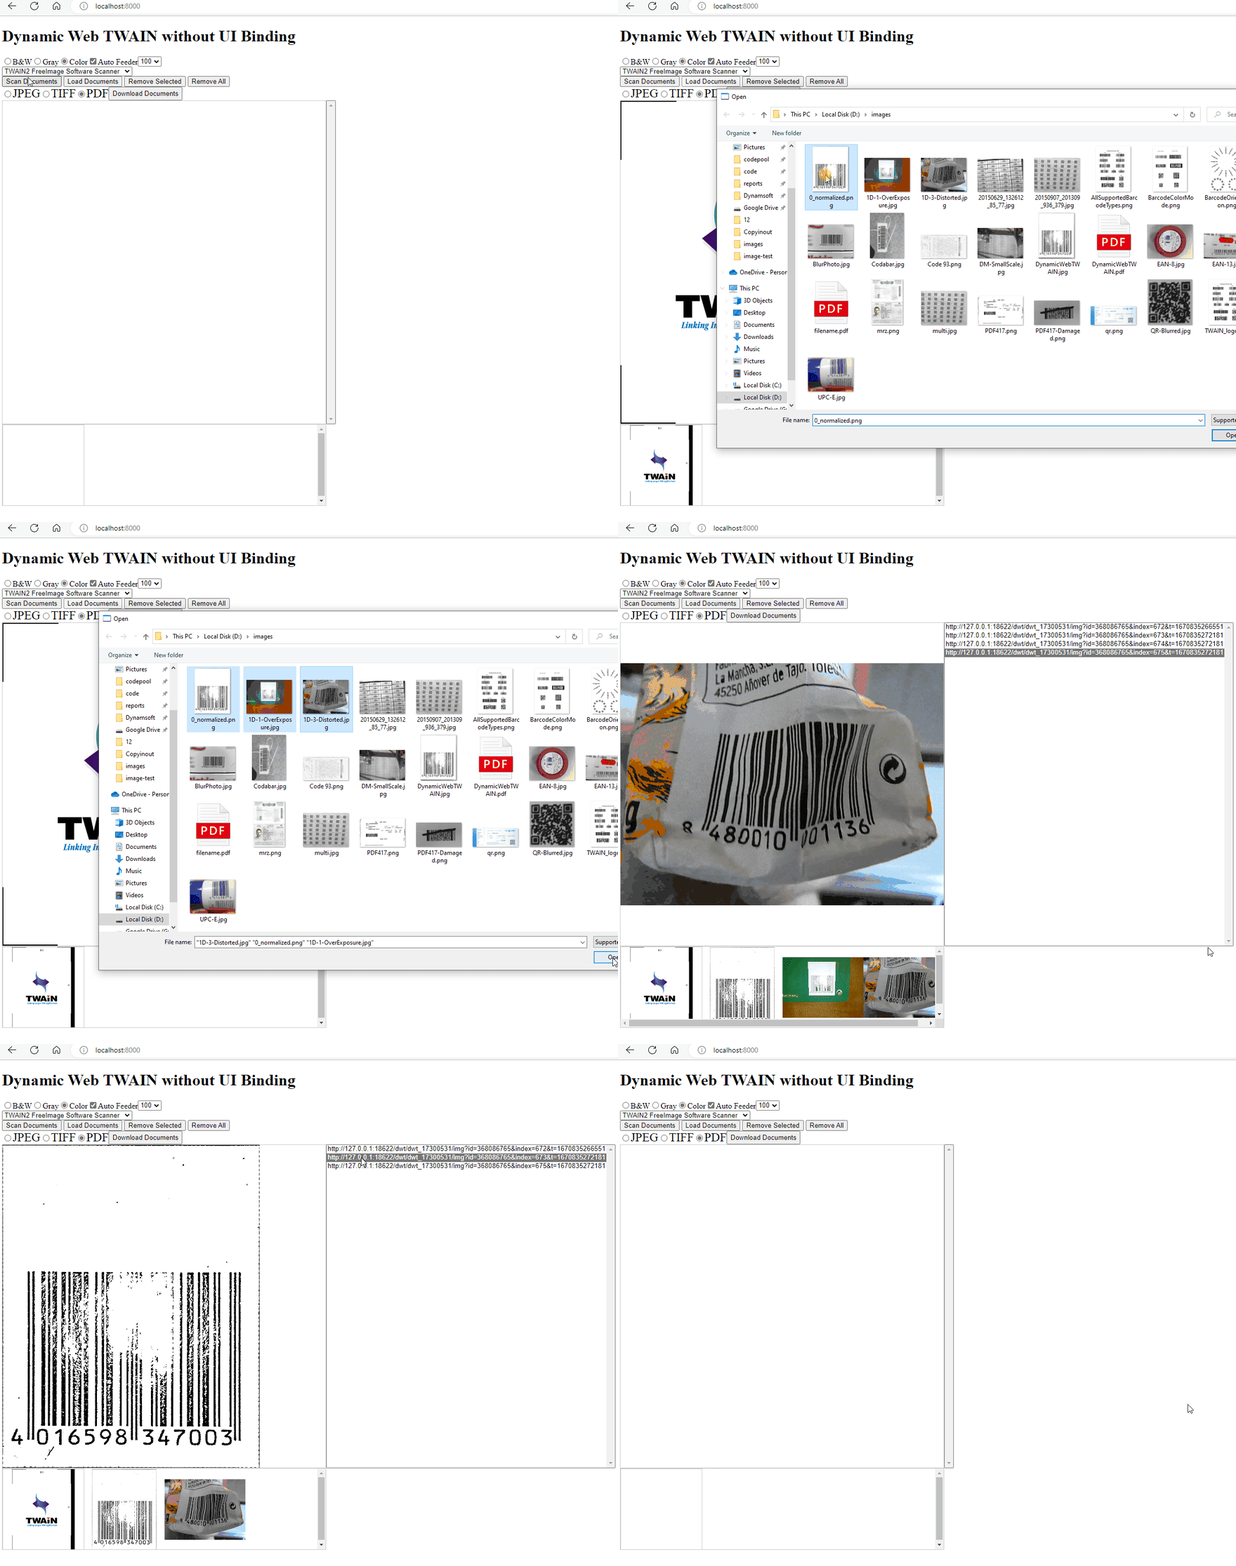
When removing a selected document or all documents, we need to update the database maintained by Dynamsoft service, the data list maintained by ourselves, the large image view, the document list, and the thumbnail view.
Let's deal with them one by one.
Remove Selected Document
- Dynamsoft service: call the RemoveImage() method to remove the selected document image from the buffer.
dwtObject.RemoveImage(index);
- Data list: call
splice()to remove an element from a JavaScript array.
data.splice(index, 1);
- Large image view: update the image element. If the removed document is the first one, display the next one. Otherwise, display the previous one.
  if (dwtObject.HowManyImagesInBuffer > 0) {
    if (index == 0) {
      image.src = data[index];
    }
    else {
      image.src = data[index - 1];
    }

    currentURL = image.src;
    imageList[data.indexOf(currentURL)].selected = true;
  }
- Document list: remove the selected option from the select element.
imageList.remove(index);
- Thumbnail view: remove the selected image element from the div element.
  let thumbnails = document.getElementById("thumb-box");
  thumbnails.removeChild(thumbnails.childNodes[index + 1]);
Remove All Documents
-
Dynamsoft service: call the RemoveAllImages() method to remove all document images from the buffer.
dwtObject.RemoveAllImages(); -
Data list: create a new array.
data = []; -
Large image view: clear the image element.
image.src = ""; currentURL = ""; -
Document list: remove all options from the select element.
let imageList = document.getElementById("image-list"); while (imageList.firstChild) { imageList.removeChild(imageList.firstChild); } -
Thumbnail view: remove all image elements from the div element.
let thumbnails = document.getElementById("thumb-box");
while (thumbnails.firstChild) {
  thumbnails.removeChild(thumbnails.firstChild);
}
Try the Web Document Scan and Management Demo
-
Get a trial license and then update the code:
Dynamsoft.DWT.ProductKey = "LICENSE-KEY"; -
Use Python to quickly start a local server:
python -m http.server -
Visit
http://localhost:8000/.
Source Code

Posted on December 13, 2022
Join Our Newsletter. No Spam, Only the good stuff.
Sign up to receive the latest update from our blog.
Related
December 13, 2022


