Xiao Ling
Posted on May 13, 2022
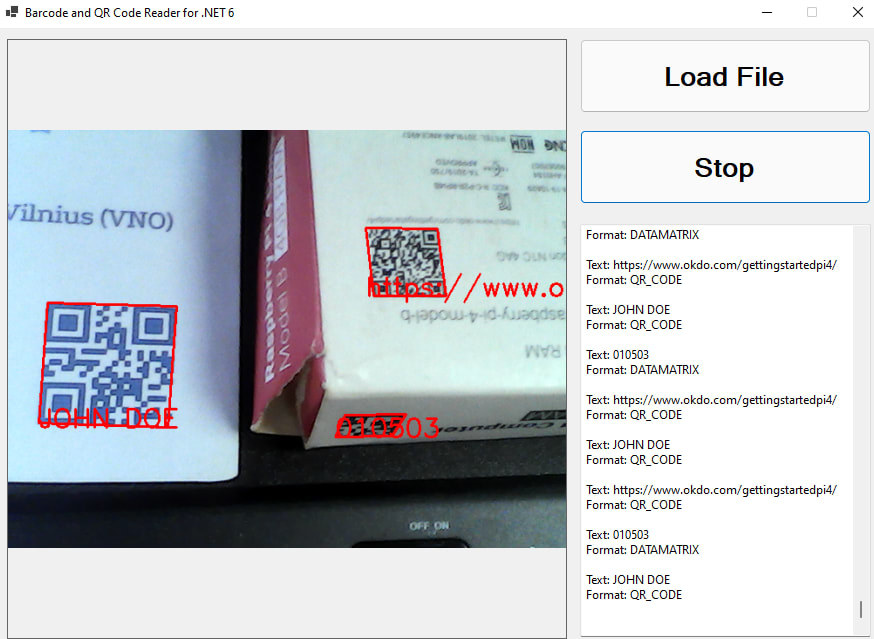
A few weeks ago, I released a .NET 6 BarcodeQRCodeSDK package implemented with Dynamsoft C/C++ Barcode SDK. This article demonstrates how to build a Windows desktop barcode and QR code scanner using .NET WinForms, OpenCvSharp, and BarcodeQRCodeSDK.
Install Dependencies
-
Used to capture video stream from webcam.
dotnet add package OpenCvSharp4.Windows -
Used to convert OpenCvSharp Mat to Bitmap.
dotnet add package OpenCvSharp4.Extensions -
Used to decode barcode and QR code from
MatorBitmap.
dotnet add package BarcodeQRCodeSDK
Steps to Develop Windows Desktop Barcode and QR Code Scanner in .NET 6
Let's build the application from scratch.
Step 1: Create Windows Forms App:
We can quickly create a new project and install dependencies via the following commands in terminal:
dotnet new winforms -o desktop-barcode-qrcode-scanner
cd desktop-barcode-qrcode-scanner
dotnet add package OpenCvSharp4.Windows
dotnet add package OpenCvSharp4.Extensions
dotnet add package BarcodeQRCodeSDK
Then import relevant namespaces and classes in Form1.cs file:
using Dynamsoft;
using Result = Dynamsoft.BarcodeQRCodeReader.Result;
using OpenCvSharp;
using OpenCvSharp.Extensions;
In constructor, we initialize BarcodeQRCodeReader and VideoCapture instances. You can apply for a 30-day trial license to activate the barcode SDK.
public Form1()
{
    InitializeComponent();
    BarcodeQRCodeReader.InitLicense("DLS2eyJoYW5kc2hha2VDb2RlIjoiMjAwMDAxLTE2NDk4Mjk3OTI2MzUiLCJvcmdhbml6YXRpb25JRCI6IjIwMDAwMSIsInNlc3Npb25QYXNzd29yZCI6IndTcGR6Vm05WDJrcEQ5YUoifQ=="); // Get a license key from https://www.dynamsoft.com/customer/license/trialLicense?product=dbr
    reader = BarcodeQRCodeReader.Create();
    capture = new VideoCapture(0);
}
Step 2: Add UI Components
Add a PictureBox and a Button to the form designer. The PictureBox is used to display the camera video stream, and the Button is used to start and stop scanning barcode and QR code from video frames. If you use Visual Studio Code, you need to manually add the components in Form1.Designer.cs. Whereas if you use Visual Studio, you can drag the components from toolbox to the form.
this.pictureBox1.BorderStyle = System.Windows.Forms.BorderStyle.FixedSingle;
this.pictureBox1.Location = new System.Drawing.Point(13, 12);
this.pictureBox1.Margin = new System.Windows.Forms.Padding(4);
this.pictureBox1.Name = "pictureBox1";
this.pictureBox1.Size = new System.Drawing.Size(640, 640);
this.pictureBox1.SizeMode = System.Windows.Forms.PictureBoxSizeMode.Zoom;
this.pictureBox1.TabIndex = 0;
this.pictureBox1.TabStop = false;

this.button1.AllowDrop = true;
this.button1.AutoEllipsis = true;
this.button1.Font = new System.Drawing.Font("Microsoft Sans Serif", 20.25F, System.Drawing.FontStyle.Bold, System.Drawing.GraphicsUnit.Point, ((byte)(0)));
this.button1.Location = new System.Drawing.Point(667, 12);
this.button1.Margin = new System.Windows.Forms.Padding(4);
this.button1.Name = "button1";
this.button1.Size = new System.Drawing.Size(333, 79);
this.button1.TabIndex = 1;
this.button1.Text = "Camera Scan";
this.button1.UseVisualStyleBackColor = true;
this.button1.Click += new System.EventHandler(this.button_Click);
The button click event handler is implemented as follows:
private void button_Click(object sender, EventArgs e)
{
    if (!capture.IsOpened())
    {
        MessageBox.Show("Failed to open video stream or file");
        return;
    }

    if (button2.Text == "Camera Scan")
    {
        StartScan();
    }
    else {
        StopScan();
    }
}
Step3: Display Camera Video Stream in PictureBox
To avoid blocking the UI thread, we capture video stream in a background thread. The type of the captured image is Mat, which cannot be passed to PictureBox directly. So we use BitmapConverter to convert Mat to Bitmap.
private void StartScan() {
    button2.Text = "Stop";
    isCapturing = true;
    thread = new Thread(new ThreadStart(FrameCallback));
    thread.Start();
}

private void StopScan() {
    button2.Text = "Camera Scan";
    isCapturing = false;
    if (thread != null) thread.Join();
}

private void FrameCallback() {
    while (isCapturing) {
        Mat frame = new Mat();
        capture.Read(frame);
        pictureBox1.Image = BitmapConverter.ToBitmap(frame);
    }
}
Step4: Decode Barcode and QR Code from Camera Video Stream
Here is the code used for decoding barcode and QR code from Mat:
Result[]? results = reader.DecodeBuffer(mat.Data, mat.Cols, mat.Rows, (int)mat.Step(), BarcodeQRCodeReader.ImagePixelFormat.IPF_RGB_888);
As we get the results, we draw text and contours on the image:
private Bitmap DecodeMat(Mat mat)
{
    Result[]? results = reader.DecodeBuffer(mat.Data, mat.Cols, mat.Rows, (int)mat.Step(), BarcodeQRCodeReader.ImagePixelFormat.IPF_RGB_888);
    if (results != null)
    {
        foreach (Result result in results)
        {
            string output = "Text: " + result.Text + Environment.NewLine + "Format: " + result.Format1 + Environment.NewLine;
            textBox1.AppendText(output);
            textBox1.AppendText(Environment.NewLine);
            int[]? points = result.Points;
            if (points != null)
            {
                OpenCvSharp.Point[] all = new OpenCvSharp.Point[4];
                int xMin = points[0], yMax = points[1];
                all[0] = new OpenCvSharp.Point(xMin, yMax);
                for (int i = 2; i < 7; i += 2)
                {
                    int x = points[i];
                    int y = points[i + 1];
                    OpenCvSharp.Point p = new OpenCvSharp.Point(x, y);
                    xMin = x < xMin ? x : xMin;
                    yMax = y > yMax ? y : yMax;
                    all[i / 2] = p;
                }
                OpenCvSharp.Point[][] contours = new OpenCvSharp.Point[][] { all };
                Cv2.DrawContours(mat, contours, 0, new Scalar(0, 0, 255), 2);
                if (result.Text != null) Cv2.PutText(mat, result.Text, new OpenCvSharp.Point(xMin, yMax), HersheyFonts.HersheySimplex, 1, new Scalar(0, 0, 255), 2);
            }
        }
    }
    else
    {
        textBox1.AppendText("No barcode detected!" + Environment.NewLine);
    }

    Bitmap bitmap = BitmapConverter.ToBitmap(mat);
    return bitmap;
}
Update the following line to show barcode and QR code results:
- pictureBox1.Image = BitmapConverter.ToBitmap(frame);
+ pictureBox1.Image = DecodeMat(mat);
Now, we can run the program to scan barcode and QR code.
dotnet run
Source Code
https://github.com/yushulx/dotnet-barcode-qr-code-sdk/tree/main/example/desktop-gui
Download the source code with Subversion:
svn checkout https://github.com/yushulx/dotnet-barcode-qr-code-sdk/trunk/example/desktop-gui

Posted on May 13, 2022
Join Our Newsletter. No Spam, Only the good stuff.
Sign up to receive the latest update from our blog.
