Understanding and Creating ReplicaSets in Kubernetes

Vladimir Romanov
Posted on February 22, 2024

Pods are the fundamental building blocks of Kubernetes. They’re used to deploy applications and services that interact with each other and the outside world / users. In the last two tutorials, we’ve deployed a pod and a service. The pod runs an Angular application with a basic UI. The service, using NodePort, allows outside users to be directed to the pod and view the application via a web browser.
Sounds simple enough… why do we need ReplicaSets?
As we’ve mentioned multiple times, pods should be considered to have “finite life.” They’re meant to be deployed, used, and discarded when a problem occurs. These issues can range from code locks to malicious attacks from the outside world.
Regardless of the nature of the issue, Pods should be considered impermanent.
ReplicaSets are used to manage groups of Pods. A ReplicaSet can contain anywhere from 1 to “infinity” of Pods. Obviously, the upper limit will most likely be dictated by the resources available to your Kubernetes cluster.
Key References
Prerequisites
- A local installation of Kubernetes. You may certainly use a cloud deployment, but you may run into additional challenges when it comes to accessing those pods, services, etc. Refer to the cloud provider documentation if you’re going that route.
- An installation of a terminal software. On Linux and MacOS, you’ll find these out of the box; for Windows, you can use PowerShell or the Terminal feature in VSCode, which we will be using here.
- A basic understanding of command line / Terminal instructions. We’ll cover what you need, but it’s important for you to understand how to navigate files, how to see what’s running in your cluster (for troubleshooting purposes), etc.
- A basic understanding of YAML Files. We've written a tutorial on this topic in case you need to get up to speed - YAML File Format.
- A basic understanding of Kubernetes Services.
Understanding ReplicaSets in Kubernetes
If you’ve deployed a pod directly into your cluster (as we previously discussed), you’re doing it wrong! You should never create and deploy single pods into a Kubernetes environment. Instead, you should be using ReplicaSets and Deployments. We’ll discuss Deployments in a future tutorial.
What’s the problem with deploying individual pods?
As mentioned above, Pods tend to fail. If you were to create a single pod that runs your application and it encountered an issue, your application would go down. For obvious reasons, we don’t want that. Kubernetes thus provides a way to “manage” pods and their availability via ReplicaSets.
You may also run into an issue by having a single Pod within a ReplicaSet. When the pod fails, your users won’t be able to access the application while the ReplicaSet recreates the new pod. The time to create a new pod will vary based on the software you’re running, the services that depend on it, and the time the applications within the Pod are ready to service the end users. The solution to this problem is to have multiple pods running at the same time via a ReplicaSet. Should one of the pods fail, the traffic will be redirected to the “Running” instance.
Creating Our First ReplicaSet in Kubernetes
In the tutorial on Pods, we created and deployed a Pod into our cluster. We will use that template and “wrap” it into what a ReplicaSet is. Note that as you get more comfortable using Kubernetes, you’ll simply deploy everything via ReplicaSets or Deployments; there’s no need to go through the first step and specify a single Pod.
Below is the code of the new ReplicaSet.
apiVersion: apps/v1
kind: ReplicaSet
metadata:
  name: myfirstset
spec:
  replicas: 2
  selector:
    matchLabels:
      app: myfirstapp
  template:
    metadata:
      labels:
        app: myfirstapp
    spec:
      containers:
      - name: myfirstapp
        image: richardchesterwood/k8s-fleetman-webapp-angular:release0
You may notice a few familiar lines! - Under the “template” section, all we’re using is the code we specified for the Pod. Per the Kubernetes documentation, this section is reserved for Pod specification; we can re-use the code we had previously written.
You may have also noticed that we changed the “kind: Pod” key-value pair to “kind: ReplicaSet” for obvious reasons.
Lastly, we’ve specified a quantity of “replicas” to be equal to 2. You can leave it at 1, but as explained above, we want to have a failover pod should the first one fail.
Deploying Our First ReplicaSet in Kubernetes
Before we deploy our new file, let’s do some basic clean-up on our cluster. Chances are, you still have a pod running from the previous tutorial. You can certainly deploy the ReplicaSet at this point, but it may become confusing to understand what’s happening inside the cluster as we start removing and resting some of the features.
First, run the following command to see what’s currently running on your cloister:
kubectl get all
You can delete a single pod in Kubernetes by issuing the following command:
kubectl delete pod "pod_name"
If you’ve created more than one pods, or if you’d like to clear all of them from your cluster, you can issue the following command:
kubectl delete pods --all
At this point, you should be left with the service that we deployed last time. Here’s a snapshot of where we are at with our cluster:

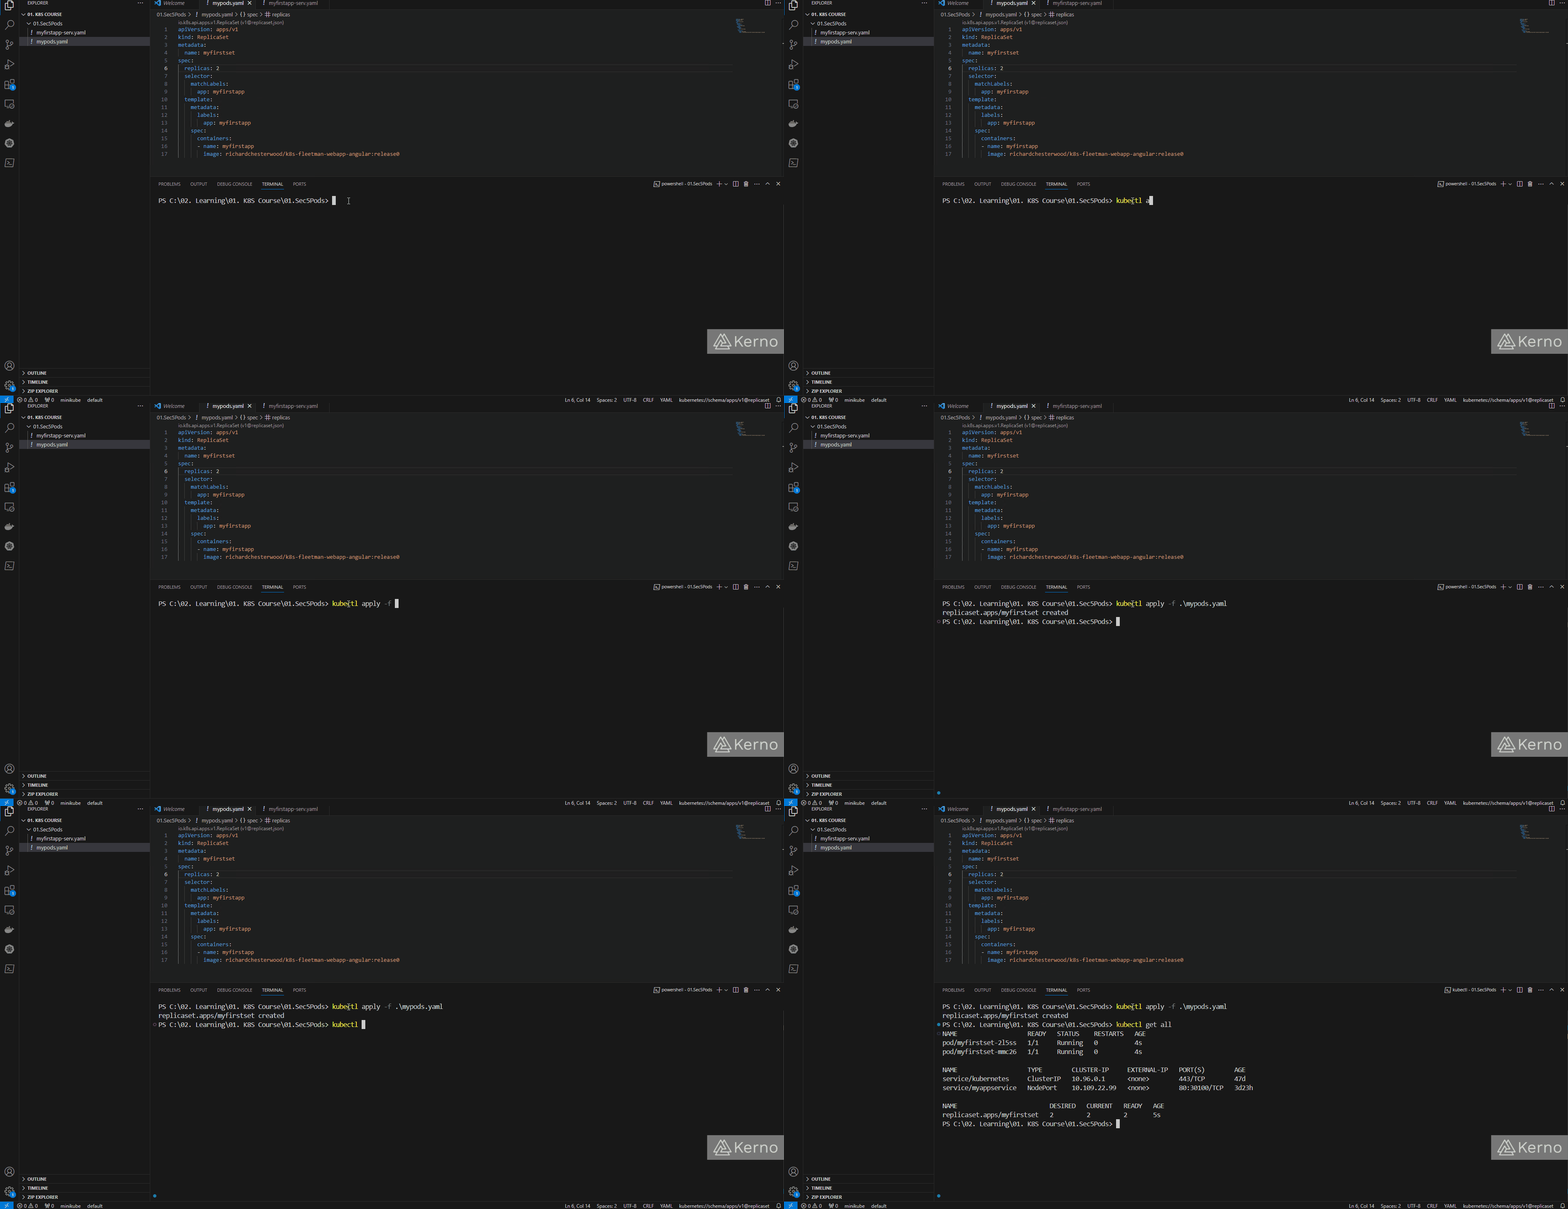
To deploy the ReplicaSet, you’ll need to issue the exact same command as before!
kubectl apply -f .\mypods.yaml
Notice that we’ve changed the name to reflect that this will deploy multiple pods instead of one.
 Figure 2 - Kubernetes ReplicaSet | Adding a ReplicaSet into the Cluster
After we run the “kubectl get all” command after the ReplicaSet deployment, you’ll notice that we have 2 pods in our cluster - “myfirstset-2l5ss” and “myfirstset-mmc26.” This is what we’d expect to see as our ReplicaSet calls out for 2 replicas of pods called “myfirstset.” The ReplicaSet will automatically append a suffix to the name so that the user can differentiate between different pods.
If you attempt to access the application at this point, you’ll get an error message from your browser. We’ve changed the path our traffic flows; the service we previously created must point to the ReplicaSet and not the pod. To fix this issue, we need to make two changes:
- ReplicaSet - We’ve already added a selector with a key-value pair labeled as “myfirstapp.”
- Service - We need to point the service to the ReplicaSet; just as before, this can be done via the label key-value pair - “app: myfirstapp” Make sure that the two of them match; redeploy the files if necessary. At this point, the application should run as before.
Testing Our ReplicaSet in Kubernetes
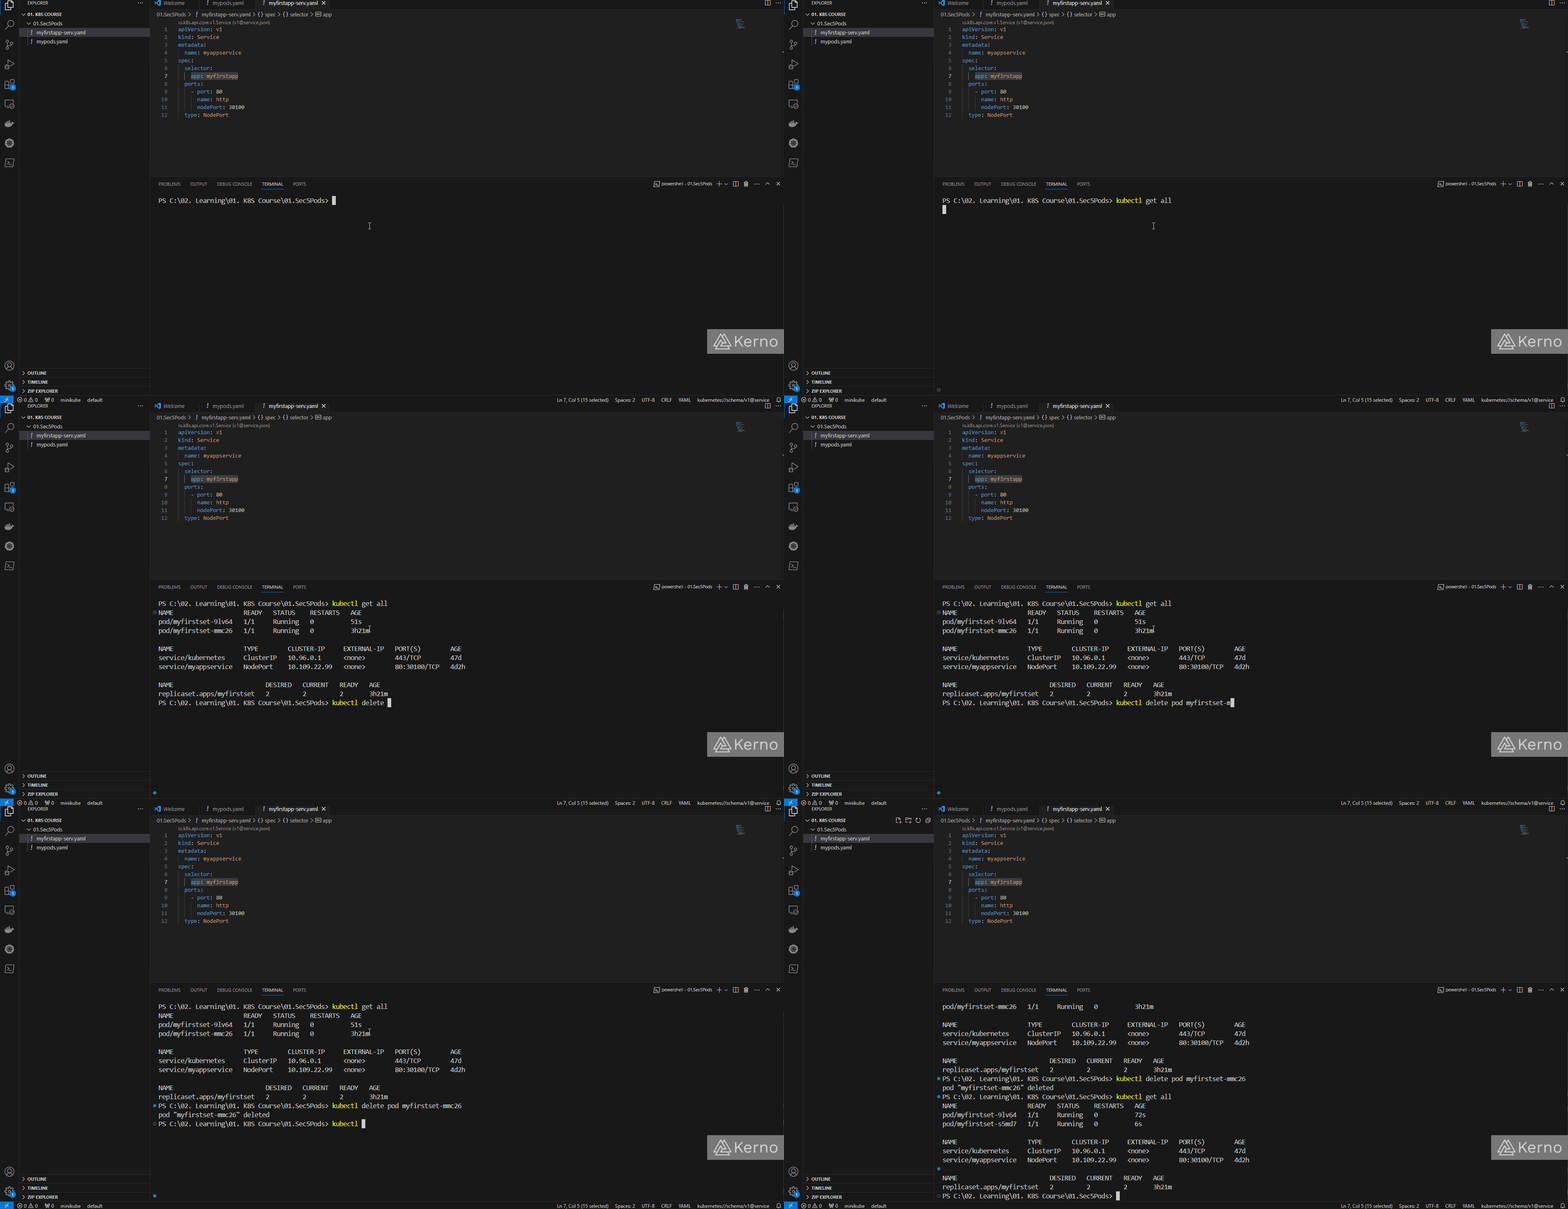
We now have a ReplicaSet with 2 pods running on the cluster. What will happen when we delete one or both of those pods? Here’s a set of instructions you can run to see the “functionality” of a ReplicaSet within your cluster:
kubectl get all
kubectl delete pod “pod_name”
kubectl get all
 Figure 3 - Kubernetes ReplicaSet | Deleting Pods and Testing ReplicaSets in K8S
As shown above, at the beginning, we have two pods. We then proceed to delete one of the pods. Immediately after, we issue the command to see the assets once again, and we can immediately notice that there are 2 pods once again. Notice that the new pod received a new suffix.
Conclusion on ReplicaSets in Kubernetes
We’ve converted a single pod specification we had written in the previous tutorial into a ReplicaSet. We’ve scaled the number of replicas to 2 and we deployed the new file into Kubernetes. We’ve verified that once a pod is deleted, it’s swiftly re-created by the ReplicaSet engine we just created.

Posted on February 22, 2024
Join Our Newsletter. No Spam, Only the good stuff.
Sign up to receive the latest update from our blog.