Vitest: Blazing fast unit test framework

Uploadcare
Posted on January 31, 2023

If you have heard of Vite, then you have probably heard of Vitest, the fast unit test framework built from it. In this article, let’s explore what Vitest is, how to use it and why it can be the next test framework for your apps.
What is Vitest
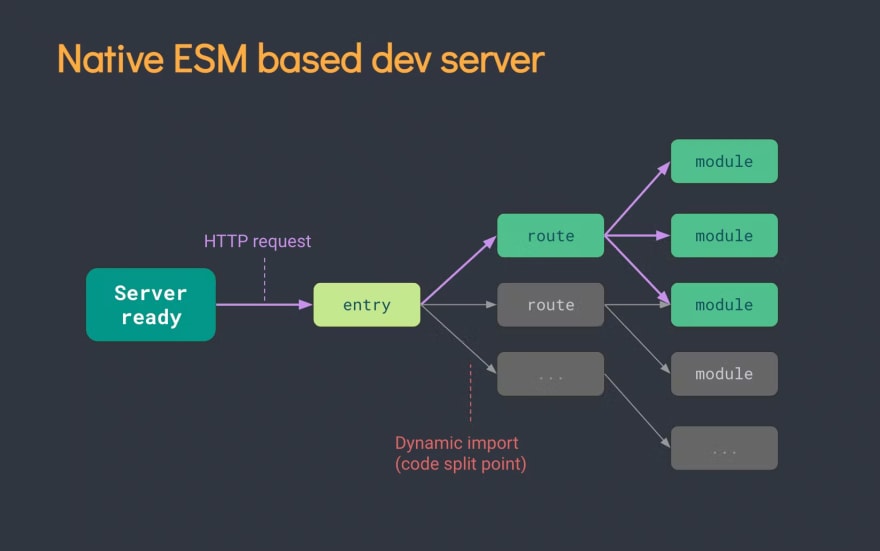
Before we get into Vitest, let’s note that Vite is a build tool that allows for faster server starts and updates thanks to its native ESM-based method to serve code on demand:
If you want to get more, feel free to read my Introduction to Vite article.
So Vitest is the unit testing framework built on top of Vite and is an excellent unit test framework with many modern features such as:
- Component testing for Vue, React, Svelte, Lit and more.
- Out-of-the-box TypeScript and JSX support.
- ESM first, top level
await. - Multithreading workers.
- Filtering, timeouts, concurrent for suite and tests.
- Jest-compatible snapshot testing.
- Chai built-in for assertions + Jest
expectcompatible APIs. - Designed with a Jest compatible API.
Let’s get started with a simple example on how to use Vitest in a Vite-powered project.
Example usage: writing unit tests in Vitest
Step 1. Create a Vite project
It’s simple, just type:
npm create vite .
Note: Vite requires Node.js version 14.18+ or 16+.
This will start the process to create a Vite project. You can name your project and choose a template appropriately. For this example, I will be choosing the Vanilla template and TypeScript:
$ npm create vite .
✔ Package name: … vitest
✔ Select a framework: › Vanilla
✔ Select a variant: › TypeScript

Scaffolding project in /tmp/vitest...

Done. Now run:

  npm install
  npm run dev
As you see, after the project is created, you can install the necessary dependencies by running:
npm install
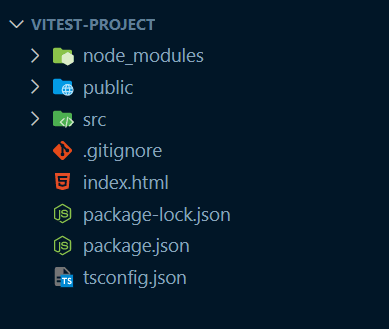
Now, you should have the following project structure:
Finally, to install Vitest, run:
npm install -D vitest
Alternative for non-Vite powered projects
It is just as easy to setup Vitest in a non-Vite powered projects.
Say we have a CRA project and want to use Vitest for testing.
All we need to do is to run:
npm install -D vitest @vitejs/plugin-react
And then add a vite.config.js in the root folder of the project:
/// <reference types="vitest" />
import { defineConfig } from 'vitest/config';
import react from '@vitejs/plugin-react';

export default defineConfig({
  plugins: [react()],
  server: {
    open: true,
  },
  build: {
    outDir: 'build',
    sourcemap: true,
    commonjsOptions: {
      include: [],
    },
  },
  optimizeDeps: {
    disabled: false,
  },
  test: {
    globals: true,
    environment: 'jsdom',
    setupFiles: '@testing-library/jest-dom',
    mockReset: true,
  },
});
Step 2. Write some simple tests
Now that our project is set up, let us write some simple tests.
Vitest has been designed based on Jest, so it shares a lot of similarities. One of them is that it can automatically detect your test files as long as you name it in any of the 3 following formats:
- A .js file in a folder named __tests__.
- A file with a name like [name].spec.js.
- A file with a name like [name].test.js.
So let’s create a new folder in our example project called tests and add a basic.test.js file:
tests/
    |- basic.test.js
In this file, let’s add some simple tests:
import { describe, it, assert } from 'vitest';

describe('Math.sqrt() test', () => {
  it('SQRT4', () => {
    assert.equal(Math.sqrt(4), 2);
  });

  it('SQRT144', () => {
    assert.equal(Math.sqrt(144), 12);
  });

  it('SQRT2', () => {
    assert.equal(Math.sqrt(2), Math.SQRT2);
  });
});
If you have worked with other testing libraries such as Jest, Mocha or Jasmine, you should be familiar with the BDD (Behavior Driven Development) pattern. It describes a function, explains what it does and uses test case(s) to assert that it works as intended.
Step 3. Run tests
To run the tests, the command is:
npx vitest
Or you can configure your package.json to run the command with npm test:
"scripts": {
  "test": "vitest"
}
More Vitest CLI commands can be found at the official documentation.
By default, the tests run in watch mode so if you make any file changes, they will re-run immediately. If the tests are successful, you should see the terminal outputting:
$ npx vitest

 DEV  v0.27.2 /tmp/vitest

 ✓ tests/basic.test.js (1)

 Test Files  1 passed (1)
      Tests  3 passed (3)
   Start at  15:05:07
   Duration  933ms (transform 379ms, setup 0ms, collect 13ms, tests 2ms)


 PASS  Waiting for file changes...
       press h to show help, press q to quit
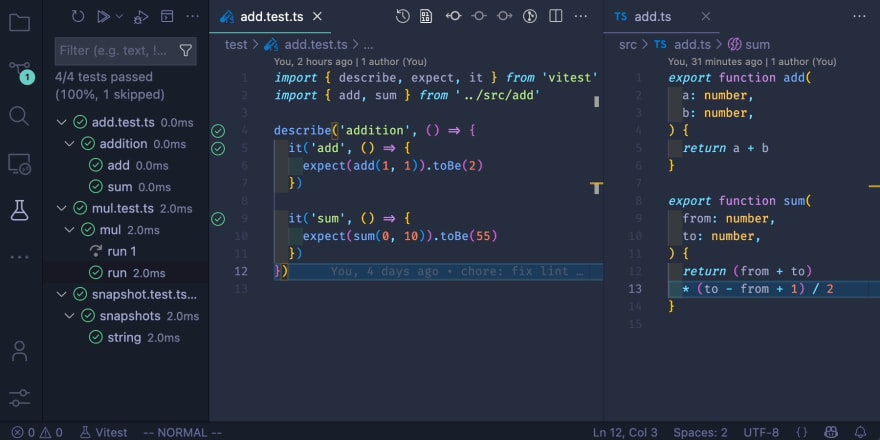
Vitest VS Code extension
To speed up testing and make debugging easier,
there is a VS Code extension for Vitest available in the Marketplace.
This extension can help to:
- filter tests by status,
- debug easier,
- inspect console output,
- rerun tests faster.
Vitest vs Other test frameworks
Vitest is often compared to Jest, another popular test framework.
It is because it is built on top of Jest, making it a more modern and improved version. Also, it offers compatibility with most of the Jest API and ecosystem libraries, making it simple to migrate by following their official guide here.
Just like other widely used test frameworks such as Mocha and Jasmine, Vitest follows a simple describe-it-assert or describe-it-expect pattern. The advantage of using Vitest over them is that it is fast to set up and does not require installing a separate assertion library.
The most convenient advantage of using Vitest is that it requires minimal configuration and can be used with any bundler. You can define the configuration for your dev, build and test environments as a single pipeline under vite.config.js.
A simple example would be setting up a Jest and Babel environment for a React app. Often, you would need to install additional packages besides the ones that come with CRA:
- babel-jest,
- @babel/core,
- @babel/preset-env,
- @babel/preset-react,
- @babel/preset-typescript,
- @types/jest.
After that, you would need a jest.config.js and a babel.config.js to complete setting up the configuration.
With Vitest, you don’t have to install those extra dependencies. All you need is a vite.config.js or vitest.config.js file. Even for non-Vite projects, it is a single file to configure. For example:
import { defineConfig } from 'vitest/config';

export default defineConfig({
  test: {
    environment: 'jsdom',
  },
});
Learn more about configuration in the official documentation.
Here is a summarized comparison of different popular test frameworks with Vitest:
| Pros | Cons | |
|---|---|---|
| Jest |
|
|
| Mocha |
|
|
| Jasmine |
|
|
| Vitest |
|
|
More features. Test coverage report
Let’s see a simple example how we can output a test coverage report. First, let’s create a simple counter function in counter.js:
export const setCounter = (count) => {
  return count + 1;
};
Then, let’s create a test for this function in the counter.test.js:
import { describe, it, expect } from 'vitest';
import { setCounter } from '../src/counter';

describe('setCounter', () => {
  it('returns 1', () => {
    expect(setCounter(0)).toBe(1);
  });
});
Now if we run vitest run --coverage, we can see how much of our code has been tested:
$ vitest run --coverage

 RUN  v0.27.2 /tmp/vitest
      Coverage enabled with c8

 ✓ tests/counter.test.js (1)

 Test Files  1 passed (1)
      Tests  1 passed (1)
   Start at  15:19:08
   Duration  2.12s (transform 390ms, setup 0ms, collect 40ms, tests 2ms)

 % Coverage report from c8
------------|---------|----------|---------|---------|-------------------
File        | % Stmts | % Branch | % Funcs | % Lines | Uncovered Line #s
------------|---------|----------|---------|---------|-------------------
All files   |     100 |      100 |     100 |     100 |
 counter.ts |     100 |      100 |     100 |     100 |
------------|---------|----------|---------|---------|-------------------
Let’s say we add a new function in our counter.js:
// added another function
export function setupCounter(element) {
  element.addEventListener('click', () => {
    setCounter(counter++);
    element.innerHTML = `count is ${counter}`;
  });
}
If we run vitest run --coverage, we can see that not all our code has been tested:
$ vitest run --coverage

 RUN  v0.27.2 /tmp/vitest
      Coverage enabled with c8

 ✓ tests/counter.test.js (1)

 Test Files  1 passed (1)
      Tests  1 passed (1)
   Start at  15:31:52
   Duration  2.03s (transform 480ms, setup 0ms, collect 40ms, tests 2ms)

 % Coverage report from c8
------------|---------|----------|---------|---------|-------------------
File        | % Stmts | % Branch | % Funcs | % Lines | Uncovered Line #s
------------|---------|----------|---------|---------|-------------------
All files   |   54.54 |      100 |      50 |   54.54 |
 counter.ts |   54.54 |      100 |      50 |   54.54 | 7-11
------------|---------|----------|---------|---------|-------------------
This report ensures that most of your project’s code is tested.
By default, Vitest uses the c8 package to run coverage reports. You may install it manually with the command:
npm i -D @vitest/coverage-c8
Or install it when prompted:
$ vitest run --coverage
 MISSING DEP  Can not find dependency '@vitest/coverage-c8'

 ✔ Do you want to install @vitest/coverage-c8? …
Even more features. Component testing
Another common testing we can do with Vitest is component testing, which verifies the functionality of individual components.
Let’s add an App.test.jsx to a React App. For this example, we’re using a non-Vite project (i.e. basic Create React App template) to show that Vitest works just as fine.
In this test, we want to test only the App component and here’s what our App.test.jsx will look like:
import { render, screen } from '@testing-library/react';
import { describe, it, expect } from 'vitest';
import App from './App';

describe('App Component Test', () => {
  it ('renders without crashing', () => {
    const { container } = render(<App />);
    expect(container).toBeInTheDocument();
  })

  it('renders learn react link', () => {
    render(<App />);
    const linkElement = screen.getByText(/learn react/i);
    expect(linkElement).toBeInTheDocument();
  });
});
Now we run the tests with npm test or npx vitest. The 2 tests should pass successfully, as shown below:
$ npx vitest

 DEV  v0.27.2 /tmp/vitest

 ✓ tests/App.test.jsx (1)

 Test Files  1 passed (1)
      Tests  2 passed (2)
   Start at  16:12:12
   Duration  1.94s (transform 685ms, setup 126ms, collect 356ms, tests 37ms)


 PASS  Waiting for file changes...
       press h to show help, press q to quit
Conclusion
In this article, we learned about Vitest, a fast and modern unit testing framework powered by Vite. Thanks for reading, I hope it has been a helpful article in getting you started with Vitest. Please refer to the References section below if you would like to read more about Vitest and Vite. Cheers!
References
Originally published by Victoria Lo in Uploadcare Blog

Posted on January 31, 2023
Join Our Newsletter. No Spam, Only the good stuff.
Sign up to receive the latest update from our blog.


