thomas
Posted on July 10, 2023

Nx provides a wide range of built-in tools that automatically generate code for you. These code generation tools are called generators in Nx. However, there may be instances where you need to generate code that is almost the same as the existing generator, but with some slight differences.
In Nx, it is easy to reuse a built-in generator and customize it to better suit your company’s needs. Since all generators are JS functions, overriding them becomes a child game.
In this article, I will explain how to generate the boilerplate code for a generator (thanks to another generator 😇). Then, we will extend the built-in @nx/angular:library generator and override the generated Jest and lint configurations. Often, we need to modify the library configuration file to better align with our company’s requirements. By creating this custom library generator, we can facilitate our team’s workflow by ensuring that all files are correctly set within the Nx monorepo.
This article provides a step-by-step explanation of the process.
Create a custom plugin:
First, to create your own generator, you need to install the package @nx/plugin by executing the following command:
npm i @nx/plugin -D
Once the package is installed, it provides access to 7 built-in generators.
The next step is to create a custom plugin that will serve as a container for all our future generators or executors.
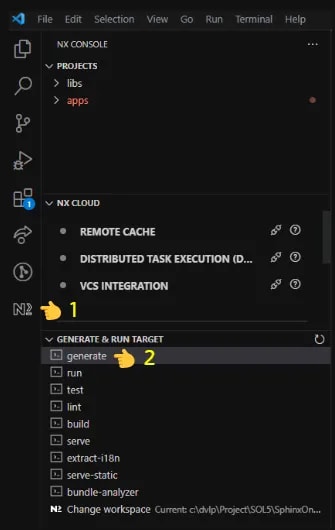
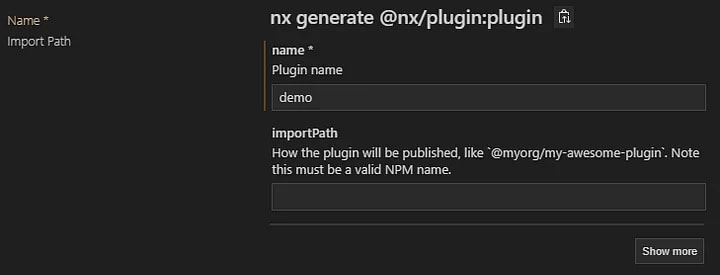
To do this, open the Nx Console (if you don’t have it, I strongly recommend installing it as a plugin in VSCode or Webstorm). Then, click on the generate button and search for @nx/plugin:plugin.
By selecting this option, a new library called demo will be created inside your lib folder.
Create the boilerplate code of our generator.
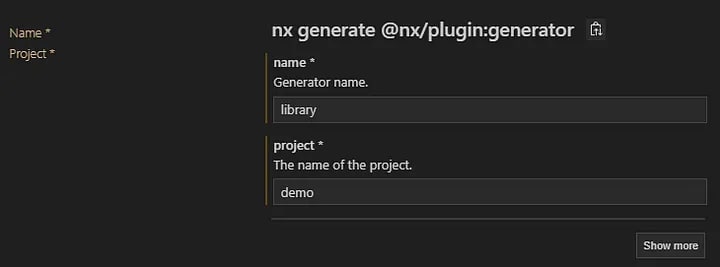
Go back to the Nx Console and click on generate again. This time, search for @nx/plugin:generator.
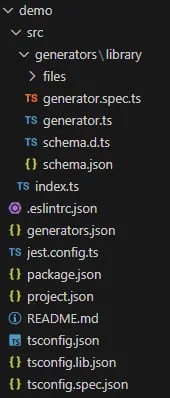
This will create the necessary boilerplate code for your generator inside your demo/src/generators folder.
-
schema.d.tscontains the interface for your input schema. It defines the structure and types of the properties that can be set for your generator. -
schema.jsonis defines how all the properties of your generator will be set and displayed within the Nx Console.(You can refer to the list of options available [here](https://nx.dev/plugins/recipes/generator-options#schema) to configure this file.) -
generator.tsis where you will write the code for your generator.
Now that we have all the necessary files set up for our generator, we can proceed to start creating its functionality.
Creation of our generator:
In order to extend the default @nx/angular:library generator, we need to locate the generator function within the Nx GitHub source code (You can find it here). As you can see, the structure of the default generator is identical to ours.
Inside library.ts the libraryGenerator has been exported as a public API. We can simply use it to replicate what the Nx generator does, as shown below:
import { libraryGenerator } from '@nx/angular/generators';
import { Tree, formatFiles } from '@nx/devkit';
import { LibraryGeneratorSchema } from './schema';

export async function mylibraryGenerator(tree: Tree, options: LibraryGeneratorSchema) {
  await libraryGenerator(tree, options);

  await formatFiles(tree);
}

export default mylibraryGenerator;
Note: To simplify things, you can copy/paste the schema.d.ts and schema.json to your own repository.
Alternatively, you can select the properties you want to customize when invoking your generator, and the rest can be passed to the Nx generator as default properties, as shown below:
import { libraryGenerator } from '@nx/angular/generators';
import { Tree, formatFiles } from '@nx/devkit';
import { LibraryGeneratorSchema } from './schema';
import { Linter } from '@nx/linter';

export async function mylibraryGenerator(tree: Tree, options: LibraryGeneratorSchema) {
  await libraryGenerator(tree, {
    ...options,
    addTailwind: true,
    buildable: true,
    linter: Linter.EsLint
  });

  await formatFiles(tree);
}

export default mylibraryGenerator;
In the above code, addTailwind, buildable and linter will not be editable. If we want to provide default values while still allowing them to be edited, we can:
- use the
defaultproperty inside theschema.json - set a default value inside
nx.jsonat the root of our project.
{
  "generators": {
    "@my-workspace/demo:library": {
      "linter": "eslint",
      "buildable": true,
      "addTailwind": true
    }
  }
}
Now that we have created the same default set of files that the Nx generator creates, we can customize some files according to our needs.
If you want to learn by practicing and challenge yourself, try out Angular Challenges. It’s a library that lists multiples Angular, Nx, Rxjs and more Challenges.
Customize Jest Configuration File:
If we want to generate a different jest.contig.ts file with additional properties, we have two options:
Option 1:
We can skip the generation of all Jest configuration through the Nx generator by setting the following inside the libraryGenerator function.
import { UnitTestRunner } from '@nx/angular/generators';

unitTestRunner: UnitTestRunner.None,
This option is suitable if you have many modifications to apply to the default Jest configuration, but keep in mind that you will have to manually update all the necessary files yourself, such as project.json with the new test target, tsconfig.json with the a tsconfig.spec.ts and create additional required files.
Option 2:
In most cases, this option is preferred as it allows you to update only what needs to be changed. In our case, we only want to update the jest.config.ts file.
To achieve this, follow these steps:
- Add a template file named
jest.config.ts__tmpl__inside the files directory of your generator folder. To avoid syntax compilation errors in our IDE, we append tmpl at the end of the file name. The content of the template file can be as follows:
/* eslint-disable */
export default {
  displayName: '<%= project %>', // 👈 variable
  preset: '<%= offsetFromRoot %>jest.preset.js', // 👈 variable
  setupFilesAfterEnv: ['<rootDir>/src/test-setup.ts'],
  transform: {
    '^.+\\.(ts|mjs|js|html)$': [
      'jest-preset-angular',
      {
        tsconfig: '<rootDir>/tsconfig.spec.json',
        stringifyContentPathRegex: '\\.(html|svg)$',
      },
    ],
  },
  transformIgnorePatterns: ['node_modules/(?!(.*\\.mjs$|lodash-es))'],
};
This template file sets two variables that can be edited based on your configuration.
- Finally, add the following code to your generator:
const projectConfig = readProjectConfiguration(tree, options.project);

tree.delete(join(projectConfig.root, './jest-config.ts'));

generateFiles(
tree,
joinPathFragments(__dirname, 'file'),
projectConfig.root,
{
  tmpl: '',
  project: options.project,
  offsetFromRoot: offsetFromRoot(projectConfig.root),
}
);
Let’s go through the code:
- We read the project configuration.
- We delete the configuration file generated by the built-in Nx generator.
- We generate our new configuration file by providing the path to the template file, the path where we want to create this file, and the definition of each variable used inside our template. By following these steps, you can customize the any TS file according to your needs.
Customize eslint configuration file:
For this one, we want to add the rule@typescript-eslint/member-ordering: ‘off’ to all our eslintrc file.
We could do the same as above, replacing the generated file with our new custom file. But since the eslintrc file is a JSON file, we can easily manipulate it.
We will just add the line at the right position inside the file.
Using the utilities provided by @nx/devkit, we can use the updateJson function to update our file. This function takes three arguments: the Nx tree, the path to the JSON file, and a callback function that manipulate the JSON object.
Here’s the function to achieve this:
  updateJson(tree, eslintPath, (json) => {
    json.overrides[0].rules = {
      ...json.overrides[0].rules,
      '@typescript-eslint/member-ordering': 'off',
    };
    return json;
  });
In the above code, we update the rulesproperty inside the first override object of the ESLint configuration file. We add the rule @typescript-eslint/member-ordering with the value off.
To check out the full working example, it’s here. 👇
 Answer:25 generator extending lib
#70
code to create a generator that extends the built-in Nx library generator
Now we have a fully functional generator. If you go back to your NX Console and navigate to the generate command, you should see our custom generator listed there.
Note: If you don’t see it, simply restart your IDE to allow Nx to detect your new generator.
You did it! You have built a fantastic generator that will save you a lot of errors and time. Enjoy the full power of these generators and create as many as your team needs. 🚀🚀🚀
You can find me on Twitter or Github.Don't hesitate to reach out to me if you have any questions.

Posted on July 10, 2023
Join Our Newsletter. No Spam, Only the good stuff.
Sign up to receive the latest update from our blog.
Related

February 29, 2024


