Kim Hallberg
Posted on August 26, 2020
What is a composer? 🎼
A composer is a musician who is an author of music in any form, including vocal music, instrumental music, electronic music, and music which combines multiple forms. - Wikipedia.
All jokes aside, Composer is PHP's dependency manager, think npm or yarn but for PHP, currently in v1.10 with v2 still being in the alpha stages.
If you've ever considered adding a package to Composer and have gone to their website, you might've seen there isn't much information on how to add a package. That's because while Composer handles your dependencies, the packages live somewhere else.
Introducing Packagist. 🐘
Packagist is the main Composer repository. It aggregates public PHP packages installable with Composer. - Packagist
Aah, that's more like it, here's where the composer finds its music - or packages in this case. When you require a dependency from Composer, if no other repository has been added to the composer.json file, this is where Composer finds your dependencies.
Prerequisites to adding a package. 📋
So with that brief explanation of what Composer and Packagist are out of the way, let us dive right into adding our package to Packagist. 😎
Before adding our package, we will need two things, an account on Packagist and access to a VCS, or version control system, for me, my VCS of choice happens to be GitHub.
So, while I wait why don't you register your account and come back to me. 👍
I also recommended enabling two-factor authentication, as that'll give your account an extra layer of security and, if you're using GitHub like me, you can connect your Packagist account via the settings, if both accounts are using the same email you can then use sign-in with GitHub later on.
Setting up our package 🛠
Now that we have our account created and access to our VCS of choice its time to start adding some structure to our project, I like to get this out of the way in the beginning so I don't have to do it later.
The first thing I'll do is create my new repo where our package source will live and in that, the first file I'll create is our .gitignore, I'm ignoring our /vendor folder, which is the folder where Composer places our dependencies, so if your package has any they won't be added to our repository.
/vendor/
Next up, let us create our src folder, this will be the base directory for our package code.
mkdir src
Next up, lets touch our composer.json file, which will live in the root of our repository, and not in our base directory.
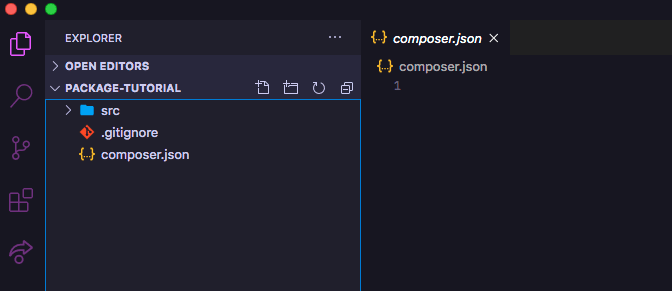
Your repository should now look like this.
Filling out our composer.json ✏️
Now that our setup is done, it's time to fill out our composer.json file with the necessary information.
So let's create an empty JSON object and start filling out some information - note if you have composer installed locally, you don't need to create the file, you can run composer init and go through an interactive command-line experience to create one.
Let's start with our package name, which will consist of two parts, our [vendor] and [project] name, joined by a /.
Your vendor name will be protected ones your vendor has been published to prevent users from publishing under that name. They can publish to your vendor if they've been a maintainer on at least one package within your vendor previously.
Next, we will define our type field, which will be what type our package is, types, in this case, are used for installation logic, some packages have different types depending on what they are, even custom ones like wordpress-plugin or symfony-bundle, in this case, we will go with the default of library - for information on what types are available, I recommend reading the documentation on types.
Let us speed things up a bit and add our description, homepage, license, and authors.
The next two fields will be our requirements and our autoload. In our require we can define any requirements our package has, that might be other packages, PHP extensions using etx-[extension] or even our PHP version using php.
So let's set our PHP requirements to 7.2 or later for this one.
"require": {
  "php": ">=7.2"
}
We can also require development dependencies using the require-dev field.
Our last field will be how our package will be loaded using the autoload field, here will go with PSR-4 - for more information about PSR-4 and autoloading I recommend reading the documentation on PSR-4.
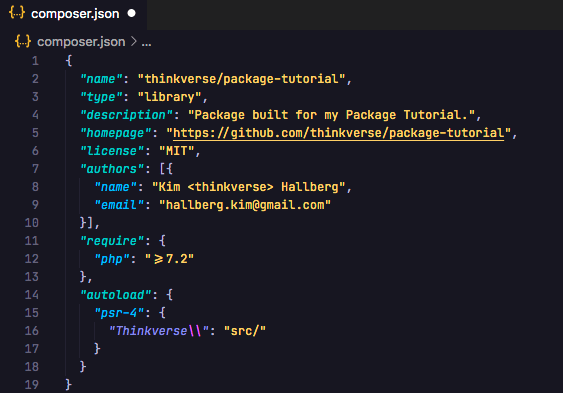
Our composer.json should now look something like this.
Time for some code 💻
Now that we've filled out our composer.json we can start to add our code but since this is a tutorial I won't be creating anything special, so let's create a class that simply repeats a given sentence or tells ut that no sentence has been given.
namespace Thinkverse;

class Repeat
{
    /**
     * Repeat the given sentence.
     *
     * @param string|null $sentence
     * @return string
     */
    public static function sentence(?string $sentence = null): string
    {
        return $sentence ?? 'No sentence given.';
    }
}
Now with our code done, we can add our license and our readme, and push our code to GitHub.
Submitting our package. 📨
With our code pushed, our composer.json done, our next step is to submit our package, for that we head over to packagist.org/packages/submit and submit our repository URL and click check, if Packagist found it, it'll then ask you to submit.
And there you go, your package has been published.
Releasing a version. 🔥
You might've noticed that your package version is currently set to dev-master, to release a new version, say 1.0.0, you need to tag a release, so travel over to your repository and create a release, in your tag you'll fill out your release version, Packagist works off of semver otherwise known as semantic versioning, which means major.minor.patch, so for us, we're releasing our first major version, so I'm adding a tag of 1.0.0.
If your Packagist account is synced with your GitHub you should notice that a new version has been created, if not you will need to update it manually or wait for Packagist to crawl for a new version, which happens once a week for non-auto-updating packages.
Congratulations 🎉
Congratulations, if you've followed along, you should've released your first package, you can find the package I created for this tutorial under thinkverse/package-tutorial, or test it our yourself using
composer require thinkverse/package-tutorial
The source is also available on my github with step-by-step commit history if that suits you. 🙂
Thank you for reading, I can't wait to see what packages you create. 👋

Posted on August 26, 2020
Join Our Newsletter. No Spam, Only the good stuff.
Sign up to receive the latest update from our blog.

