Exposing Azure Services using Azure API Management

Surya Venkat
Posted on August 5, 2019

Originally Published at Serverless360 Blogs
Azure API Management
With Azure API Management we can expose our services in a managed way, allowing to take control through policies, add security, gain insights, provide decoupling between frontend and backend, and much more. API Management enables us to create a service repository, where we can expose all our services to clients, which can quickly start using these – thanks to the documentation and testing capabilities presented by the developer portal. By implementing various of the available policies, we can enrich our services with capabilities like caching, throttling, advanced security, and even protocol and data translations. In short, API Management gives the option to create a complete ecosystem around our services, including everything from development and publishing to customization and monitoring.
This gives us various possibilities around exposing our services, not only in the cloud but on-premises as well. Moreover, we can also present several of our Azure services this way. Some of these can be exposed in API Management out of the box, like API Apps or Logic Apps, but as the other Azure services also provide REST endpoints, we can use these as well. This way, we can easily publish a large variety of services to our clients through a single repository, with a homogenous experience to consume all these different services.
Exposing services
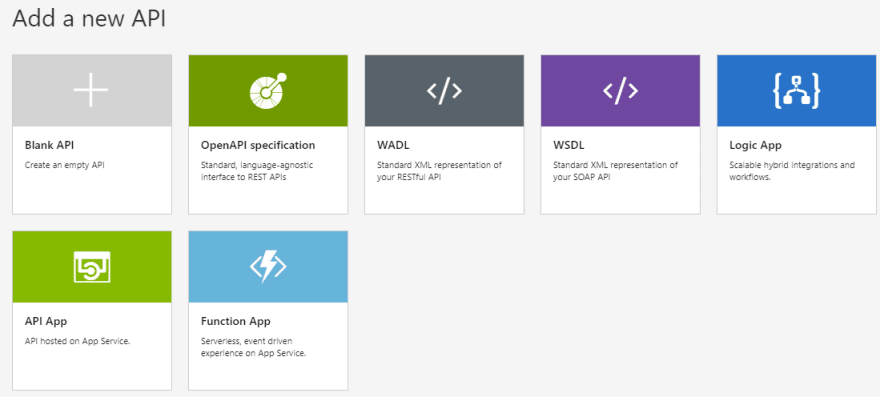
All of this starts by creating an API management instance, which is used to publish our services. If you haven’t done so yet, follow these instructions to create your own. During this blog post, we will assume you have API Management set up, including the basics like users, groups, and products. When we add a new API to API management, we will find that there are several different options to do this. Some of these will be discussed in the following paragraphs, while others provide the capability to add our own services running outside of Azure. For example, an API with an OpenAPI specification, which is the successor of Swagger, can be added through here. You just point to the location of you’re the OpenAPI definition, and API Management will pull in all information around the operations, messages, etc. Another option is to load an API from a WSDL, allowing to even expose SOAP services. Consequently, the SOAP service can then be exposed directly, however, we even have the option to expose this as a REST API.
API Apps
Now let’s have a look at the various options for presenting our Azure services through API Management. Besides the options to load definitions like OpenAPI, WADL or WSDL, we also have the opportunity to load several of the Azure services directly. The first example of this is API Apps, which allow to build and host RESTful services in Azure. By choosing the API Apps option on the Add a new API screen, we will be presented with an overview of all API Apps available in our subscription.
We can just select one of the API Apps, update the names and suffix if required, and the API definition will be created in our API Management. Altogether, it took us only a few seconds to add the API App through API Management, where we can now configure it as desired, like adding additional policies or security.
Logic Apps
Similarly, we can also use API Management to expose our Logic Apps to our consumers. This does require the Logic App to be triggered using an HTTP based trigger like the Request trigger.
When we choose to add a Logic App from API Management, we will find an overview of all the Logic Apps which are usable in this manner. Once again, this allows us to quickly and easily publish another Azure service through API Management.
Functions
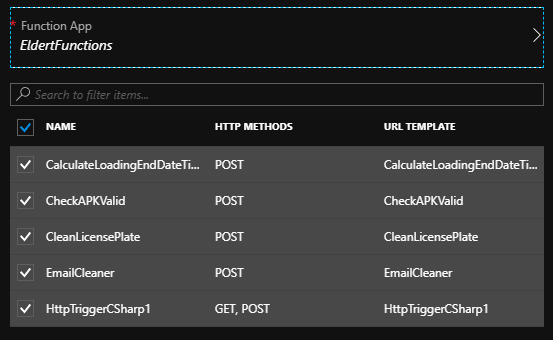
Next, we have Azure Functions, which once again can be imported from the Add a new API screen. Important to note here is that to expose a Function through API Management, the Function needs to use an HTTP trigger, and the authorization needs to be on an anonymous or function level. Additionally, it’s even possible to select multiple Functions inside a single Function App, which will then all be exposed through the same API in API Management as different operations.
Service Bus
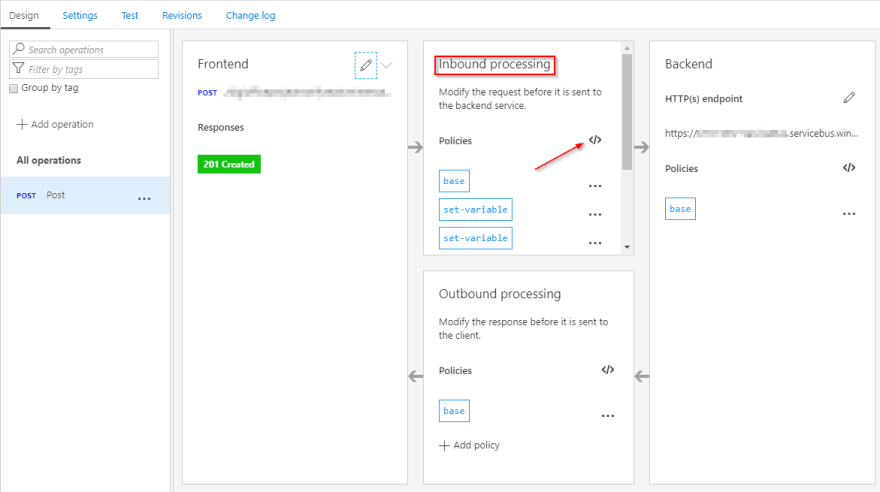
We now have seen how to expose various services directly through the API Management user interface, but how about services which do not offer this option? Luckily, we can leverage the REST endpoints of these services. For example, Service Bus offers various endpoints, which we can use to send and retrieve messages to queues and topics. Service Bus does, however, require us to use a WRAP token to authenticate against the service. In API Management we can leverage a policy to expose the Service Bus entities, allowing our clients to, for example, send in messages over HTTP, without them needing to know all details about how to create a WRAP token. To do this, we will create a blank API in API Management using our service namespace URI as the Service URI (f.e. https://yournamespace.servicebus.windows.net/), and then add a new POST operation to the API. Next, we open the policy editor for the inbound processing of the operation, where we will set up the policies needed.
The policies we need to set up will set the necessary headers while using variables to pass in the needed data. As you will find, we will execute some C# code from the policy to set the Authorization header, which is needed since we need to calculate some of the values expected in this header. Remember, the SAS key should be created in Service Bus with the correct permissions, like send or listen.
<policies>

    <inbound>

        <base />

        <set-variable name="resourceUri" value="https://yournamespace.servicebus.windows.net/yourqueuename" />

        <set-variable name="sasKeyName" value="yoursaskeyname" />

        <set-variable name="sasKey" value="yoursaskeyvalue" />

        <set-header name="Authorization" exists-action="override">

            <value>@{

// Load variables

string resourceUri = (string) context.Variables.GetValueOrDefault("resourceUri");

string sasKeyName = (string) context.Variables.GetValueOrDefault("sasKeyName");

string sasKey = (string) context.Variables.GetValueOrDefault("sasKey");

// Set the token lifespan

System.TimeSpan sinceEpoch = System.DateTime.UtcNow.Subtract(new System.DateTime(1970, 1, 1));

var expiry = System.Convert.ToString((int)sinceEpoch.TotalSeconds + 60); //1 minute

string stringToSign = System.Uri.EscapeDataString(resourceUri) + "\n" + expiry;

System.Security.Cryptography.HMACSHA256 hmac = new System.Security.Cryptography.HMACSHA256(System.Text.Encoding.UTF8.GetBytes(sasKey));

var signature = System.Convert.ToBase64String(hmac.ComputeHash(System.Text.Encoding.UTF8.GetBytes(stringToSign)));

// Format the sas token

var sasToken = String.Format("SharedAccessSignature sr={0}&sig={1}&se={2}&skn={3}",

System.Uri.EscapeDataString(resourceUri), System.Uri.EscapeDataString(signature), expiry, sasKeyName);return sasToken;

}</value>

        </set-header>

        <set-backend-service base-url="https:// yournamespace.servicebus.windows.net/" />

    </inbound>

    <backend>

        <base />

    </backend>

    <outbound>

        <base />

    </outbound>

    <on-error>

        <base />

    </on-error>

</policies>
Now when we save the policy, we can use API Management to pass in any message, which then places these in the specified queue.
Blob Storage
Similarly, we can expose Azure Blob Storage using API Management as well. In this case, we can use API Management to expose a storage container, allowing us to have clients send messages which are then created as a blob inside the container. We will also use some C# code here to calculate the Authorization header.
<policies>

    <inbound>

        <set-variable name="UTCNow" value="@(DateTime.UtcNow.ToString("R"))" />

        <set-variable name="ContainerName" value="@(context.Request.Headers.GetValueOrDefault("Container"))" />

        <set-variable name="BlobName" value="@(context.Request.Headers.GetValueOrDefault("Blob"))" />

        <base />

        <set-header name="Authorization" exists-action="override">

            <value>@{

                    string storageAccount = " yournamespace ";

                    string storageKey = "yourstoragesaskeyvalue";

                    string containerName = context.Variables.GetValueOrDefault<string>("ContainerName");

                    string blobName = context.Variables.GetValueOrDefault<string>("BlobName");

                    string contentLength = context.Request.Headers.GetValueOrDefault("Content-Length");

                    string ContentType = context.Request.Headers.GetValueOrDefault("Content-Type");

                    string dateToSign = context.Variables.GetValueOrDefault<string>("UTCNow");

                    string headerResource = $"x-ms-blob-type:BlockBlob\nx-ms-date:{dateToSign}\nx-ms-version:2016-05-31";

                    string urlResource = $"/{storageAccount}/{containerName}/{blobName}";

                    var stringToSign = string.Format("PUT\n\n\n{0}\n\n{1}\n\n\n\n\n\n\n{2}\n{3}",contentLength,ContentType,headerResource,urlResource);

                    HMACSHA256 hmac = new HMACSHA256(Convert.FromBase64String(storageKey));

                    string signature = Convert.ToBase64String(hmac.ComputeHash(Encoding.UTF8.GetBytes(stringToSign)));

                    string authorizationHeader = String.Format("{0} {1}:{2}", "SharedKey", storageAccount, signature);

                    return authorizationHeader;

                }</value>

        </set-header>

        <set-header name="x-ms-date" exists-action="override">

            <value>@(context.Variables.GetValueOrDefault<string>("UTCNow"))</value>

        </set-header>

        <set-header name="x-ms-version" exists-action="override">

            <value>2016-05-31</value>

        </set-header>

        <set-header name="x-ms-blob-type" exists-action="override">

            <value>BlockBlob</value>

        </set-header>

        <set-backend-service base-url="@{

            string containerName = context.Variables.GetValueOrDefault<string>("ContainerName");

            string blobName = context.Variables.GetValueOrDefault<string>("BlobName");

            return String.Format("https://yournamespace.blob.core.windows.net/{0}/{1}", containerName, blobName);

        }" />

    </inbound>

    <backend>

        <base />

    </backend>

    <outbound>

        <base />

    </outbound>

    <on-error>

        <base />

    </on-error>

</policies>
Conclusion
As we have seen, API Management allows us to easily expose our Azure services, both out of the box or by making use of policies. We can now assign the various APIs we created in API Management to our products, which expose them to the clients. As the consumers won’t need to know anything about the underlying services, they can consume the exposed APIs in a consistent manner over HTTP, using a single key, and from a single repository. In the meantime, we gain the advantage of advanced insights into the usage of the services and can apply all the capabilities provided by API Management, like additional security and advanced policies.

Posted on August 5, 2019
Join Our Newsletter. No Spam, Only the good stuff.
Sign up to receive the latest update from our blog.


