Create a Job Board Website Using React and Strapi

Strapi
Posted on December 9, 2022

A job board is a platform to post job vacancies and search for jobs. It allows employers to find employees faster by searching for potential global candidates.
A typical job board platform supports searching and filtering open jobs and has a form for applying for positions. Examples of standard job boards are Strapi, Upwork, Indeed, or Fiverr.
Strapi is an open-source headless CMS based on Node.js, where you can host and manage content. Strapi supports Jamstack technology, and it is easy to serve content to the front-end across different platforms via restful API calls. Strapi has made it easy for developers to manage their application content without writing complex code.
React is also an open-source JavaScript front-end framework for creating interactive user interfaces. React allows developers to create reusable components that, when combined, form the entire application user interface.
In this tutorial, you will learn about Strapi and walk through a step-by-step guide on creating a complete job board website with React and Strapi.
Goal
Let's have a look at what we'll accomplish at the end of this tutorial:
- Create a user interface where employees can search and filter open jobs and apply for them (vacancy listing).
- Create an admin interface where employers can post new jobs, view and assess candidate qualifications, and accept or decline applications (handling job applications).
- Use Strapi as the back-end for managing the application content and sending a notification email to candidates when their application is accepted. ## Prerequisite:
To complete this tutorial, you'll need the following software installed:
- Node.js:
v14orv16 - Npm or Yarn
- You should also be familiar with React.js. ## Strapi installation
Set up Strapi on our local machine using Strapi CLI (Command Line Interface). In your terminal, navigate to the folder where you wish to install Strapi. Run the command below.
npx create-strapi-app <app-name> --quickstart
Once the installation is complete, the Strapi app should automatically launch in the
browser. If not, you can start the Strapi server on your browser by running the command below in the terminal.
npm run develop
Once you have started the server, open your browser and enter http://localhost:1337/admin. You must register as an admin and then log in to your dashboard.
Complete the form with your details and press the submit button. You will then be redirected to your dashboard, as shown below.
Creating the Collection Types
We will create two collection types for our application:
and `joblist`.
`applicantlist` **Collection Type**: This will contain all the information submitted by the candidates and the status of each application, whether it is accepted or not.
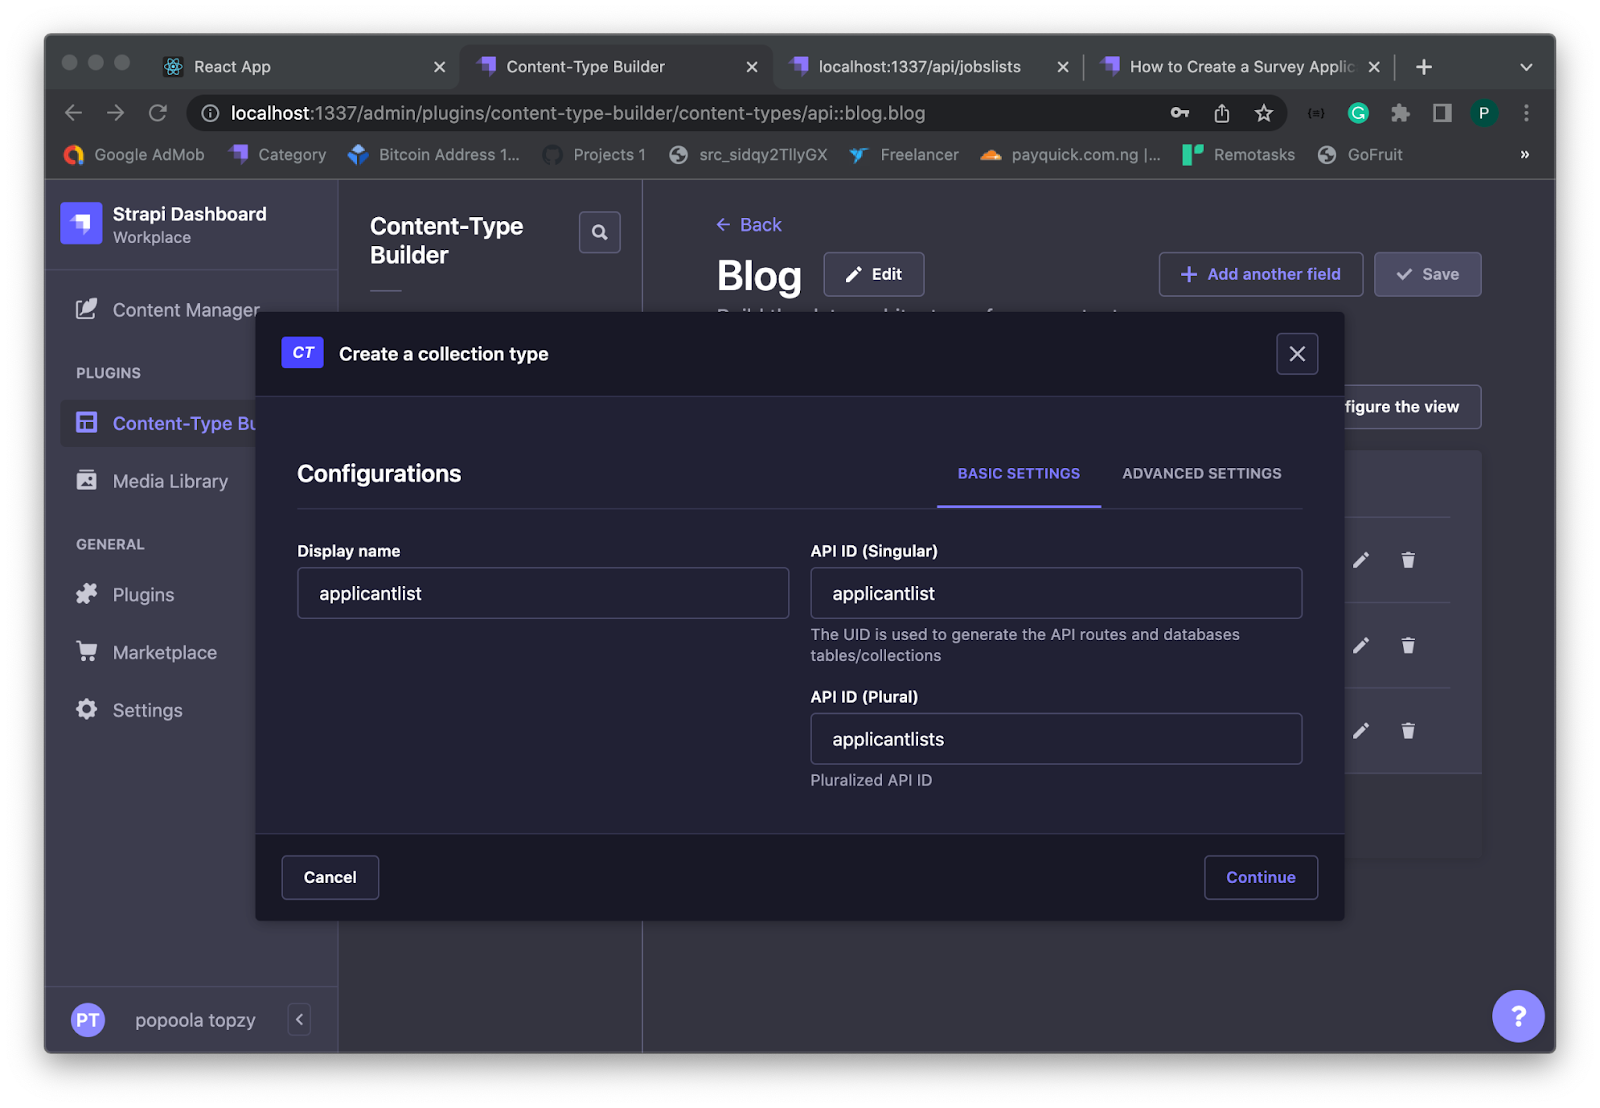
Follow the following steps to create `applicantlist` Collection Type:
**Step 1**
- From your dashboard menu, click on **Content-Type Builder**
- Click on **Create New Collection Type**
- Enter the display name for the collection type (`applicantlist`),
- Then click on **Continue**.

**Step 2**
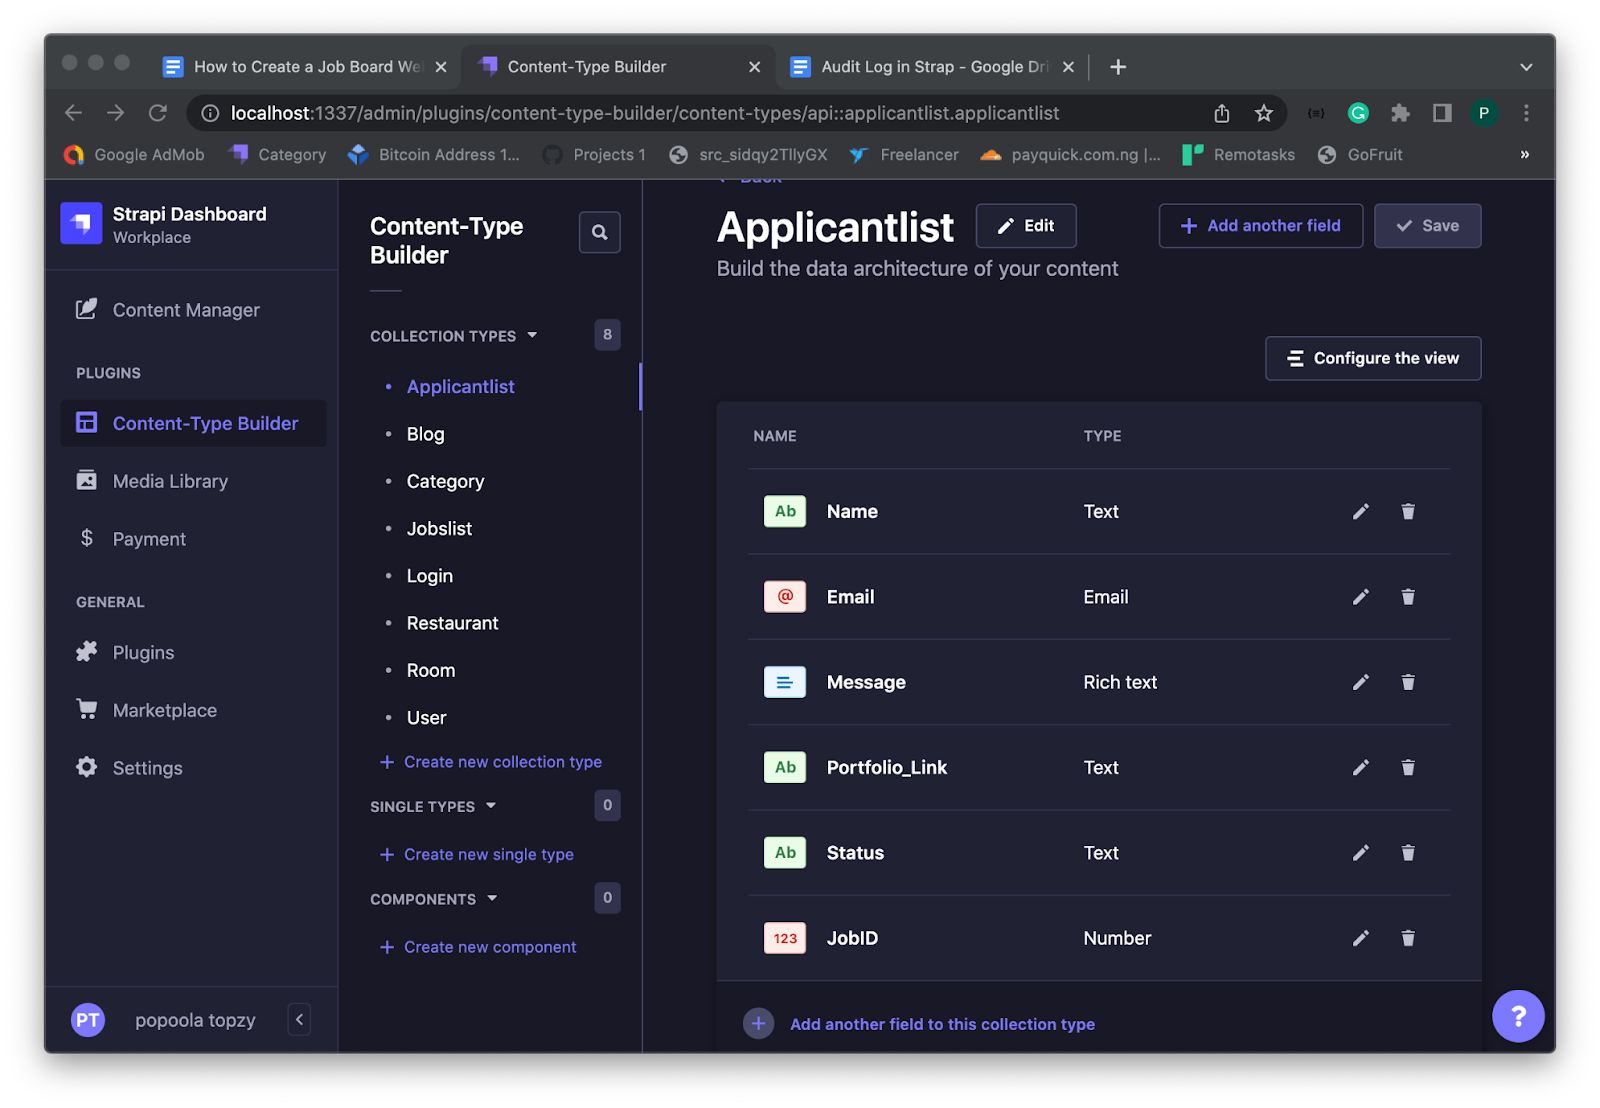
What we need to do next is to add the necessary fields to the collection type. The `applicantlist` content type will contain the following fields:
- Name: (Text - Long Text)
- Email: (Text - Short Text)
- Message: (Text - Short Text)
- Portfolio_Link: (Text - Short Text)
- Status: (Rich text)
- JobID: (Number - Integer)

`Joblist` **Collection Type**: This collection will contain open jobs and employer details. Follow the following steps to create the collection type:
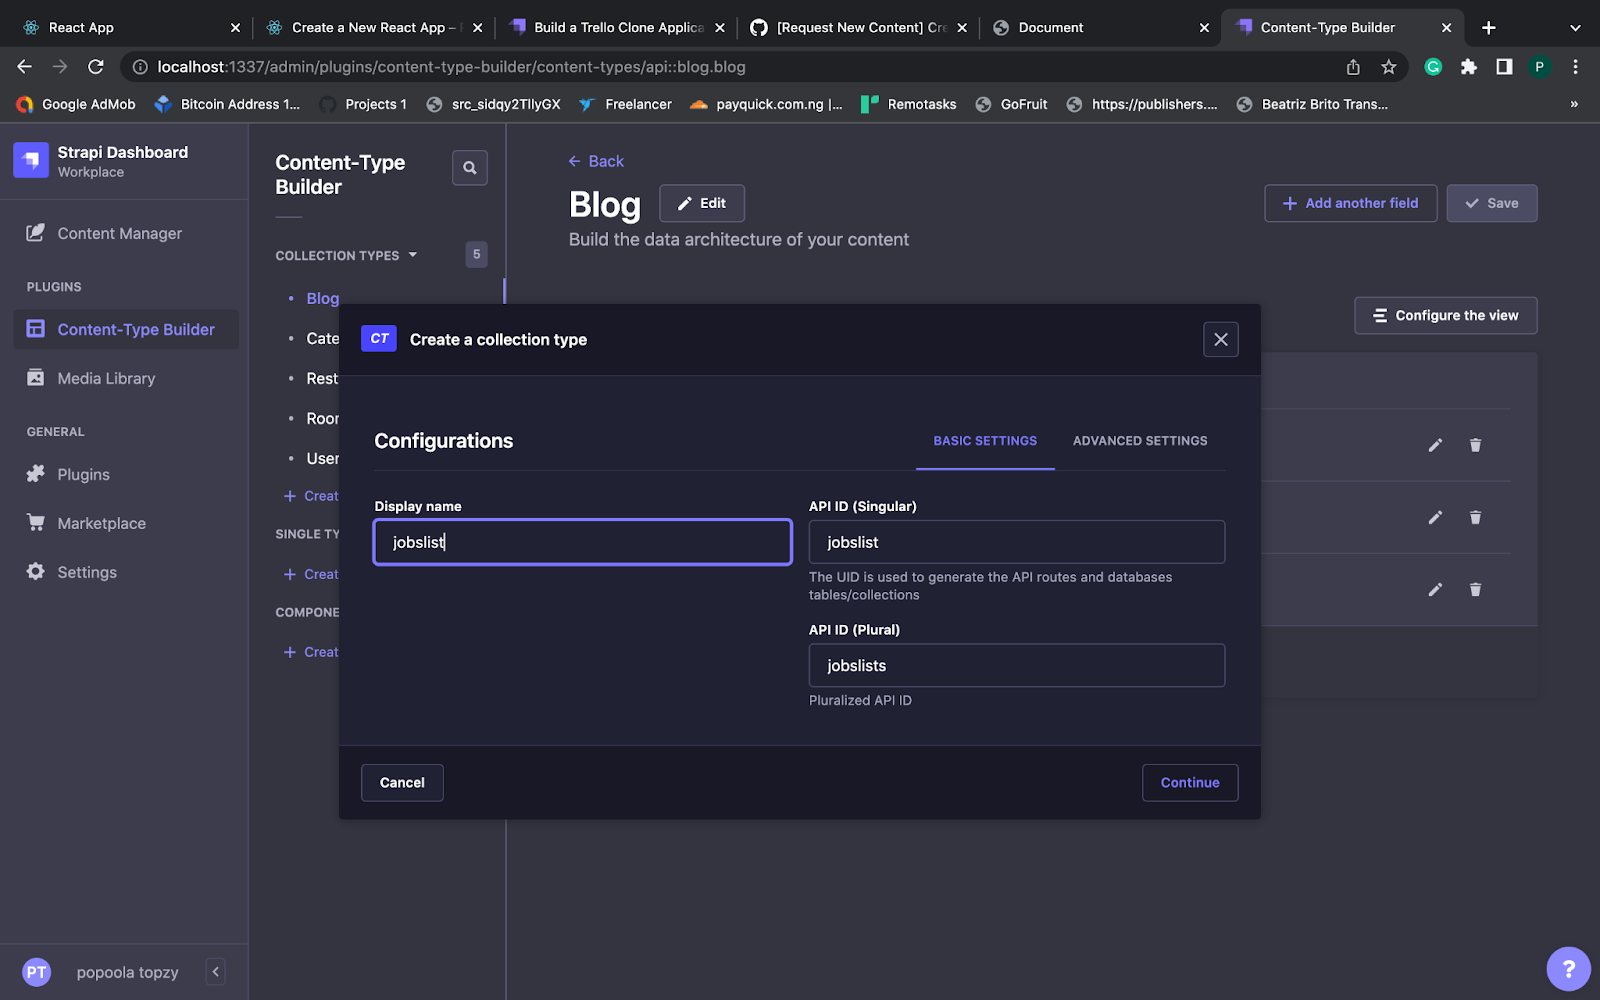
**Step 1**
- From your dashboard menu, click on **Content-Type Builder**
- Click on **Create New Collection Type**
- Enter the display name for the collection type (`Joblist`),
- Then click on **Continue**.

**Step 2**
We need to add the necessary fields to the collection type. The `joblist` content type will contain the following fields:
- JobPosition: (Text - Short Text)
- Category: (Text - Short Text)
- Location: (Text - Short Text)
- Experience: (Text - Short Text)
- JobStatus: (Text - Short Text)
- Agency: (Text - Short Text)
- JobDescription:(Text - Long Text)

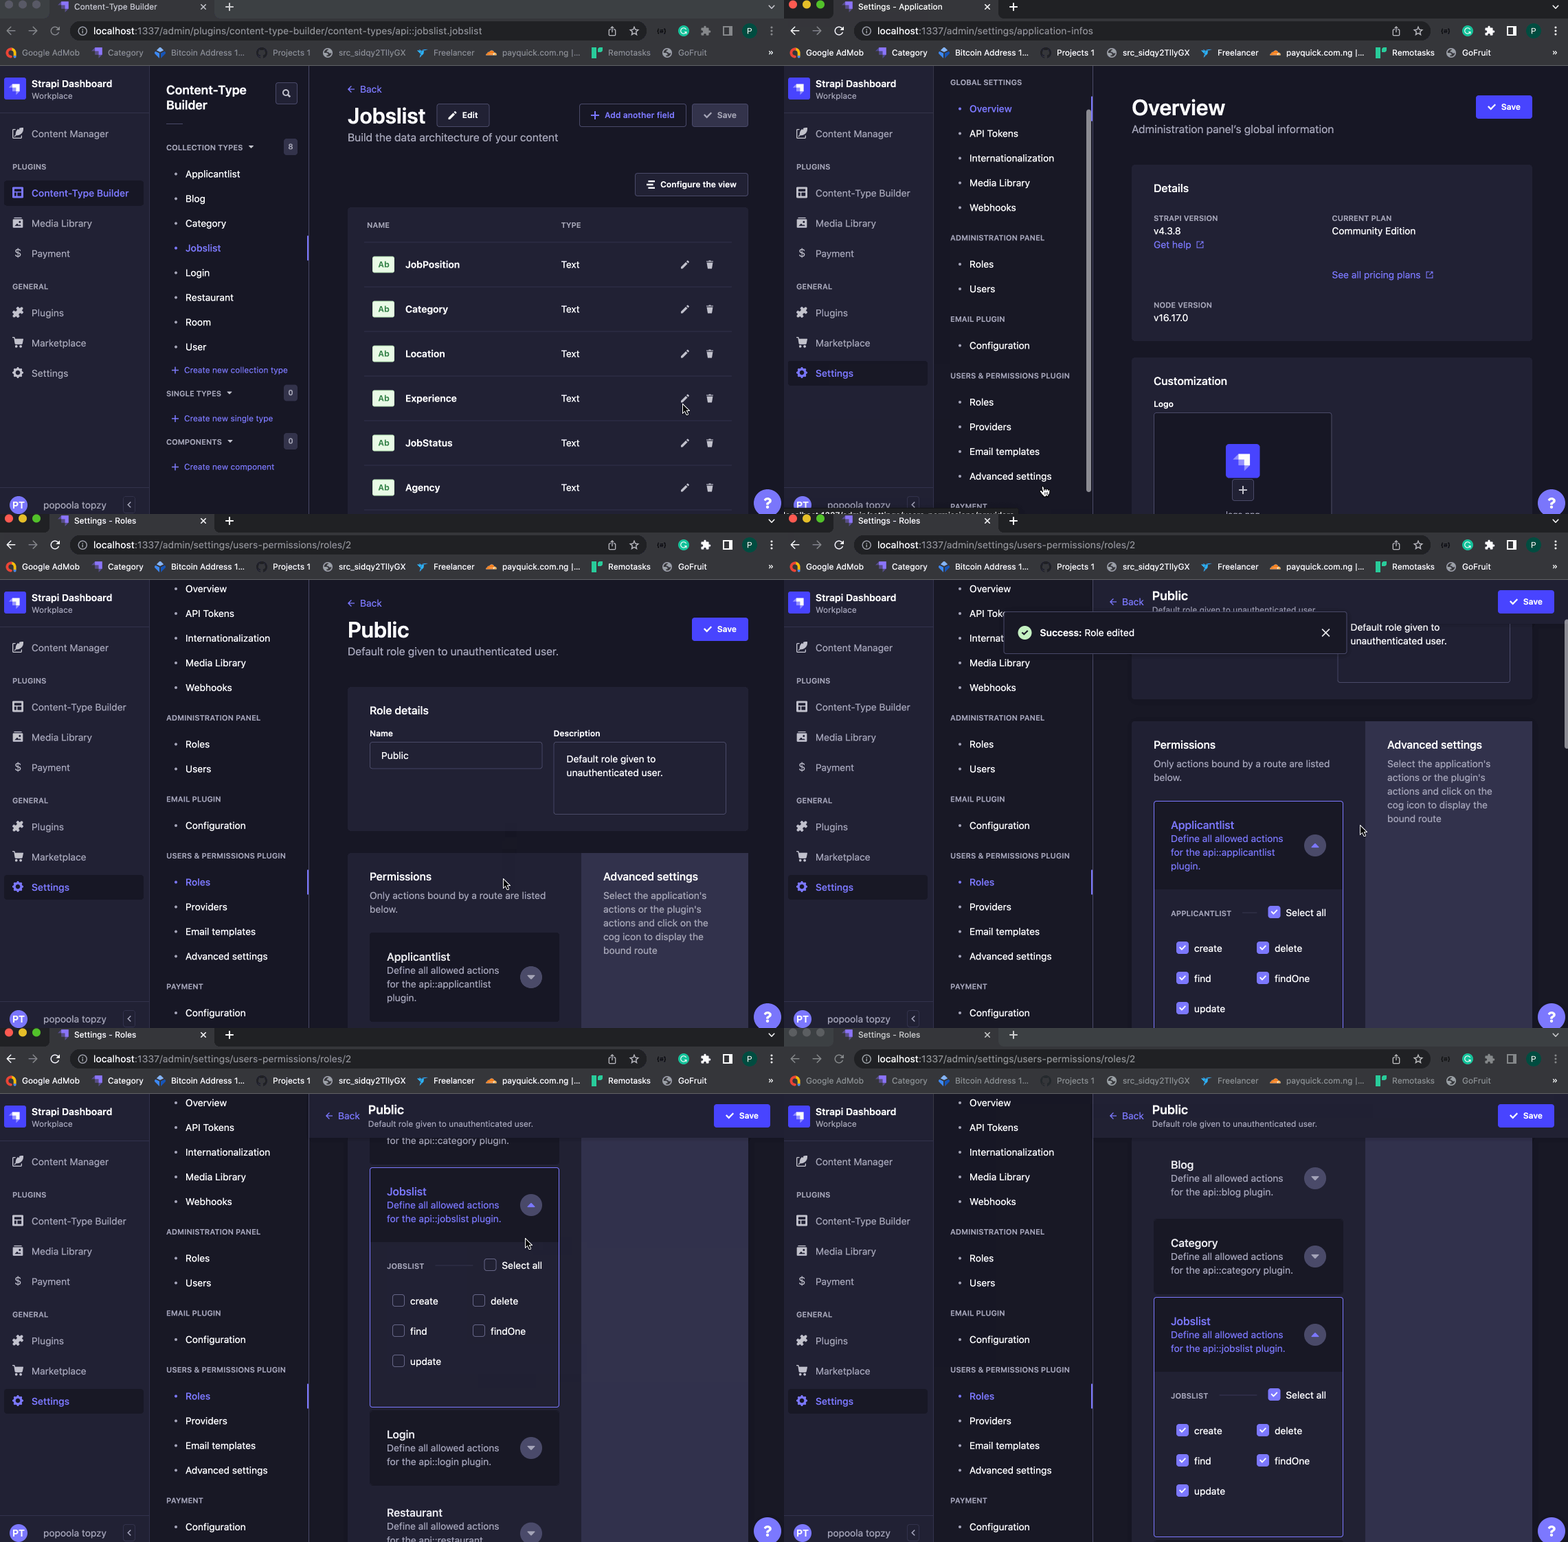
Next, we need to be able to interact with the two collections via an API call by changing the permission role of the type. To change the permission role for the collection types, follow the steps below:
- From your dashboard menu, click on **Settings**,
- Under USERS & PERMISSION PLUGIN, click on **Roles and public**
- Next, click on `applicantlist` and `joblist`, and select all, respectively
- Then click on **Save**.

## Designing the application's front-end
Now that we have set up the back-end, we will start building the application interface and its functionalities next.
### React Installation
Open a new terminal and install react with the command below.
```bash
npx create-react-app job-board
cd job-board
npm start
Next, let's break the job board application into two sections: the candidate and admin interface.
React is a single-page application, but we'll leverage the react route to navigate between the application pages in the browser.
Install React Route
React Router is an external library that enables us to navigate through various components in a React application by changing the browser URL and keeping the UI in sync with the URL. We can install the react route with the command below:
npm install react-router-dom@6
Building the Candidate Interface
This part will have the following features: a search bar for searching for a job, filter options for the job type, and a form to apply for jobs. Navigate to src/pages, open app.js in any code editor, paste the following code, and then save it.
    import './style.css';
    import { useState, useEffect } from 'react';
    import { Link } from 'react-router-dom';


    function App() {
     const [todos, setTodos] = useState([]);
     const [search, setSearch] = useState("");


     function update() {
       fetch("http://localhost:1337/api/jobslists")
         .then(res => res.json())
         .then(todo => {
           setTodos(todo.data);
         })
     }
     useEffect(() => {
       update();
     }, [])


     return (
       <div>

         <div className="header">
           <link href="https://cdn.jsdelivr.net/npm/bootstrap@5.1.3/dist/css/bootstrap.min.css" rel="stylesheet"></link>
           <script src="https://cdn.jsdelivr.net/npm/bootstrap@5.1.3/dist/js/bootstrap.bundle.min.js"></script>
           <div >

               <div className="menu1">
               <Link to="/">Job Board</Link>


               </div>

               <div className="menu2">
               <Link to="/login">Login</Link>
               </div>

           </div></div>
         <br></br>


         <div>
           <div className="margin">
             <br />


           </div>
           <div className="filter">
             <br />
             <div>
               <button className="filter2 btn btn-info">filter Job list</button><br /><br />
               <form className="filter3" method="get">
                 <input type="radio" onChange={(event) => setSearch(event.target.value.toLowerCase())}  name="c" value="" />
                 <label>All Jobs</label><br />
                 <input type="radio" name="c" value="Backend" onChange={(event) => setSearch(event.target.value.toLowerCase())}  />
                 <label>Part Time</label><br />
                 <input type="radio" name="c" value="Internship" />
                 <label>Internship</label><br />
                 <input type="radio" name="c" />
                 <label>Freelance</label>
               </form>
             </div>
          </div>

           <div className="job">
             <div><br />
               <div className="form-group">
                 <label >Search:</label>
                 <input type="text" placeholder="Search Job Title..." value={search} className="form-control" onChange={(event) => setSearch(event.target.value.toLowerCase())} />
               </div>
             </div>
          <br />
        <br />
              {
               todos.map((todo, i) => {
                 const link = "apply?jobid=" + todo.id;
                 const filter = JSON.stringify(todo.attributes).toLowerCase()
                 if(filter.includes(search)){
                   return (
                     <div key={i}>
                       <div>
                         <div className="detaills">
                           <img src='https://super-static-assets.s3.amazonaws.com/e7c0f16c-8bd3-4c76-8075-4c86f986e1b2/uploads/favicon/9c68ae10-0a8a-4e3f-9084-3625b19df9cb.png' className="logo"/>
                           <div className="description">
                             <span className="span1">{todo.attributes.JobPosition}</span>
                             <span className='right'> {todo.attributes.Location}</span>
                             <span className="span2">
                             {todo.attributes.JobStatus}
                             </span><br /><br />
                             <span className="span1">{todo.attributes.Agency}</span>
                           </div>
                          </div>
                         <div className="apply">
                           <a href={link }><button className="ap1">Apply Now
                           </button></a>
                           <div className="ap2">{todo.attributes.Experience}</div>
                         </div>
                       </div> <br />
                     </div>
                   )
                 }else{}
               })
             }
          </div>
        </div>
      </div>
     );
    }

    export default App;
Now, if we try to run the application in the browser, it will generate an error because we have not set up the navigation URL for our React app. To do that, from your application root folder, open index.js and replace it with the following code:
    import React from 'react';
    import ReactDOM from 'react-dom/client';
    import './index.css';
    import App from './App';
    import Apply from './pages/apply';
    import reportWebVitals from './reportWebVitals';
    import { BrowserRouter,Routes,Route} from 'react-router-dom';

    const root = ReactDOM.createRoot(document.getElementById('root'));
    root.render(
     <React.StrictMode>
        <BrowserRouter>
        <Routes>
         <Route path="/" element={<App />} />
         <Route path="apply" element={<Apply />} />
       </Routes>
       </BrowserRouter>
     </React.StrictMode>
    );

    // If you want to start measuring performance in your app, pass a function
    // to log results (for example: reportWebVitals(console.log))
    // or send to an analytics endpoint. Learn more: https://bit.ly/CRA-vitals
    reportWebVitals();
Next, let's add style to the application. Inside the src folder, create a style.css file and add the following:
    .header {
        height: 50px;
        width: 100%;
        background-color: #24cef0;
        position: fixed;
     }

     .menu1 {
        margin-top: 10px;
        margin-left: 80px;
        font-size: 20px;
        width: 400px;
        float: left;
        color: black;

     }

     .menu2 {
        margin-top: 10px;
        margin-right: 80px;
        font-size: 20px;
        width: 100px;
        float: right;
        color: black;
     }

     .menu3 {
        margin-top: 10px;
        margin-right: 80px;
        font-size: 20px;
        width: 70px;
        float: right;
        color: black;
     }

     .right {
        float: right;
     }

     .color {
        background-color: #f1f1f1;
     }

     .margin {
        margin-right: 100px;
     }


     body {
        font-family: Arial, Helvetica, sans-serif;
        background-color: #f5f5f5;
        opacity: 0.9;
        scroll-behavior: auto;
     }

     input[type=text],
     input[type=password] {
        width: 100%;
        padding: 12px 20px;
        margin: 8px 0;
        display: inline-block;
        border: 1px solid #ccc;
        box-sizing: border-box;
     }


     .cancelbtn {
        width: auto;
        padding: 10px 18px;
        background-color: #f44336;
     }

     .imgcontainer {
        text-align: center;
        margin: 24px 0 12px 0;
        position: relative;
     }


     .container {
        padding: 16px;
     }

     span.psw {
        float: right;
        padding-top: 16px;
     }

     /* The Modal (background) */
     .modal {
        display: none;
        position: fixed;
        z-index: 1;
        left: 0;
        top: 0;
        width: 100%;
        height: 100%;
        overflow: auto;
        background-color: rgb(0, 0, 0);
        background-color: rgba(0, 0, 0, 0.4);
        padding-top: 60px;
     }

     .modal-content {
        background-color: #fefefe;
        margin: 5% auto 15% auto;
        border: 1px solid #888;
        width: 80%;
     }

     .close {
        position: absolute;
        right: 25px;
        top: 0;
        color: #000;
        font-size: 35px;
        font-weight: bold;
        cursor: pointer;
     }

     .job {
        /* min-height: 180px; */
        width: 700px;
        border-radius: 10px;
        float: right;
        margin-right: 310px;
     }

     .job2 {
        /* background-color: red; */
        min-height: 180px;
        width: 700px;
        border-radius: 10px;
        float: right;
        margin-right: 100px;
     }

     .detaills {
        background-color: white;
        height: 140px;
        width: 100%;
        border: 3px solid #f8f9fc;
        border-top-left-radius: 9px;
        border-top-right-radius: 9px;
     }

     .detaills_ {
        background-color: white;
        height: 230px;
        width: 100%;
        border: 3px solid #f8f9fc;

        border-top-left-radius: 9px;
        border-top-right-radius: 9px;
     }

     .apply {
        background-color: #f8f9fc;
        height: 40px;
        width: 100%;
        border-bottom-left-radius: 10px;
        border-bottom-right-radius: 10px;
        border: 3px solid #f8f9fc;
     }

     .ap1 {
        float: right;
        margin-right: 14px;
        margin-top: 10px;
        background-color: transparent;
        border-width: 0px;

     }

     .ap2 {
        float: left;
        margin-left: 14px;
        margin-top: 10px;
        background-color: transparent;
        border-width: 0px;

     }

     .logo {
        width: 100px;
        height: 100px;
        border: 3px solid pink;
        margin-left: 40px;
        margin-top: 18px;
        border-radius: 10px;
        float: left;
     }

     .description {
        float: left;
        margin-top: 27px;
        margin-left: 18px;
        width: 70%;
     }

     .span2 {
        font-size: 14px;
        margin-left: 30px;
     }

     .span1 {
        font-size: 18px;
     }

     .filter {
        width: 240px;
        /* background-color: #f44336; */
        height: 300px;
        float: left;
        margin-left: 30px;

     }

     .filter2 {
        margin-top: 30px;
        font-size: 18px;
     }

     .filter3 {
        margin-left: 20px;
     }

     .select {
        width: 200px;
        border-radius: 10px;
        font-size: 17px;
     }

     .logo_ {
        width: 40px;
        height: 40px;
        border: 3px solid pink;
        margin-left: 40px;
        margin-top: 18px;
        border-radius: 10px;
        float: left;
     }


     .span1_ {
        font-size: 14px;
     }

     .filter_ {
        width: 240px;
        height: 300px;
        float: right;
        margin-left: 30px;

     }

     .filter3_ {
        width: 100px;
        margin-left: 30px;

     }

     .filter2_ {
        margin-top: 20px;
        font-size: 18px;
        margin-left: 20px;
     }
We need to create a component that will handle job application submission and send it to the backend. Inside the src/pages, create a component called apply.js and the following code:
    import { useState, useEffect } from 'react';
    import { Link } from 'react-router-dom';

    function Apply() {
     const queryParams = new URLSearchParams(window.location.search);
     const jobid = queryParams.get('jobid');
     const [job, setJob] = useState([]);
     const[fullname,setFullname] = useState("")
     const[email,setEmail] = useState("")
     const[link,setLink] = useState("")
     const[message,setMessage] = useState("")


     const update  = async () =>  {
       fetch("http://localhost:1337/api/jobslists/"+jobid)
         .then(res => res.json())
         .then(job_info => {
           setJob(job_info.data.attributes);
           console.log(job_info.data.attributes);
         })
     }
     useEffect(() => {
       update();
       console.log(job);
     }, [])

     const subbmit = async () => {
       const requestOptions = {
           method: 'POST',
           headers: { 'Content-Type': 'application/json' },
           body: JSON.stringify({
               "data": {
                   "Name": fullname,
                   "Email": email,
                   "Message": message,
                   "Portfolio_Link": link,
                   "Status": "Pending",
                   "JobID": jobid
               }
           })
       };

       fetch('http://localhost:1337/api/applicantlists', requestOptions)
           .then(response => response.json())

       alert("Application Submited Successful...");
    }

     return (
       <div>
       <div className="header">
           <link href="https://cdn.jsdelivr.net/npm/bootstrap@5.1.3/dist/css/bootstrap.min.css" rel="stylesheet"></link>
           <script src="https://cdn.jsdelivr.net/npm/bootstrap@5.1.3/dist/js/bootstrap.bundle.min.js"></script>
           <div >

               <div className="menu1">
               <Link to="/">Job Board</Link>


               </div>

               <div className="menu2">
               <Link to="/login">Login</Link>
               </div>

           </div></div>
         <br/><br/>
       <div>

           <div className="job2" style=>
               <br/><br/>
               <div>
                   <div className="detailds_" style=>
                       <img src='https://super-static-assets.s3.amazonaws.com/e7c0f16c-8bd3-4c76-8075-4c86f986e1b2/uploads/favicon/9c68ae10-0a8a-4e3f-9084-3625b19df9cb.png' style=/>
                       {/* </div> */}
                       <div className=>
                           <center><span className="span1_"><b>{job.JobPosition}</b></span><br/>

                           <span className="span1_">{job.Location}</span><br/><br/>
                           <span>{job.JobDescription} </span>


                           </center><br/><br/><br/><br/>
                           <div>
                             <span><b>{job.Experience}</b></span> <br/><br/>
                             <span><b>Category : {job.Category}</b></span> <br/><br/>
                             <span><b>Company : {job.Agency}</b></span>
                           </div>
                       </div>

                   </div>

               </div>

           </div>


           <div clas="job2" style=>
               <br/><br/>
               <div>
                   <div className="details_" style=>
                      <center><br/>
                       <h4>Application form</h4>
                       <form action="">
                           <div className="form-group">
                               <input type="text" onChange={(event) => setFullname(event.target.value)} className="form-control" placeholder="Enter Fullname" style=id="usr"/>
                           </div> <br/>
                           <div className="form-group">
                               <input type="email" onChange={(event) => setEmail(event.target.value)} className="form-control" placeholder="Enter Email Address" style=id="usr"/>
                           </div><br/>
                           <div className="form-group">
                               <input type="url" onChange={(event) => setLink(event.target.value)} className="form-control" placeholder="Link to  Your Portfolio" style=id="usr"/>
                           </div><br/>
                           <div className="form-group">
                               <textarea name="" onChange={(event) => setMessage(event.target.value)} className="form-control"  rows="6" placeholder="Tell us more about you and your experience" style=></textarea>
                               <br/>

                               <input type="button" onClick={() => subbmit()} className="form-control" value="Submit" />


                           </div>
                       </form>

                   </center>

                   </div>

               </div>

           </div>


       </div>
       </div>
     );
    }


    export default Apply;
To confirm that the candidate interface that we just built is working fine, let's add some open jobs to the application, as demonstrated in the image below:
Next, enter npm run start on the terminal and open [http://localhost:3000/](http://localhost:3000/) in the browser. It should look like this:
Building The Admin Interface
Now, let's create the admin page where the admin user can log in, view candidate profiles, and decide whether to approve or decline candidates' applications. Let's start with the login page. Inside the pages folder, create login.js and add the following code to it, then save.
    import { useState, useEffect } from 'react';
    import { Navigate } from "react-router-dom";

    export default function Expenses() {

       const queryParams = new URLSearchParams(window.location.search);
       const id = queryParams.get('id');
       const [auth, setAuth] = useState('');
       const [Email, setEmail] = useState('test@gmail.com');
       const [Password, setPassword] = useState('pass123');
       const [submit, setsubmit] = useState();
       const update = async () => {

            const requestOptions = {
               method: 'POST',
               headers: { 'Content-Type': 'application/json' },
               body: JSON.stringify({identifier:Email,password:Password})
           };
           fetch('http://localhost:1337/api/auth/local', requestOptions)
               .then(response => response.json())
               .then(data => setAuth(data));
         }

       console.log(auth.jwt)
       if(typeof(auth.jwt)!=="undefined"){
           const url = "/dashboard?token="+auth.jwt;
           return <Navigate to={url}/>;
       }

       return (

           <div className="container">


               <center>
                   <div style={{ width: '270px', marginLeft: '0px', marginTop: '200px' }}>
                       <h2>Login</h2>
                       <p>login as{id} agent</p>
                       <form role="form">
                           <div className="form-group">
                               <label for="usr">Email:</label>
                               <input type="text" className="form-control" id="usr" onChange={(event) => setEmail(event.target.value)} />
                           </div>
                           <div className="form-group">
                               <label for="pwd">Password:</label>
                               <input type="password" className="form-control" id="pwd" onChange={(event) => setPassword(event.target.value)} />
                           </div>
                           <div className="form-groug">
                               <br />
                               <a className="form-control" value="login" onClick={() => update()} >Login</a>

                           </div>
                       </form>
                   </div></center>
           </div>

       );
    }
If the login details are correct from the login page, the admin will be redirected to the dashboard.
Next, inside the src/pages folder, create a dashboard.js file and add the following code.
    import { useState, useEffect } from 'react';
    import { Navigate } from "react-router-dom";
    import { Link } from 'react-router-dom';

    export default function Dashboard() {
       const [state, setState] = useState("")
       const [Applicant, setApplicants] = useState([]);
       const [jobTitle, setjobTitle] = useState("")
       const [jobCategory, setjobCategory] = useState("")
       const [jobLocation, setjobLocation] = useState("")
       const [jobDescription, setjobDescription] = useState("")
       const [jobExpreience, setjobExpreience] = useState("")
       const [openJob, setOpenJob] = useState([])
       const queryParams = new URLSearchParams(window.location.search);
       const token = queryParams.get('token');

       function Applicants() {
           fetch("http://localhost:1337/api/applicantlists")
               .then(res => res.json())
               .then(list => {
                   setApplicants(list.data);
               })

       }

       function open() {
           fetch("http://localhost:1337/api/jobslists")
               .then(res => res.json())
               .then(list => {
                   setOpenJob(list.data);
               })

       }

       const update = async (id) => {
           const requestOptions = {
               method: 'PUT',
               headers: { 'Content-Type': 'application/json' },
               body: '{"data":{"Status":"Approved"}}'
           };
           console.log(requestOptions)
           fetch('http://localhost:1337/api/applicantlists/' + id, requestOptions)
               .then(response => response.json())
               .then(data => this.setState("1"));


       }
       const delete1 = async (id) => {
           const requestOptions = {
               method: 'DELETE',
               headers: { 'Content-Type': 'application/json' }
           };
           console.log(requestOptions)
           fetch('http://localhost:1337/api/applicantlists/' + id, requestOptions)
               .then(response => response.json())
               .then(data => this.setState("1"));


       }

       useEffect(() => {
           Applicants();
           open();
       }, [])

       if (typeof (Applicant.id) === "undefinsed") {
           const url = "/login";
           return <Navigate to={url} />;
       }


       const addjob = async () => {
           const requestOptions = {
               method: 'POST',
               headers: { 'Content-Type': 'application/json' },
               body: JSON.stringify({
                   "data": {
                       "JobPosition": jobTitle,
                       "Category": jobCategory,
                       "Location": jobLocation,
                       "Experience": jobExpreience,
                       "JobDescription":jobDescription,
                       "JobStatus": "Open",
                       "Agency": "Strapi"
                   }
               })
           };
           // console.log(requestOptions)
           fetch('http://localhost:1337/api/jobslists', requestOptions)
               .then(response => response.json())
           //  .then(data => this.setState(data ));

           alert("Job Added Successful...");
       }

       return (
           <div>
               <div className="header">
                   <link href="https://cdn.jsdelivr.net/npm/bootstrap@5.1.3/dist/css/bootstrap.min.css" rel="stylesheet"></link>
                   <script src="https://cdn.jsdelivr.net/npm/bootstrap@5.1.3/dist/js/bootstrap.bundle.min.js"></script>
                   <div >

                       <div className="menu1">
                           <Link to="/">Job Board</Link>


                       </div>

                       <div className="menu2">
                           <Link to="/">Logout</Link>
                       </div>

                   </div>
               </div>
               <br /><br />

               <div className="filter_">
                   <br />

                   <div className="filter2_">
                       <span>Open Positions</span>
                       <hr />
                       {
                           openJob.map((list, i) => {

                               if (list.attributes.JobStatus == "Open") {
                                   return (
                                       <div key={i}>
                                           <span style={{ fontSize: '17px' }}>{list.attributes.JobPosition}</span>
                                           <hr />
                                       </div>
                                   )
                               }
                           })
                       }


                   </div>

               </div>
               <div className="job2">
                   <br /><br />

                   {
                       Applicant.map((list, i) => {

                           if (list.attributes.Status == "Pending") {
                               return (
                                   <div key={i}>
                                       <div>
                                           <div className="detaills_">
                                               <div className="logo_"></div>
                                               <div className="description">
                                                   <span className="span1_">{list.attributes.Name}</span>
                                                   <span style={{ float: 'right' }}>{list.attributes.Status}</span>
                                                   <br />
                                                   <span className="span1_">{list.attributes.Email}</span>
                                                   <textarea style={{ borderWidth: '0px' }} readonly id="" cols="70"
                                                       rows="3">{list.attributes.Message}</textarea>
                                                   <center>
                                                       <a target={"_blank"} href={list.attributes.Portfolio_Link}>View Portfolio</a> <br />
                                                       <button className="btn-success" onClick={() => update(list.id)} >Approve</button>
                                                       <button className="btn-danger" onClick={() => delete1(list.id)}>Decline</button>
                                                   </center>
                                               </div>

                                           </div>

                                       </div> <br />
                                   </div>
                               )

                           }
                       })
                   }
            </div>

               <div className="filt">
                   <br />

                   <div className="filter2_">
                       <span>Post New Position</span><br /><br />
                       <form className="filter3_" method="get">
                           <input type="text" onChange={(event) => setjobTitle(event.target.value)} placeholder="Job Title" style={{ width: '200px', borderRadius: '10px' }} />
                           <input type="text" onChange={(event) => setjobCategory(event.target.value)} placeholder="Enter Job Category" style={{ width: '200px', borderRadius: '10px' }} />
                           <br />
                           <input type="text" onChange={(event) => setjobLocation(event.target.value)} placeholder="Location" style={{ width: '200px', borderRadius: '10px' }} id="" />
                           <br />

                           <textarea onChange={(event) => setjobDescription(event.target.value)} style={{ width: '200px', borderRadius: '10px' }}
                               placeholder="Job description"></textarea>
                           <br />

                           <select onChange={(event) => setjobExpreience(event.target.value)} className="select">
                               <option disabled selected>Requirement</option>
                               <option value="Experience : 0 - 1 year">Experience : 1 - 3 years</option>
                               <option value="Experience : 2 - 3 years">Experience : 1 - 3 years</option>
                               <option value="Experience : 4 - 7 years">Experience : 4 - 7 years</option>
                           </select><br /><br />


                           <center>
                               <input type="button" onClick={() => addjob()} className="form-control" value="Add Job" />
                           </center>

                       </form>
                   </div>

               </div>


           </div>

       );
    }
Let's finish the front end by adding the new pages we created into index.js. Update src/index.js with the code below:
    import React from 'react';
    import ReactDOM from 'react-dom/client';
    import './index.css';
    import App from './App';
    import Login from "./pages/Login";
    import Test from "./pages/test";
    import Dashboard from "./pages/dashboard";
    import reportWebVitals from './reportWebVitals';
    import { BrowserRouter,Routes,Route} from 'react-router-dom';
    import Apply from './pages/apply';

    const root = ReactDOM.createRoot(document.getElementById('root'));
    root.render(
     <React.StrictMode>
        <BrowserRouter>
        <Routes>
         <Route path="/" element={<App />} />
         <Route path="login" element={<Login />} />
         <Route path="test" element={<Test />} />
         <Route path="dashboard" element={<Dashboard />} />
         <Route path="apply" element={<Apply />} />
       </Routes>
       </BrowserRouter>
     </React.StrictMode>
    );

    // If you want to start measuring performance in your app, pass a function
    // to log results (for example: reportWebVitals(console.log))
    // or send to an analytics endpoint. Learn more: https://bit.ly/CRA-vitals
    reportWebVitals();
Now let's add a new admin user. From your Strapi dashboard menu, navigate through Content Manager to User and create a new user, as shown in the image below.
The admin dashboard (localhost:3000/login ) should function as shown below.
Conclusion
Now we have successfully built a complete job board website from scratch.
This tutorial explains what Strapi is, how to get started and how to use it with React to build a complete job board application.
You can find the source code for the job board application here:

Posted on December 9, 2022
Join Our Newsletter. No Spam, Only the good stuff.
Sign up to receive the latest update from our blog.
Related

August 8, 2022


