Docker: Images, Containers, and its main commands

Igor Souto
Posted on June 20, 2020

Docker came to facilitate the creation and management of environments, for personal users, enterprises, and open-source communities.
Running just a command, we can now have the entire environment that the project was built with, with its versions and applications installed and running, easy setup.
And the phrase "but it works on my machine" is not necessary anymore, because we always have the same environment, whatever we are running the application. :D
Let's see a little bit of how Docker works and what we can do with it!
Container
A container is where you will install your dependencies, application, and everything to your project to start running. It will use the container images (like little OS as a base) to run the application, and when it needs to use the Kernel, it will not use the container's kernel, because it does not have one. It will use the host docker's Kernel (the physical machine).
This Kernel will manage all the containers running.
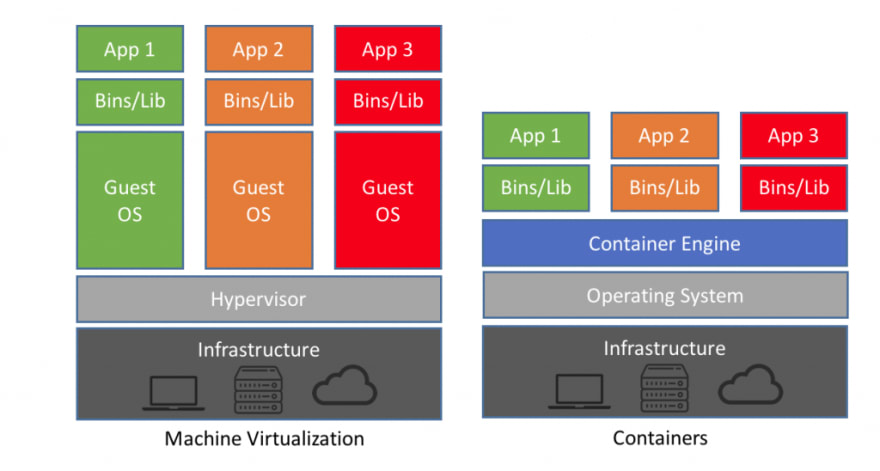
A container is not a VM like most people say. A VM you have to virtualize all the OS, it's big, a complete OS with a kernel and many layers until the application, consuming much more resources.
A container is small, the application is closer to the infrastructure and OS.
A VM emulates a machine, the container emulates an application.
It's portable too, you can easily get the binaries that Docker creates for the container and put in another server/machine, it will work like a charm.
Images
A Docker image is like a Docker container in a point at the time, or like stopped docker container.
When you build a container, you use images that are a container that was created and shared in Dockerhub (or you can build yours from scratch).
If you build a container, stop and share it, other people can use it inside their container as an image.
Using the OOP concept, It's like the image is a Class and a container is an instance of that image.
Layers
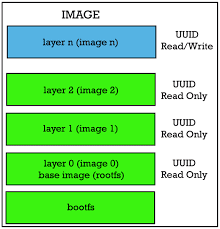
The Docker's file system works with layers.
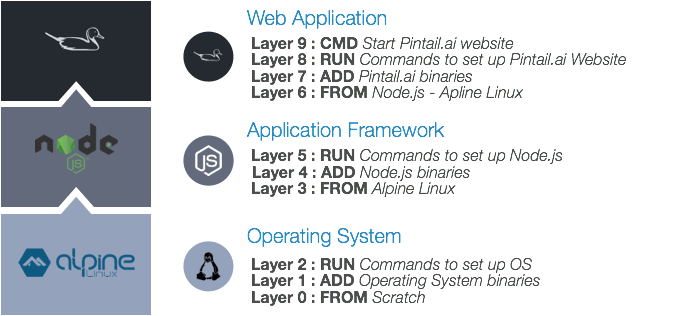
When you're building an image, each step creates a layer, and all layers are read-only, except the last layer that is Read-write.
Copy on Write
When you need to modify a read-only layer, this layer will be copied to the read-write layer and then it can be modified.
This action is called Copy on Write.
That is like a book, that you can read, but when you change a sheet, the moment that you touch the pen, that sheet is copied and you modify that copied sheet, creating a new sheet, preserving the old one.
CLI Commands
RUN
docker run hello-world
Is the command the initializes a container, passing the image's name that the container will use.
If Docker is unable to find that image locally, it will automatically try to find that image in Dockerhub and start downloading and running.
PS
docker ps
List the containers in execution.
Passing the parameter -a after ps will list all containers, including the stopped ones.
IMAGES
docker images
We Will list all images in your machine.
CREATE
docker create ubuntu
It creates a container but not execute it.
STOP
docker stop container-id
Stops the container.
START
docker start container-id
It starts a stopped container.
STATS
docker stats container-id
Show the stats like memory, net, and CPU of a container.
RM
docker rm container-id
Removes a container, if the container is running, use the parameter -f to force it.
Important parameters for command Run
-ti
docker run -ti image-name /bin/bash
The t is terminal, and i is interactive, so we are telling that we can want a terminal and it will be interactive to use the container.
-d
docker -d image-name
It is for running the container in daemon mode (in the background).
It's useful for "data-only" containers, that will not need interaction.
ATTACH
docker attach container-id
Return to a closed (but not stopped) container.
Bash commands
CTRL + D
Will exit the container "killing" the bash, and if the bash is the principal job of the container, the container will be killed.
CTRL + P + Q
Will exit the container without "killing" it, just closing. You can go back to this container using the attach command.
Freeing memory
docker rm $(docker ps -a -q); docker rmi $(docker images -a -q) -f
docker system prune --volumes
Conclusion
Docker came to help a lot with our lives, with just some settings, we can develop a huge environment that anyone with Docker can easily use too.

Posted on June 20, 2020
Join Our Newsletter. No Spam, Only the good stuff.
Sign up to receive the latest update from our blog.


