OpenVPN: SSL and hostname configuration

Arseny Zinchenko
Posted on March 3, 2019
 We already have our OpenVPN AS running in Production, so a few more posts about last steps in its configuration.
For now – need to configure SSL to avoid alerts in clients browsers.
OpenVPN AS documentation for SSL setup – here>>>.
Let’s Encrypt
Install the Let’s Encrypt client:
root@openvpnas2:~# git clone https://github.com/letsencrypt/letsencrypt /opt/letsencrypt
Open port 80 in your AWS Security Group – it’s safe as OpenVPN AS listen on the 443 for clients and 943 for the admin page access.
Obtain a new certificate:
root@openvpnas2:~# /opt/letsencrypt/letsencrypt-auto certonly -d vpn.example.com
...
1: Spin up a temporary webserver (standalone)
...
IMPORTANT NOTES:
- Congratulations! Your certificate and chain have been saved at:
/etc/letsencrypt/live/vpn.example.com/fullchain.pem
Your key file has been saved at:
/etc/letsencrypt/live/vpn.example.com/privkey.pem
SSL in OpenVPN AS
You can change certificates using Admin UI in the Web Server Configuration, or using CLI.
On the first run OpenVPN AS generates self-signed certificates stored in the /usr/local/openvpn_as/etc/web-ssl/ directory:
root@openvpnas2:~# ls -l /usr/local/openvpn_as/etc/web-ssl/
total 16
-rw-r--r-- 1 root root 1111 Feb 21 14:50 ca.crt
-rw------- 1 root root 1708 Feb 21 14:50 ca.key
-rw-r--r-- 1 root root 1082 Feb 21 14:50 server.crt
-rw------- 1 root root 1704 Feb 21 14:50 server.key
They are kind of failover-certificates in case if others will be broken.
To configure SSL we need to have three files, in case of using Let’s Encrypt we will use the next files to create them:
-
*.crt– it’s ourfullchain.pemfile -
*.key–privkey.pemfile -
*.bundle– will be created fromfullchain.pemandprivkey.pem
Check Let’s Encrypt existing files:
root@openvpnas2:/etc/letsencrypt/live/vpn.example.com# ls -l
total 4
lrwxrwxrwx 1 root root  42 Feb 22 10:56 cert.pem -\> ../../archive/vpn.example.com/cert1.pem
lrwxrwxrwx 1 root root  43 Feb 22 10:56 chain.pem -\> ../../archive/vpn.example.com/chain1.pem
lrwxrwxrwx 1 root root  47 Feb 22 10:56 fullchain.pem -\> ../../archive/vpn.example.com/fullchain1.pem
lrwxrwxrwx 1 root root  45 Feb 22 10:56 privkey.pem -\> ../../archive/vpn.example.com/privkey1.pem
Install the private key to OpenVPN server:
root@openvpnas2:/etc/letsencrypt/live/vpn.example.com# /usr/local/openvpn_as/scripts/sacli --key "cs.priv_key" --value_file "privkey.pem" ConfigPut
[True, {}]
Install its public cert:
root@openvpnas2:/etc/letsencrypt/live/vpn.example.com# /usr/local/openvpn_as/scripts/sacli --key "cs.cert" --value_file "fullchain.pem" ConfigPut
[True, {}]
“Generate” the bundle file – just by using cat for the fullchain.pem and privkey.pem:
root@openvpnas2:/etc/letsencrypt/live/vpn.example.com# cat fullchain.pem privkey.pem > bundle.pem
Add it to the OpenVPN AS:
root@openvpnas2:/etc/letsencrypt/live/vpn.example.com# /usr/local/openvpn_as/scripts/sacli --key "cs.ca_bundle" --value_file "bundle.pem" ConfigPut
[True, {}]
Restart the service:
root@openvpnas2:/etc/letsencrypt/live/vpn.example.com# /usr/local/openvpn_as/scripts/sacli start
RunStart warm None
{
"errors": {},
"service\_status": {
"api": "on",
"auth": "on",
"bridge": "on",
"client\_query": "restarted",
"crl": "on",
"daemon\_pre": "on",
"db\_push": "on",
"ip6tables\_live": "on",
"ip6tables\_openvpn": "on",
"iptables\_live": "on",
"iptables\_openvpn": "on",
"iptables\_web": "restarted",
"license": "on",
"log": "on",
"openvpn\_0": "on",
"openvpn\_1": "on",
"user": "on",
"web": "restarted"
}
}

WILL_RESTART ['web', 'client']
Check the UI now:
OpenVPN AS hostname
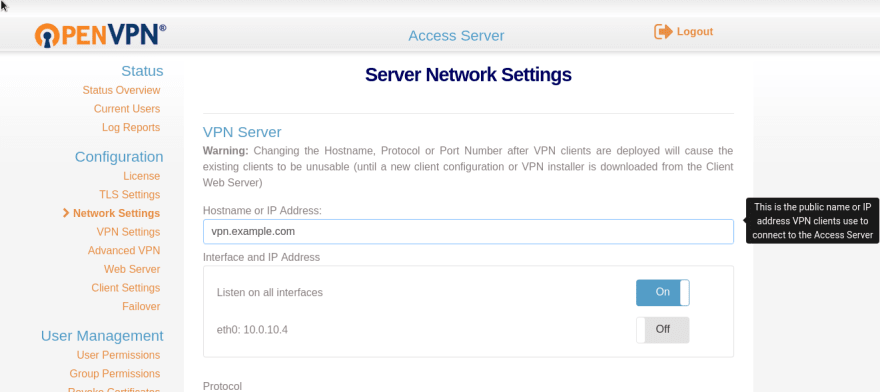
And the last step here will be to configure server’s hostname if this wasn’t made during initial setup.
Go to the Admin UI => Network Settings:
Done.
Similar posts
- 02/26/2019 OpenVPN: настройка SSL и hostname (0)
- 09/26/2017 Let’s Encrypt: firewall и верификация домена (0)
- 01/22/2018 Let’s Encypt: удалить сертификат (0)
- 02/21/2019 OpenVPN: OpenVPN Access Server set up and AWS VPC peering configuration (0)
- 02/22/2019 OpenVPN: DNS and dnsmasq configuration (0)

Posted on March 3, 2019
Join Our Newsletter. No Spam, Only the good stuff.
Sign up to receive the latest update from our blog.

