Mike Barlow
Posted on April 2, 2024

In this guide we'll be showing you how to work your way around the Vultr Control Panel so you can deploy your own server and integrate it into ServerAuth for easy server management.
Getting started
For the purpose of this guide, we'll assume you already have an account with Vultr and our Platform. If not, do that now before proceeding.
If you prefer a more automated approach then skip ahead to the Easier alternative setup. With this method we create the server on your behalf using the Vultr API.
Adding your SSH Key
When you first login to Vultr, your dashboard screen should look something like this.
Our first task is to add your computers SSH key to your account in Vultr. During server creation you will be asked which SSH Key to add to the server, if you don't have one you can add on then. However, doing it first saves breaking away mid-setup. If you already have a SSH Key in your Vultr account, skip ahead to Deploy your Server section.
In the left menu, click the Account link and then in the "sub left menu", click "SSH Keys" and it should look something like this.
Click the Add SSH Key button to bring up the add form. Drop in your SSH Key and give it a "friendly name" so you can identify which key is which if you add multiple keys, I've called mine "My Laptop". If you need a guide on creating an SSH Key, you can follow our guide on how to set up SSH Keys.
An SSH Key should look something like this.
ssh-rsa AAAAB3NzaC1yc2EAAAADAQABAAACAQCwQgfXajx0XezIrX74LJJdzaPEGTO8iWv1loQboV3RaPGxHSbQeRGLsKiHUG46zrNIssq73eCqtzXh9OYBHB8308/QYlXpYBsbgW5q+U+dYL4eTJde5S3oDoKD09EgWJ/NY8vXoJ/iJAlSbvaTUr98xCRQ3F7BUDh9gr7DYpyWNXAjF+XJp4dETT02/y0o+cQ4vITGu0OljvwCIkDSFt+QNQn6Wggd+C1bbQRPY8N0DchzqhF3ixU+XF1Q3KKUC7QTldfnrlRCr6qDKI2eSfUL+iG2N0KuLTSLvCe+84XqM1I2IwfujQtUcAgxyWF2nRp0xYHiKty60nrI1dNbQl5/uEJUHpL5sCo8kcjMfMS0lhTDyoaNBKTt/j3zu+cBiXj2IZa7lBQuLuH+/oTiBtuJ7g+XO8E8zXQKXmbZiFiC/7TA5A4Z9SkB6lcZqGLF5xbnKFnHywUPN1mdrDL8XyDQrNBmdqyzuqVZieDkCyrVraT12ruWjgR8UB0jM+j6yLKqmN9uUzBIvhavlHpzw/YeJ4pZSqjuicWLPnK9BzKSAqx0WbtQa0aCY0O1f6PVeirW6JM9zUvV7H0Yy4QGRyllaahy7z7kD4kxXQX07K0ep2SbmzstpRizRp38dG71fvNpel8dFtKPxOaTy4bBAARUc6UcW1RtJPrHQnxWZmdigQ== mike@example.com
Once saved, head back to the initial Vultr Dashboard screen by clicking the Products link in the left menu and then Compute in the sub left menu.
Deploy your Server
From this dashboard scree, click the "+ Deploy" button next to the search box. This should take you to the screen to deploy a new instance.
First you need to select the type of instance you want, for this guide we are selecting a Cloud Compute - Shared CPU server.
Next, select the location of the server. It's important to know where your target audience may be located. For example, if you server is going to be hosting websites/systems specific to the Floria area you may wish to select the Miami location. This simply ensures that any requests to your websites have the fastest response time possible.
For this guide we've selected London, UK.
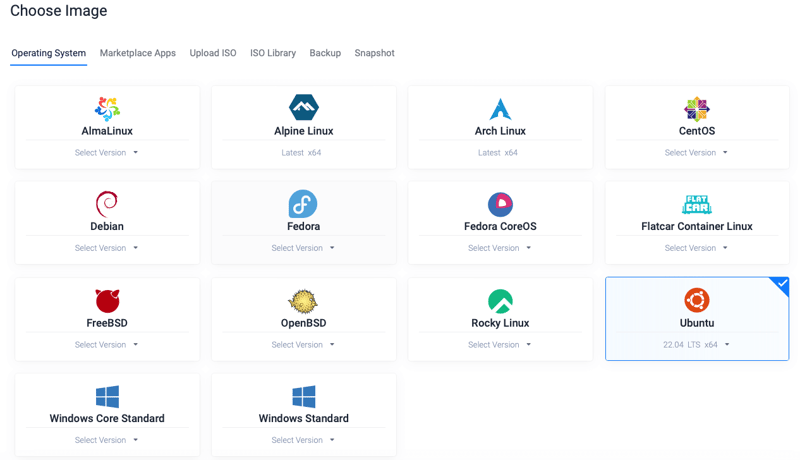
Next up, we need to select the operating system you want installed on the server. You also hve the option to upload your own ISO or select an App from their marketplace! We're big fans of Ubuntu here, so we're going to select Ubuntu 22.04.
With the OS selected, it's time to pick the size of the server you need. Vultr have a wide range servers from High Performance AMD and Intel servers down to your standard VPS. For this guide we're happy with a regular cloud compute server but we do want a little extra memory so we've opted for the "55 GB SSD" server.
Next is some additional options including, automated backups, DDOS protection, IPv6, VPC and more! We have our own backup solution so we've unticked the automated backups and left all the other options off.
Now it's time to set the SSH key that we wish to use. If you've been following along then you should have a drop down menu that contains the SSH key you added earlier, select it from the menu if you have. If not, click to add a new SSH key.
With that, it's time for the last step which is to set the Server hostname and give it a label for easy identification. If you're happy with everything you've selected, hit the deploy now button to start creating your server!
You will be taken out of the form and to a listing page that will show any servers in your account. Our new server will now appear in the list with a status of "Installing". Once it's finished the status will change to "Running" and should look something like this.
Once running, your servers IP address should appear under the server hostname/label. Click to copy it as it will be needed next!
Integrating with ServerAuth
When you login to ServerAuth or create your account, you will seen a screen that looks like this. This is your dashboard and server list, any servers you integrate ServerAuth into will appear here.
Click the center of the content area or the blue "Add A Server" button to get started. You'll have the option to select a server provider or to setup a custom server. More on server providers below in the Easier alternative setup
Select the "Create custom server" option, this will take you into the 3 step process for integrating ServerAuth into your server.
The first step will ask you to select the operating system for your server, we selected Ubuntu 22.04 as that matches what we created in Vultr. Like the "Server Label" in Vultr, you will then be asked to enter a name for the server. This will be used so you can identify the server within the ServerAuth server list. For the purpose of this guide, leave Server Users and tags blank. Click next when you're done.
Step 2, is where we need the IP address you copied earlier, paste that into the first box. Next is the SSH port, as default this is 22 and unless you've changed something on your server, you can leave it as is. The last box is for the SSH username ServerAuth will use to make the initial connection to your server. As default with Vultr, this is root. However, you can click into your server within the Vultr control panel and find the username in the bottom left of the content area.
Below is a screenshot showing our step 2 filled out, hit next when you're done.
When creating the server, we selected a SSH key to install on the server. We do this to avoid connecting to your server via a password which is less secure than using a SSH key that is tied directly to your machine. With this in mind, we're going to select the SSH Connection option on step 3 of this installation flow.
When you select "SSH Connection" option you will be shown your ServerAuth teams SSH key. This is used by our system to authenticate with your server so we can configure it. Copy your teams SSH key and open up your terminal.
SSH into the root user of your new server with the following command, remember to switch out the IP address for your IP.
ssh root@[your-server-ip]
Once you are connected, open up the authorized_keys file for your root user, this can be found at ~/.ssh/authorized_keys.
Use whatever editor you are most comfortable with to open and edit the file. I'm using nano in this tutorial.
nano ~/.ssh/authorized_keys
You will see a SSH key already in the file, this will be the original key you selected during server creation on Vultr. Move the cursor to a new line and paste in your ServerAuth team SSH key and save the file.
Head back to your ServerAuth window, and check the box to confirm you have added the SSH key to your user and click Test Connection. The UI will change to show we are testing the connection and once complete, the UI will change again to show if it was successful or not. If it was successful, you will be able to continue setting up your server, click the "Setup Server" button to continue.
Our systems will start connecting to your server, setting up and configuring all it's options allowing us to help make server management easier for you. You'll be shown an "in progresss" screen with all the steps completed, along with the steps left to complete.
Once complete, you will be automatically be redirected to the server overview screen for your new server! From here you can start to manage your server directly from our Platform.
An easier alternative setup
Want to lighten the task of setting up your server? We have an easier way to create your Vultr server via their API.
First head back to the Vultr Control Panel and click into Account via the left menu and then click into API within the sub left menu. As default the API will be disabled, click the Enable API button to turn it on. The page will reload and your API key will be at the top of the page, copy it to the clipboard.
Further down the page is the Access Control section, from here you can restrict which IP address can access the Vultr API on your behalf, click to allow all IPv4 and IPv6 addresses.
Once enabled, head back to the ServerAuth platform and click into the Teams section via the main menu and then click into Server Providers via the sub menu. You will be shown the form to add a new server provider.
Give the provider a name, if you have multiple Vultr accounts this could be the name or email on the Vultr account so you know the difference. Select Vultr from the provider dropdown. A box will appear to add your API Token. Paste it in then hit save.
Click the Servers link in the top menu and click to Add a Server. You will notice that this page looks slightly different from before as you will now have Vultr as a server provider option.
Click the Vultr provider and you will be taken to a new form and prompted to fill out a name for the server so it can be identified within ServerAuth (and the Vultr, we'll send this name to them via the API). Then select which region you wish to create your server in, these will match the options available in the first step when creating the server within Vultrs control panel.
We've selected London again. Once you select your region, there will be a short delay as we use your API token to retrieve the available server types within that region and the prices from the Vultr API.
Select the server type / price you want, we've opted for the same server type as earlier in the tutorial. 1 core, 2GB ram, 55GB storage for $10 per month (at time of writing). Once selected, you can ignore the rest of the options and click the button to create your server.
You will be presented with a similar processing screen as before, however wording will be slightly different to reflect the different processes now occurring.
In the background, our systems are now talking to the Vultr API and creating your server. Once Vultr has finished creating your server our systems will automatically start configuring your server so it has everything it needs for us to manage your server.
Once complete, you will be redirected to the familiar server details page.
Whichever method of integration you chose, setup is now complete! You can use the left menu to access the various options available and start managing your server like a pro!
Check out our help site for more information or assistance on using parts of the system. Alternatively, if you can't find the answer you're looking for, within the ServerAuth platform, you should see the "Need Help?" link in the header. Use this to get in touch with us and we'll do our best to answer any questions you have!

Posted on April 2, 2024
Join Our Newsletter. No Spam, Only the good stuff.
Sign up to receive the latest update from our blog.


