Create AWS EFS (Elastic File System) Plugin storage for WordPress behind Load Balancer

Salman Sohail
Posted on February 7, 2020
This article is the continuation of WordPress with Docker, AWS (ECS, Code Pipeline, Load Balancer, RDS, EFS) Complete Series. For better understating, please start from the beginning of the series.
Why do we need to use EFS for plugin storage
We all love the fact that on WordPress, we can install plugins without a deployment. Here’s the challenge with this approach, if your WordPress website is behind a Load balancer and there are multiple instances running. You will be installing the plugin only on the instance you are connected to. It will crash for the users who are connected to other instances.
One simpler solution is to deploy the WordPress website again with the plugin included. It takes away the freedom of installing or un-installing a plugin without a redeployment.
AWS Elastic File System (EFS) is our answer, we will simple mount the plugin directory of WordPress instances to our EFS.
Let’s get our hands dirty folks !!!
Create EFS Service
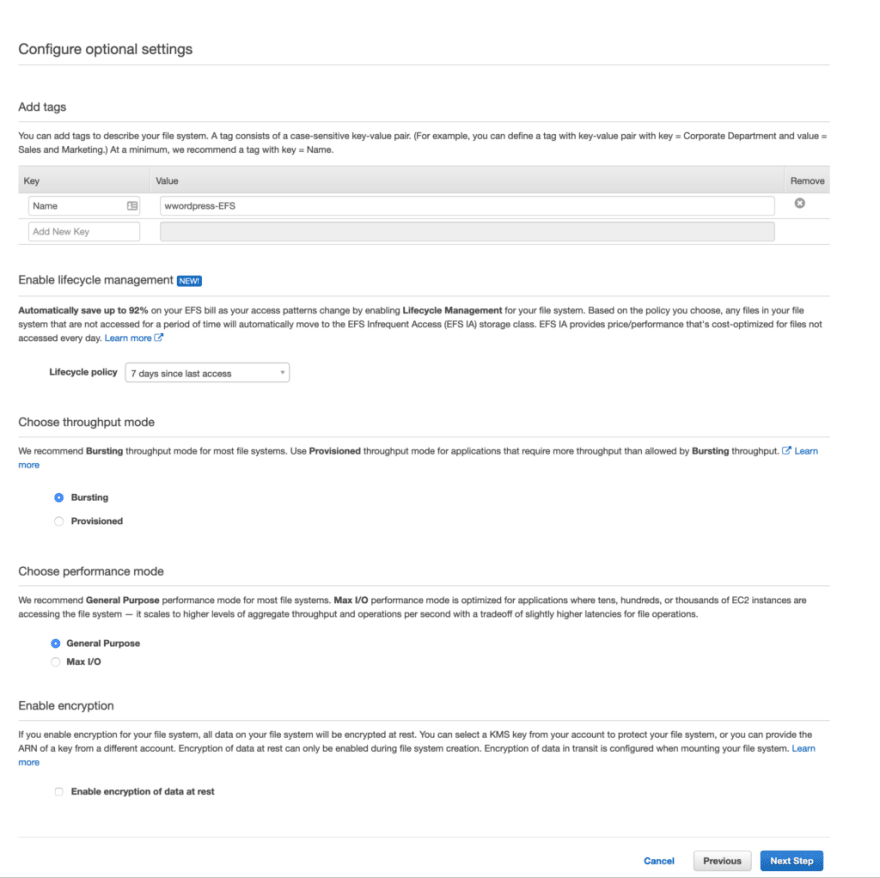
Select EFS from the service tab of your AWS console and click on Create file system
In the security groups we will add efs Security group.
Note: Please use MAX/IO option optimal performance.
Go ahead and finish creating the EFS setup. It will take few minutes for AWS to create our file system.
In the meantime, we will SSH into our Bastian instance and install few things. Please refer to the Prepare AWS Security Groups for WordPress project Connect to Bastian Instance section to connect.
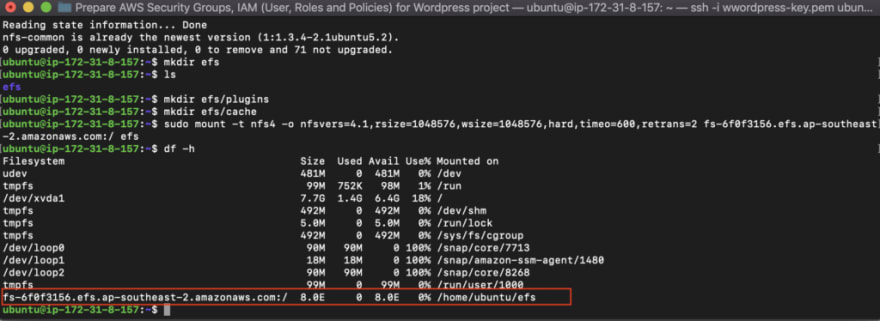
Once you connect to the bastian instance, run the following commands:
sudo apt-get update

sudo apt-get install nfs-common

mkdir efs
mkdir efs/plugins
mkdir efs/cache
We will use the same EFS for our plugins and cache (for SEO optimization later)
Go to your EFS file system and copy the DNS value.
Run the following command
sudo mount -t nfs4 -o nfsvers=4.1,rsize=1048576,wsize=1048576,hard,timeo=600,retrans=2 fs-6f0f3156.efs.ap-southeast-2.amazonaws.com:/ efs
Please replace fs-6f0f3156.efs.ap-southeast-2.amazonaws.com with your own file system DNS name
now run the following command to make sure that the EFS is mounted correctly.
df -h
As I told you earlier, It’ll get easier as we will progress. Our plugins and cache storage in completed !!!!
Previous
Create MYSQL database using AWS RDS
Next

Posted on February 7, 2020
Join Our Newsletter. No Spam, Only the good stuff.
Sign up to receive the latest update from our blog.


