Vidit Shah
Posted on March 13, 2024

The Whole Motive behind this blog is Auth is hard and a bit of pain to set up in AWS Cognito.With All Due AWS Cognito is a great service but has a learning curve.
So, lets learn how to integrate all this stack together
The common assumption you have a Nextjs Project clerk ready and a Users table in DynamoDB in your specific region
I have Users Table deployed with Partition key as ClerkID
So first let's get started with our nextjs Project
Folder Structure lib->actions->user.action.ts
"use server";
import { DynamoDBClient, PutItemCommand } from "@aws-sdk/client-dynamodb";
import { marshall } from "@aws-sdk/util-dynamodb";

export const createUser = async ({
  clerkId,
  name,
  username,
  email,
  picture,
}: {
  clerkId: string;
  name: string;
  username: string;
  email: string;
  picture: string;
}) => {
  const ddbClient = new DynamoDBClient({
    region: process.env.AWS_REGION as string,
    credentials: {
      accessKeyId: process.env.AWS_ACCESS_KEY_ID as string,
      secretAccessKey: process.env.AWS_SECRET_ACCESS_KEY as string,
    },
  });
  const params = {
    TableName: "Users",
    Item: marshall({
      ClerkID: clerkId,
      Name: name,
      Username: username,
      Email: email,
      Picture: picture,
    }),
  };

  try {
    await ddbClient.send(new PutItemCommand(params));
  } catch (err) {
    throw err;
  }
};
As you see this code runs on server so lets update our next config too
next.config.mjs
const nextConfig = {
  experimental: {
    mdxRs: true,
    serverComponentsExternalPackages: [
      "@aws-sdk/client-dynamodb",
      "@aws-sdk/util-dynamodb",
    ],
  }
}
Now the API Post route in your app directory
This all is explained in the Documentation for clerk
Now in our App Directory
app->api->webhook->route.ts
/* eslint-disable camelcase */
import { Webhook } from "svix";
import { headers } from "next/headers";
import { WebhookEvent } from "@clerk/nextjs/server";
import { createUser } from "@/lib/actions/user.action";
import { NextResponse } from "next/server";

export async function POST(req: Request) {
  // You can find this in the Clerk Dashboard -> Webhooks -> choose the webhook
  //
  const WEBHOOK_SECRET = process.env.NEXT_CLERK_WEBHOOK_SECRET;

  if (!WEBHOOK_SECRET) {
    throw new Error(
      "Please add WEBHOOK_SECRET from Clerk Dashboard to .env or .env.local"
    );
  }

  // Get the headers
  const headerPayload = headers();
  const svix_id = headerPayload.get("svix-id");
  const svix_timestamp = headerPayload.get("svix-timestamp");
  const svix_signature = headerPayload.get("svix-signature");

  // If there are no headers, error out
  if (!svix_id || !svix_timestamp || !svix_signature) {
    return new Response("Error occured -- no svix headers", {
      status: 400,
    });
  }

  // Get the body
  const payload = await req.json();
  const body = JSON.stringify(payload);

  // Create a new SVIX instance with your secret.
  const wh = new Webhook(WEBHOOK_SECRET);

  let evt: WebhookEvent;

  // Verify the payload with the headers
  try {
    evt = wh.verify(body, {
      "svix-id": svix_id,
      "svix-timestamp": svix_timestamp,
      "svix-signature": svix_signature,
    }) as WebhookEvent;
  } catch (err) {
    console.error("Error verifying webhook:", err);
    return new Response("Error occured", {
      status: 400,
    });
  }

  const eventType = evt.type;

  console.log({ eventType });
  // write this block by yourself
  try {
    // ... (existing code)

    if (eventType === "user.created") {
      const {
        id,
        email_addresses,
        image_url,
        username,
        first_name,
        last_name,
      } = evt.data;

      try {
        console.log("Creating user...");
        const user = await createUser({
          clerkId: id,
          name: `${first_name}${last_name ? ` ${last_name}` : ""}`,
          username: username!,
          email: email_addresses[0].email_address,
          picture: image_url,
        });
        return NextResponse.json({ message: "OK", user: user });
      } catch (err) {
        console.error("Error creating user:", err);
        return new Response("Error creating user", { status: 500 });
      }
    }

    return new Response("", { status: 201 });
  } catch (err) {
    console.error("Error in API route:", err);
    return new Response("Internal Server Error", { status: 500 });
  }
}
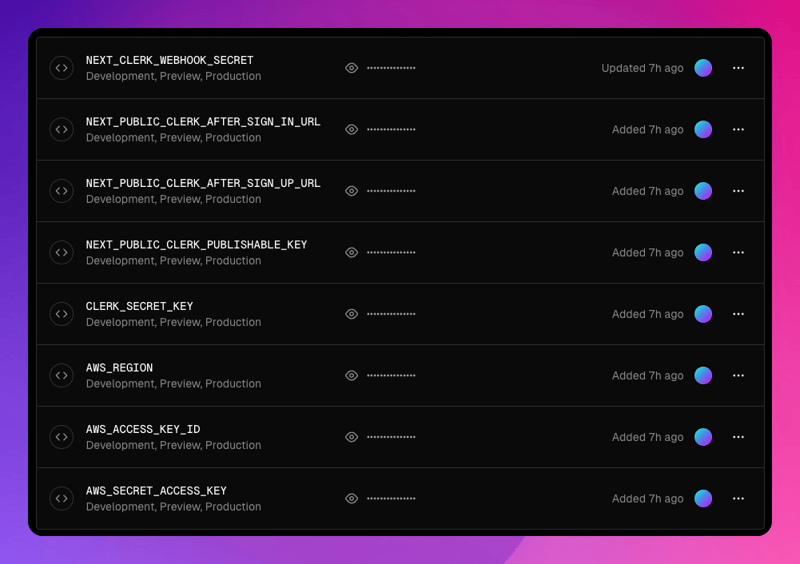
Deploy your website to Vercel or any other provider add your webhook endpoint of the deployed website to the environment variables here are images to do so
eg : www.example.com/api/webhook
Make sure you add NEXT_CLERK_WEBHOOK_SECRET in your .env.local
Here what .env.local should look like when deployed
Taddaa you are all set

Posted on March 13, 2024
Join Our Newsletter. No Spam, Only the good stuff.
Sign up to receive the latest update from our blog.


