Building CI/CD Pipeline using AWS CodePipeline, AWS CodeBuild, Amazon ECR, Amazon ECS with AWS CDK

Petra Barus
Posted on March 23, 2020

This post is part of series Building Modern PHP/Yii2 Application using AWS. In this post, I will demonstrate how to build a CI/CD Pipeline for my code hosted at Github to deploy to our cluster at Amazon Elastic Container Service (ECS). I will use AWS CodePipeline, AWS CodeBuild, and Amazon Elastic Container Registry (ECR) with AWS Cloud Development Kit (CDK) to model the infrastructure.
In my personal experience, it is a good habit to set up Continuous Integration/Continuous Delivery (CD/CD) every time I set up a new project. This will reduce the amount of friction to test every commit in the production/staging environment. That way I can easily detect any code defects earlier, rather when it's too late. Building CI/CD pipeline can be very intimidating and it can have steep learning curve, so a lot of developers will do it at later stage of development. However by using Infrastructure as a Code, developers can easily configure the CI/CD pipeline and moreover they can use the template for next projects.
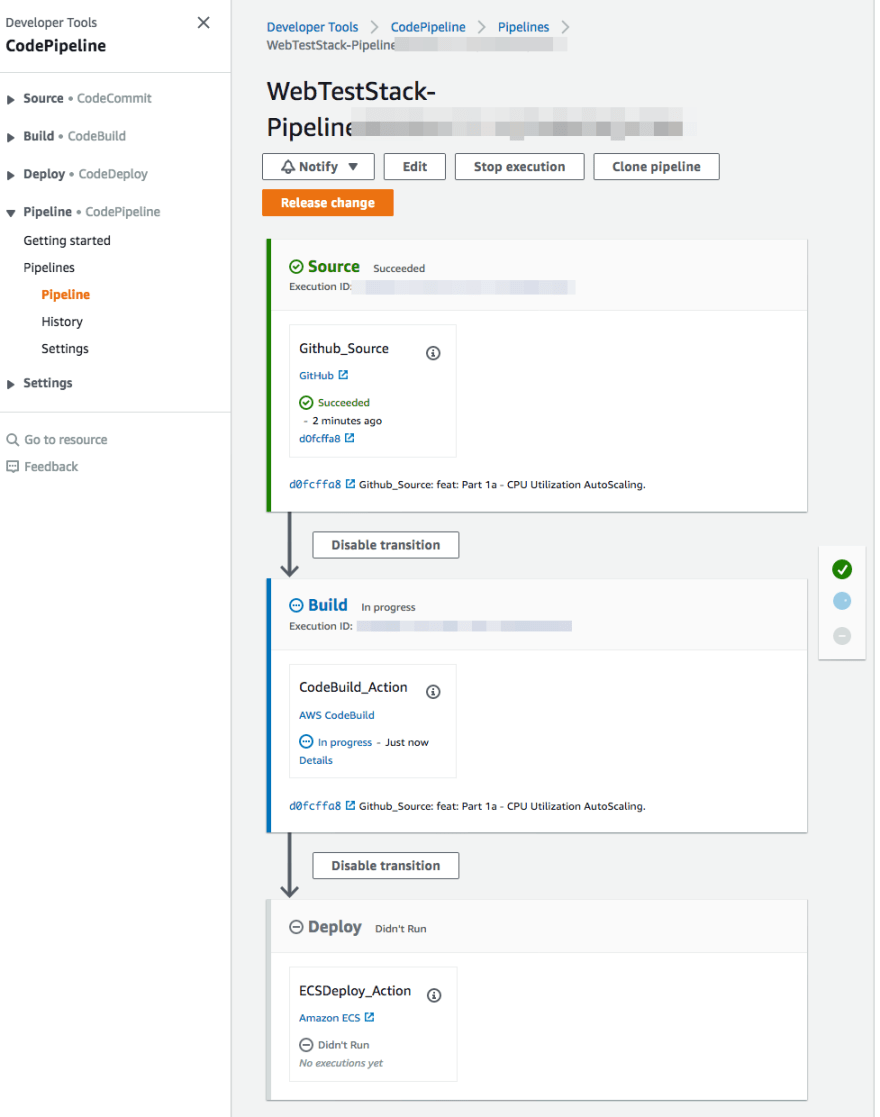
The set up will look like below. We are going to use AWS CodePipeline to model our pipeline. The pipeline itself will have 3 stages: Source, Build, and Deploy.
The first stage Source will fetch the source code from Github and send the artifact to the next stage. Second stage Build will use AWS CodeBuild to run the docker image building from the code artifact and then store the image to Amazon ECR. This stage will output the container name and. the image URL as artifact to next stage. The last stage Deploy will update Amazon ECS to use the new image URL for its container.
Setting Up Github Access
Before we start, we are going to set up access to our Github repository and store it to AWS Systems Manager Parameter Store and AWS Secrets Manager so our pipeline can access the code securely.
STEP 1 Go to Github Settings / Developer settings / Personal access token.
STEP 2 Choose Generate new token.
STEP 3 Fill in the name of the new token. And choose repo permission.
STEP 4 Choose Generate new token
Now we are going to store repository name and owner to the Parameter Store and access token to Secrets Manager. Execute the following commands, replace the owner, repo, and abcdefg1234abcdefg56789abcdefg with your configuration. You also can change the name with easily memorized parameter name.
aws ssm put-parameter \
    --name /myapp/dev/GITHUB_OWNER \
    --type String \
    --value owner

aws ssm put-parameter \
    --name /myapp/dev/GITHUB_REPO \
    --type String \
    --value repo

aws secretsmanager create-secret \
    --name /myapp/dev/GITHUB_TOKEN \
    --secret-string abcdefg1234abcdefg56789abcdefg
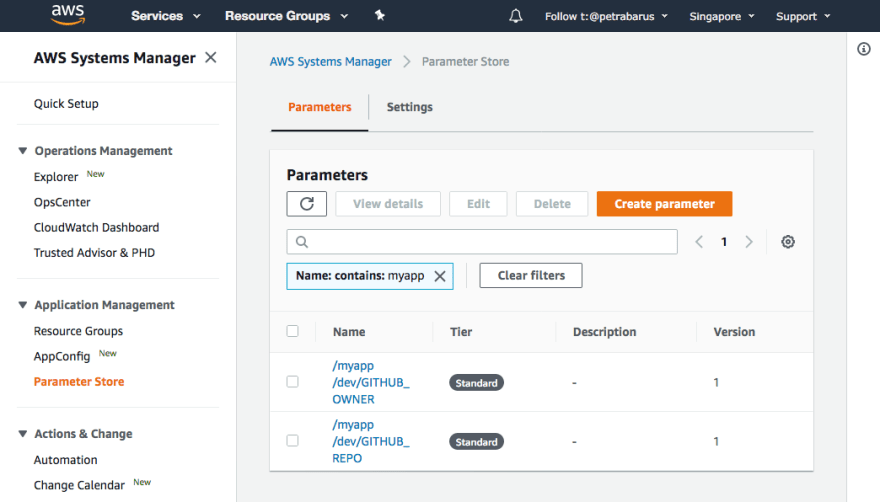
If you access the Parameter Store console, you can see that the parameter is now stored.
Similar if you access to the Secrets Manager console, you can see the secrets is stored.
Creating AWS CDK Code
Now we return back to our code from previous article. Or if you are new, you can access at my Github.
We then need to install couple of CDK dependencies for AWS CodePipeline, AWS CodeBuild, and Amazon ECR. Execute the following command.
npm update

npm install @aws-cdk/aws-codepipeline @aws-cdk/aws-codepipeline-actions @aws-cdk/aws-codebuild @aws-cdk/aws-ecr @aws-cdk/aws-ssm  @aws-cdk/aws-secretsmanager
We are going to refactor the existing WebStack into three Construct, Cluster, WebApp and Pipeline. See the following gist for the code.
https://gist.github.com/petrabarus/8accb7b61f895ff683f07819a2109b67
After this you need to execute following command to deploy.
cdk deploy MyWebAppStack
After deployment finished, you can check the CodePipeline console to see if the pipeline has been created.
Code Explanation
The best thing about AWS CDK that I love is, by using common programming language, I can still practice a lot of best programming best practices that I am already familiar with. With this, it is easier to read the code and explain the code to people.
Cluster Construct
The Cluster construct is fairly simple. It's just creating ECS Cluster. The instance of this construct will be passed to WebApp.
    readonly ecsCluster: ecs.Cluster;

    constructor(scope: cdk.Construct, id: string) {
        super(scope, id);
        this.ecsCluster = new ecs.Cluster(this, 'EcsCluster');
        this.output();
    }
At this point, there is not really a big reason why we need to pull out the ECS Cluster from the WebApp construct other than showing we can demonstrate using multiple construct. But it shows pretty good concept since an ECS cluster can have multiple services inside.
WebApp Construct
This construct is similar to the previous article. It is building a Fargate service (and setting up the autoscaling, since we left it there at previous article). However we refactor the ECS Cluster instantiation part to the Cluster Construct. We also introduce the ECR repository in this construct to store the image.
In the following line, we do three things. First we create the ECR repository, Secondly we give access to the Fargate task execution role to pull the docker image. And third, we get the defined service and container name. We then pass the ECR Repo, service, and container name to the pipeline.
    this.ecrRepo.grantPull(this.fargateService.taskDefinition.executionRole!);
        this.service = this.fargateService.service;
        this.containerName = this.fargateService.taskDefinition.defaultContainer!.containerName;
Pipeline Construct
The pipeline construct is a bit complex, however. We will need the WebApp instance for the constructor. From this we will obtain the ECS Service to update, the container to update, and the ECR repository to store the docker image. After that we call createPipeline to instantiate the CodePipeline Pipeline Construct.
interface PipelineProps {
    readonly webapp: WebApp;
}

class Pipeline extends cdk.Construct {
    private readonly webapp: WebApp;

    readonly service: ecs.IBaseService;
    readonly containerName: string;
    readonly ecrRepo: ecr.Repository;

    public readonly pipeline: codepipeline.Pipeline;

    constructor(scope: cdk.Construct, id: string, props: PipelineProps) {
        super(scope, id);
        this.webapp = props.webapp;
        this.service = this.webapp.service;
        this.ecrRepo = this.webapp.ecrRepo;
        this.containerName = this.webapp.containerName;

        this.pipeline = this.createPipeline();
        this.output();
    }
Pipeline
We create a new Pipeline construct with three stages and two artifacts. The stages are refactored into different methods to make the code more readable. The artifacts will be passed from stage to stage, e.g. the sourceOutput artifact will be output of Source stage and input to Build stage and buildOutput will be output of Build stage and input to Deploy stage.
    private createPipeline(): codepipeline.Pipeline {
        const sourceOutput = new codepipeline.Artifact();
        const buildOutput = new codepipeline.Artifact();
        return new codepipeline.Pipeline(this, 'Pipeline', {
            stages: [
                this.createSourceStage('Source', sourceOutput),
                this.createImageBuildStage('Build', sourceOutput, buildOutput),
                this.createDeployStage('Deploy', buildOutput),
            ]
        });
    }
Source Stage
In the Source stage, we create a GithubSourceAction to fetch the source securely from GitHub. Usually I use AWS CodeCommit as example, but this time I use GitHub because I am storing the code publicly there. To configure the source action, we will need to fetch the configurations that we had set up before. They are the GitHub repo and owner name we stored at Parameter Store and the GitHub token we stored in Secrets Manager. The output artifact will be the code fetched from the GitHub source.
private createSourceStage(stageName: string, output: codepipeline.Artifact): codepipeline.StageProps {
    const secret = cdk.SecretValue.secretsManager('/myapp/dev/GITHUB_TOKEN');
    const repo = ssm.StringParameter.valueForStringParameter(this, '/myapp/dev/GITHUB_REPO');
    const owner = ssm.StringParameter.valueForStringParameter(this, '/myapp/dev/GITHUB_OWNER');
    const githubAction = new codepipeline_actions.GitHubSourceAction({
        actionName: 'Github_Source',
        owner: owner,
        repo: repo,
        oauthToken: secret,
        output: output,
    });
    return {
        stageName: stageName,
        actions: [githubAction],
    };
}
Build Stage
Next stage, the Build stage will receive fetched GitHub code as input artifact and will send artifact output for the Deploy stage.
private createImageBuildStage(stageName: string, input: codepipeline.Artifact, output: codepipeline.Artifact): codepipeline.StageProps {
We created the CodeBuild in the following code. It receives the buildspec and environment definitions. Since we will use docker commands inside the build process, we need to set the privilegedMode as true. We also need to pass the ECR repository URL as environment variable as docker image push destination and container name to write the output artifact.
const project = new codebuild.PipelineProject(
    this,
    'Project',
    {
        buildSpec: this.createBuildSpec(),
        environment: {
            buildImage: codebuild.LinuxBuildImage.STANDARD_2_0,
            privileged: true,
        },
        environmentVariables: {
            REPOSITORY_URI: {value: this.ecrRepo.repositoryUri},
            CONTAINER_NAME: {value: this.containerName}
        }
    }
);
The following line will grant access for the Codebuild to pull or push image to ECR repository.
this.ecrRepo.grantPullPush(project.grantPrincipal);
Method createBuildSpec() will define the build specification for CodeBuild. But alternatively, we can set buildspec.yml in the project directory.
createBuildSpec(): codebuild.BuildSpec {
Following lines will set the runtime configuration and install the required NPM and composer. We need runtime nodejs and php to do both.
install: {
    'runtime-versions': {
        'nodejs': '10',
        'php': '7.3'
    },
    commands: [
        'npm install',
        'composer install',
    ],
},
In the following lines, we configure docker to access ECR and create tag name for tagging the docker image version we are going to build.
'aws --version',
'$(aws ecr get-login --region ${AWS_DEFAULT_REGION} --no-include-email |  sed \'s|https://||\')',
'COMMIT_HASH=$(echo $CODEBUILD_RESOLVED_SOURCE_VERSION | cut -c 1-7)',
'IMAGE_TAG=${COMMIT_HASH:=latest}'
The following lines will build the docker image, tag it, and push to ECR.
'docker build -t $REPOSITORY_URI:latest .',
'docker tag $REPOSITORY_URI:latest $REPOSITORY_URI:$IMAGE_TAG',
'docker push $REPOSITORY_URI:latest',
'docker push $REPOSITORY_URI:$IMAGE_TAG',
Finally, the last lines will generate a file named imagedefinitions.json in the root project that we call as Image Definitions File. It contains JSON with the container name and the repository URI pair. This file will be the output artifacts of the Build stage and passed to the Deploy stage.
            'printf "[{\\"name\\":\\"${CONTAINER_NAME}\\",\\"imageUri\\":\\"${REPOSITORY_URI}:latest\\"}]" > imagedefinitions.json'
        ]
    }
},
artifacts: {
    files: [
        'imagedefinitions.json'
    ]
}
Deploy Stage
The last stage, the Deploy stage will receive the imagedefinitions.json artifact and then deploy it to ECS using the ECSDeployAction.
    createDeployStage(stageName: string, input: codepipeline.Artifact): codepipeline.StageProps {
        const ecsDeployAction = new codepipeline_actions.EcsDeployAction({
            actionName: 'ECSDeploy_Action',
            input: input,
            service: this.service,
        });
        return {
            stageName: stageName,
            actions: [ecsDeployAction],
        }
    }
Main Application
The main CDK application now will contain WebStack that will simply call all the previous constructs.
    const cluster = new Cluster(this, 'Cluster');
    const webapp = new WebApp(this, 'WebApp', {
        cluster: cluster
    });
    const pipeline = new Pipeline(this, 'Pipeline', {
        webapp: webapp
    })
NOTE If you are still experimenting, don't forget to execute cdk destroy to avoid extra cost.
That is all for now. It is pretty long one. I hope you enjoy the explanation. Again, this post is part of series Building Modern PHP/Yii2 Application using AWS. If you have any interesting ideas, please post in the comment section. See you in the next post.

Posted on March 23, 2020
Join Our Newsletter. No Spam, Only the good stuff.
Sign up to receive the latest update from our blog.


