Modern Software Development Tools and oneAPI Part 3

Sriram Ramkrishna
Posted on February 28, 2023

This is the third part in the series. Part 1 is here and Part 2 is here.
Welcome to the third, and likely the final, post in this blog series! To recap, in the last blog post we talked about build systems particularly meson Before that, we talked about building a container that contains the pure open source elements of the oneAPI developer environment and use it to build a simple oneAPI SYCL program.
In this post, we're going to take our key learnings from the last two blog posts and use them to build a true user-friendly experience where you can write code using a modern IDE and compile and run them inside a container like you might be used to on other platforms like Windows and MacOS.
First, allow us to introduce you to this modern IDE - 'GNOME Builder'. GNOME Builder is an IDE developed for GNOME desktop. It is integrated to be able to write GNOME and GTK applications easily with all the modern features one would expect from a IDE, and then some.
It has an impressive set of features - the author, Christian Hergert, wrote it because he was [frustrated (https://foundation.gnome.org/2015/01/09/interview-with-christian-hergert-about-builder-an-ide-for-gnome-2/) with the state of IDEs on the Linux platform. GNOME Builder is not just an IDE, but a complete showcase of what a non-trivial application written in GNOME can do.
This blog post is about oneAPI - why use an IDE that is optimized for using GNOME to build applications?
Great question. The desktop ecosystem (GNOME and KDE has been focused on distribution of apps through a container technology called flatpak. Flatpak allows you to have an runtime that contains everything to run a GNOME (or KDE) application. There is an associated SDK that contains all the tools needed to build the application. GNOME Builder is the first IDE that integrates this idea of containerized applications into the user experience. With Builder, you only need the application - you don't need a compiler, profiler, or development libraries - it integrates all that inside a container. This means that you don't need to think about how to setup a developer environment for any GNOME application.
The containers in the past have been flatpak based containers. But it turns out that you can leverage GNOME Builder to use any container created by podman, toolbox, or distrobox.
In essence, the first blog post in this series mimicked what flatpak already does: which is a container that contains everything you need to build an oneAPI application/program instead of a GNOME one.
In a bit of circularity that you might find amusing - we will use flatpak to get the application and then use another comtainer to build our sample application that uses Meson.
If you have not read the first two blog posts, this might be a good time to stop and read those first because we'll be using the container we created in the first blog post and the build system we used in the second blog post. It's also important you use a distro like Fedora or openSUSE that supports flatpak out of the box.
With the pre-requisites out of the way, let's first start by installing GNOME Builder. You can use any desktop you want, but I will be using GNOME here as it is what I usually run, please translate accordingly.
Here are the steps:
- First make sure you add the flathub flatpak respository:
$ flatpak remote-add --if-not-exists flathub https://flathub.org/repo/flathub.flatpakrepo
- Install GNOME Builder:
$ flatpak install flathub org.gnome.Builder
- Run GNOME builder either through your desktop launch options. For GNOME, hit the meta key (usually Windows key) and then type in "Builder" - GNOME Builder should be your first, and likely only, option. You can also run it from the command line:,
$ flatpak run org.gnome.Builder
You should now have GNOME Builder running on your machine!
Creating a Project
The first step is to create a project.
Select "Create New Project..."
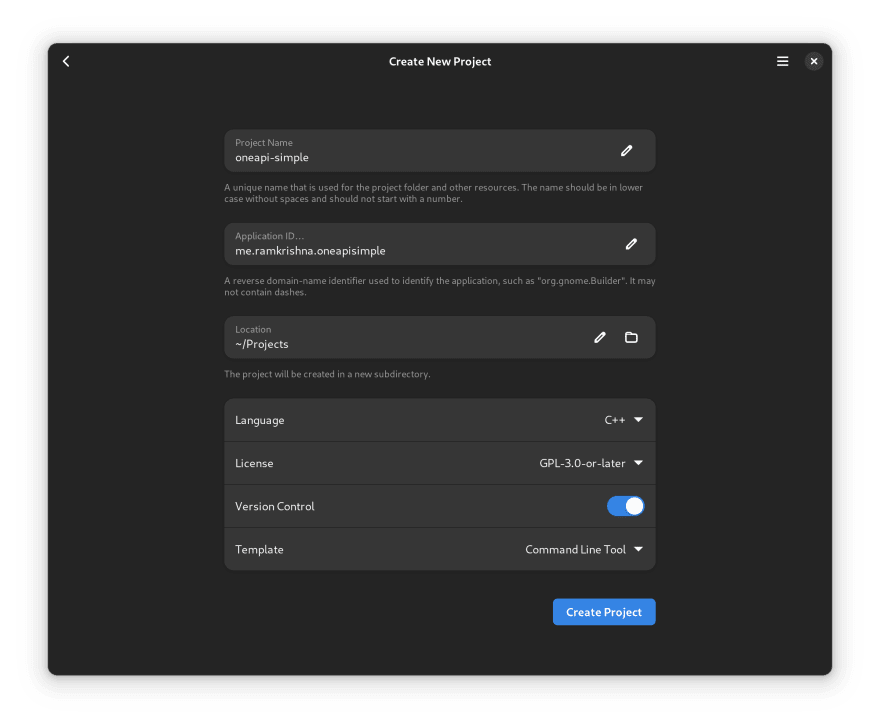
You will be presented with a new screen where you put in the details for the project. Let's call our project "oneapi-simple".
Next we need to select the application-id. Application-ids are generally a reverse DNS type of string usually based on a hostname. I have my own domain, so I usually use that. But you can use whateer you like. In this case, I am going to use me.ramkrishna.oneapisimple.
We want to use C++, so under Language change it to C++. Note that the Template section has now changed to 'Command Line Tool' Which is exactly what we want.
Here is a filled-out screenshot of the window from Builder:
We now create the project! Selected the "Create Project" and we are now ready to continue.
GNOME Builder has two sections - the sidebar and the main editor window. The side bar will have our files and so click on "src" and you should see two files - main.cpp and meson.buid.
Setup the build system
You will notice that the project is already set up to use meson by default. Meson is the preferred build system for GNOME. Meson was created by someone from the GNOME community and thus is already well trusted.
In the application space, meson has proven to be quite popular replacement for autotools.
Let's leave main.cpp alone for now, and focus on meson.build. If you click on meson.build, you'll see that it looks like this:
oneapi_simple_sources = [
  'main.cpp',
]

oneapi_simple_deps = [
]

executable('oneapi-simple', oneapi_simple_sources,
  dependencies: oneapi_simple_deps,
  install: true,
)
This meson.build is set up to compile a generic project with the g++ compiler. So that's not going to work. If you read the previous blog post, we went through what we would need to make it work with the SYCL compiler.
Replace the contents of meson.build with this:
simple_oneapi_sources = files('main.cpp')

simple_oneapi_deps = [
]

executable('simple-oneapi', simple_oneapi_sources,
  link_args:'-fsycl',
  cpp_args:'-fsycl',
  dependencies: simple_oneapi_deps,
  install: true, install_dir: '/var/home/sri/Projects/oneapi-simple/bin'
)
For the SYCL compiler, we need some extra linker flags. We're actually missing something even more important and that's the setup for the compiler itself!
Click on the 'meson.build' file in the top level - which should be right next to the 'COPYING' file. You'll notice that every time you open a new file, it creates a new tab in the editor view. You can easily switch to each file by clicking on the tab.
Let's take a look at it. It should look like this.
project('oneapi-simple', ['cpp', 'c'],
          version: '0.1.0',
    meson_version: '>= 0.59.0',
  default_options: [ 'warning_level=2', 'werror=false', 'cpp_std=gnu++2a', ],
)

subdir('src')
The important part here is that we are identifying that this project is C++. All of this is correct and there is nothing more to be done.
Set up our source
Now, that we have the build set up. It's time to replace the code in main.cpp. Currently, the code looks like:
#include <iostream>

int main() {
    std::cout << "Hello World\n";

    return 0;
}
We are going to replace it with:
#include <sycl/sycl.hpp>

int main() {
  // Creating buffer of 4 ints to be used inside the kernel code
  sycl::buffer<sycl::cl_int, 1> Buffer(4);

  // Creating SYCL queue
  sycl::queue Queue;

  // Size of index space for kernel
  sycl::range<1> NumOfWorkItems{Buffer.size()};

  // Submitting command group(work) to queue
  Queue.submit([&](sycl::handler &cgh) {
    // Getting write only access to the buffer on a device
    auto Accessor = Buffer.get_access<sycl::access::mode::write>(cgh);
    // Executing kernel
    cgh.parallel_for<class FillBuffer>(
        NumOfWorkItems, [=](sycl::id<1> WIid) {
          // Fill buffer with indexes
          Accessor[WIid] = (sycl::cl_int)WIid.get(0);
        });
  });

  // Getting read only access to the buffer on the host.
  // Implicit barrier waiting for queue to complete the work.
  const auto HostAccessor = Buffer.get_access<sycl::access::mode::read>();

  // Check the results
  bool MismatchFound = false;
  for (size_t I = 0; I < Buffer.size(); ++I) {
    if (HostAccessor[I] != I) {
      std::cout << "The result is incorrect for element: " << I
                << " , expected: " << I << " , got: " << HostAccessor[I]
                << std::endl;
      MismatchFound = true;
    }
  }

  if (!MismatchFound) {
    std::cout << "The results are correct!" << std::endl;
  }

  return MismatchFound;
}
OK - now we have everything. But we can't quite compile yet. Right now, if you tried to compile this - it won't work. The reason is, the build is currently set up for native build'. Which means it will try to use the toolchain on the host system. On the host system, we don't have any of the oneAPI libraries or the SYCL compiler. So it won't find anything. Everything we wanted is encapsulated in a container.
This is why GNOME Builder is especially suited to do this exercise on Linux because you set the run and build environment to any podman (or docker) container.
Set the build and run environment to our SYCL container.
Refer to the
first
blog post on how to setup the build and run container.
In that blog post, we named our container - 'oneapi'. It should container the SYCL compiler that we
built and all the accompanying libraries to build our simple SYCL program.
To set the build type - we need to move our cursor to the widget at the top in the center next to the
hammer icon. Click on the down arrow, and then select 'Configure Project', there is a keyboard shortcut
"alt+," (hold alt and then comma) and the window should pop up.
Select "Default" at the bottom of the dialog box.
Under Build Environment, you want to change that from 'Host Operating System' to 'oneapi'. If 'oneapi',
does not appear on your list of choices then you have not created the container using distrobox. You
should refer to the first blog post in the series for testing.
At this point, we have our build system using our container - but we aren't done yet. The problem now is
that the build system will explicitly use c++ instead of the SYCL compiler. To override using the native toolchain, we generally use an environmental variable. This is generally not recommended but for sake of simplicity, we will use it for now. In another blog post, we can revisit the issue. For the impatient, it requires that you use the native file feature of meson - see https://mesonbuild.com/Machine-files.html.
For now, we will use Builder's ability to set shell environment variables to set the CXX and other
critical environment variables.
Click on 'Add Variables' and set the following key value pairs (be sure to replace the paths to the
correct paths):
DPCPP_HOME=/var/home/your_login/src/dpcplusplus
PATH=/usr/bin:/usr/sbin:/usr/local/bin:/home/yourlogin/bin:/home/yourlogin/.local/bin:/var/home/yourlogin/src/dpcplusplus/llvm/build/bin
LD_LIBRARY_PATH=/var/home/yourlogin/src/dpcplusplus/llvm/build/lib
CC=clang
CXX=clang++
Your config should look like this:
The environment variables that are set are mirrored from the environment variables we had to set when we set up a simple oneapi codebase inside the container in the first blog post. We are merely recreating it.
At this point, you can click on the "hammer" icon and GNOME Builder should proceed to properly build the source code. It will give two warnings that you can safely ignore at this point.
To execute the program, you need to hit the right pointing triangle(it looks like a "play" button) and it will try to execute it.
You'll note that it was not able to execute.
That's becasue when it is running it doesn't set the LD_LIBRARY_PATH
inside the container. Since build environment is using non-standard paths we have to do a trick to set everything up so that it can find the libraries it needs.
So, to mitigate that we need to create a wrapper script that will set the LD_LIBRARY_PATH before executing. In another blog post, we will work on something a litte more clever. This will do for now.
Let's call the script 'run-oneapi.sh'. Here is the very simple code for it:
#!/bin/sh
export LD_LIBRARY_PATH="/var/home/sri/src/dpcplusplus/llvm/build/lib"
exec /var/home/sri/Projects/oneapi-simple/bin/oneapi-simple
Install it somewhere within your PATH environment. I have mine in ~/Projects/oneapi-simple/bin where the
run time binary gets built and installed.
Once you have that, you need to let builder know how to run it.
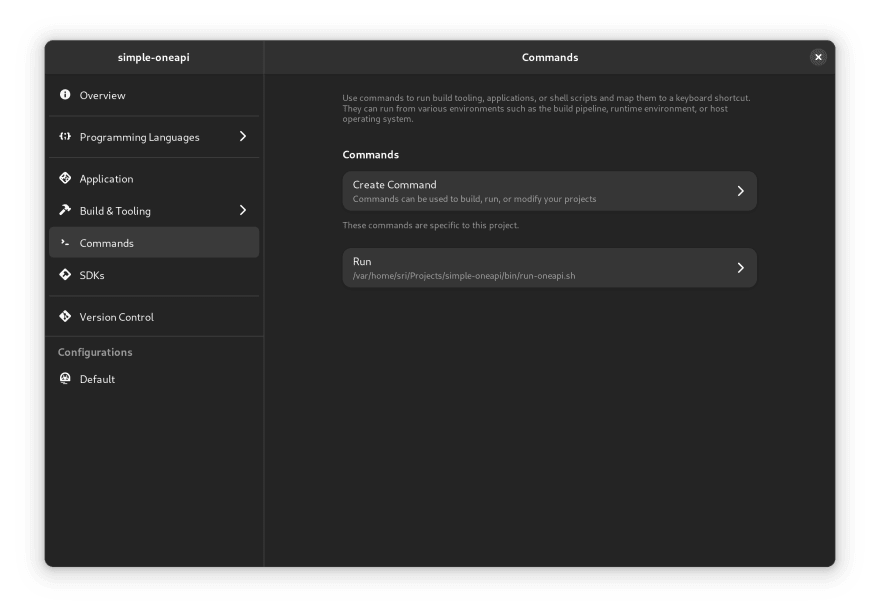
The first step is to go back to the build configuration menu, use the keyboard shortcut ALT-, and then select "Command" on the far left column.
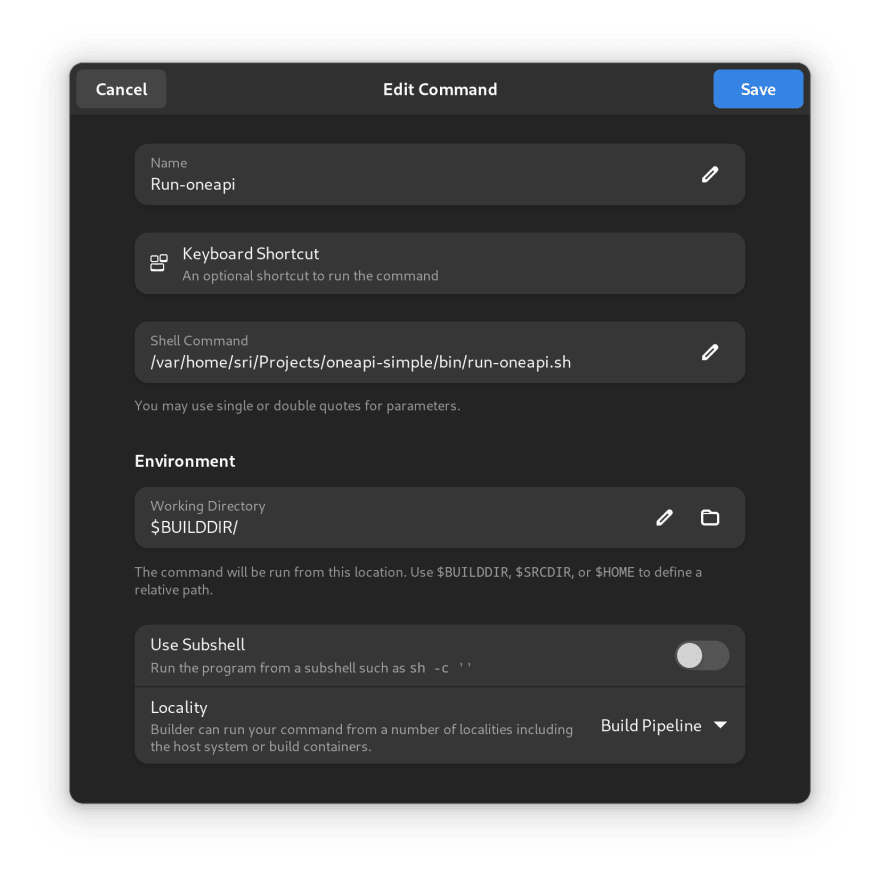
Select "Create Command" and then fill in the dialog box like this:
Once you've added that, you are ready to configure the run command to use this script.
Click on 'Applications'
On the first line you'll see "Run Command" which will be set to "Automatically Discover". Use the drop down list to select "Run-oneapi".
Close the dialog box, and you will now have setup Builder to build and run. Since, everything is already cached. You will need to re-run the build.
Select the drop down list next to the hammer icon and select "Rebuild". This will rebuild the source from scratch and clear out all the cache.
You will now be setup to run.
Click on the play icon next to the hammer icon and it should now properly build and run.
Congratulations - you have now succesfully set up building an oneAPI build on GNOME Builder.
There are a lot of ways to go from here. I would love to hear if anybody actually set this up and give some feedback on whether you were able to make this work and what further plans you have.
There are definitely some improvements that need to be done. Since this set up doesn't actually work to ship an application.
This ends third in the series. I might revisit. I would love to get feedback, improvements and whether you all are hacking code using GNOME Builder!

Posted on February 28, 2023
Join Our Newsletter. No Spam, Only the good stuff.
Sign up to receive the latest update from our blog.


