PHP Authentication: Implementing Access Token

Oghenekparobo
Posted on March 7, 2024

Security is a major and necessary step in ensuring that sensitive information is protected. In this article, we shall navigate through the traditional approach of employing the HTTP Authorization request header and delve into the utilization of the "Bearer Token" format. We will also see how we can create or use an access token to keep our data secure.
Syntax:
Authorization: Bearer <access-token>
In a previous article, I explored an alternative authentication method called the "API Key" You can access the article through this link.
PERQUISITES
It is essential to possess a strong understanding of PHP operations. If you lack this foundational knowledge, fear not; you can follow along with this article to gain familiarity and proficiency as you code. Additionally, you will require the following tools:
Git and GitHub for cloning repositories.
A web server to set up your database and test your APIs.
A code editor for writing your code, of course.
Further necessary tools will be introduced as needed throughout the course.
SETTING UP OUR PROJECT
We will interact with our database by creating one named "college," which consists of two tables: "students" and "users." Additionally, we also have a registration frontend to manage user profiles. You can clone the repository from the following link: [https://github.com/Oghenekparobo/PHP-AUTHENTICATION-TUTORIAL/tree/access-token-temp].
Make sure you're on the "access-token-temp" branch before proceeding. Follow these steps to switch to the branch after cloning:
- Clone the repository by executing the following command in your terminal or command prompt:
git clone https://github.com/Oghenekparobo/PHP-AUTHENTICATION-TUTORIAL.git
- Once the cloning process is complete, navigate to the project directory. You can do this by using the cd command followed by the path to the project directory. For example:
cd C:\xampp\htdocs\PHP-AUTHENTICATION-TUTORIAL
- After navigating to the project directory, switch to the access-token-temp branch using the following command:
git checkout access-token-temp
Ensure you follow these steps meticulously to ensure you're working on the correct branch.
OUR PROJECT CONTENTS
After successfully setting up our project, you'll observe that certain packages come pre-installed. One of these packages is vlucas/phpdotenv. This package serves the purpose of facilitating the loading of .env variables within your projects. These variables, stored in a file named '.env', allow for the configuration of various settings without hardcoding them directly into your code. Instead, you can define environment-specific variables such as database credentials, API keys, or any other sensitive information in the .env file, providing a more flexible and secure approach to configuration management.
COMPOSER
Our project template is equipped with Composer and an autoload class pre-installed. This inclusion in the repository streamlines the setup process, particularly for this access-token course. Composer, a dependency manager for PHP, simplifies the integration of external libraries and ensures efficient autoloading of classes. It plays a pivotal role in managing project dependencies, enabling developers to focus more on implementation rather than manual library management. If you're unfamiliar with Composer or need guidance on its installation, refer to the following link for detailed instructions: [https://getcomposer.org/] and this article for more details on the setup of the packages in this project.
Uploading SQL File to PHPMyAdmin
You'll find a college.sql file located in the root directory of our project. This file contains the database structure and data that we will be using. We will import this file into our web server, specifically using XAMPP for this project. However, you can opt for any web server of your preference for the setup. We will utilize PHPMyAdmin, a MySQL database administration tool, to manage and interact with our database effectively.
Here are the steps to upload an SQL file to PHPMyAdmin:
- Open PHPMyAdmin: Open your web browser and navigate to PHPMyAdmin. This typically involves entering the URL in the address bar (e.g., http://localhost/phpmyadmin/) and logging in if required.
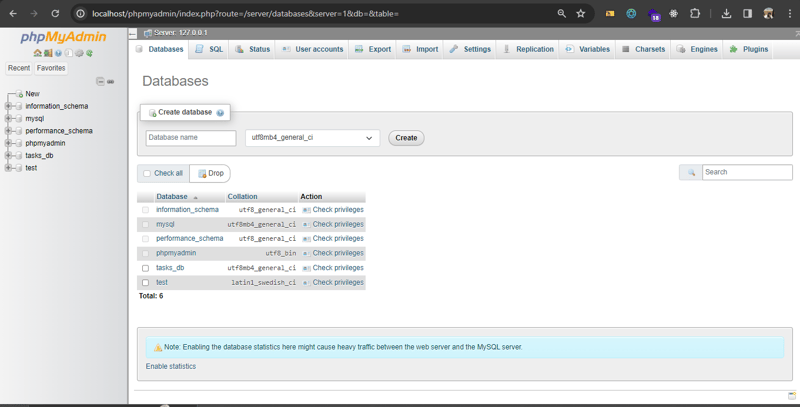
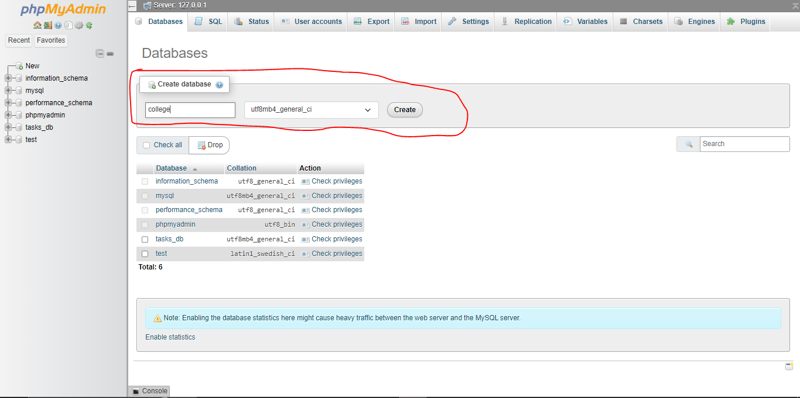
- To create a new database in PHPMyAdmin, navigate to the PHPMyAdmin dashboard and locate the "New" button. Click on it to initiate the database creation process. In our scenario, we will name the database college.
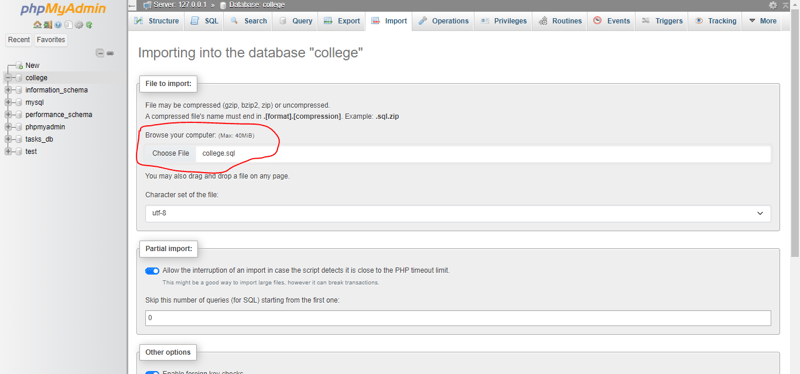
After creating the database, locate the "Import" tab in the section of our newly created DB, in the top menu bar and click on it to proceed with the import process.
Upload SQL File: On the Import page, you'll find an option to upload files. Click on the "Choose File" button and locate the SQL file you want to import from your local system.
Initiate Import: After selecting the SQL file and configuring any necessary settings, click on the "Go" or "Import" button to initiate the import process.
PHPMyAdmin will now process the SQL file and import its contents into the selected database. Depending on the size of the file and server performance, this process may take some time. Be patient and wait for the import to complete.
You will also notice the student table is already populated.
PROJECT STRUCTURE
Now that we've created our database, let's delve into our project structure and set up our classes while establishing the connection to our database.
api folder
In the "api" folder, you'll find two key files: "bootstrap.php" and "index.php." This folder serves as the central point where incoming requests are directed. Additionally, we will create a "login.php" file responsible for generating access tokens for authenticated users already present in the database. These tokens will enable access to student data.
In "bootstrap.php," we start by loading necessary dependencies using Composer's autoloading feature. We also configure environment variables using the Dotenv library. Error and exception handling mechanisms are set up to ensure smooth operation. Moreover, database connection details are initialized using the provided environment variables.
Moving to "index.php," we continue by requiring "bootstrap.php" to ensure all dependencies are loaded. Then, we initialize instances of essential classes like "User," "Authenticate," "Gateway," and "Controller." These classes facilitate user authentication, database operations, and request processing, ensuring efficient handling of incoming requests.
In summary, the "api" folder acts as the nerve center for directing requests. "bootstrap.php" sets up essential dependencies and environment variables, while "index.php" initializes necessary class instances for user authentication, database access, and request processing.
src folder
The "src" folder houses crucial classes responsible for user authentication, database access, and request processing.
SETTING UP OUR DATABASE CONNECTION
Our Database.php class is responsible for handling the connection to our MySQL database. Using PHP's PDO extension ensures secure interaction with the database. The class constructor initializes connection parameters like the host, database name, user, and password. The getConnection method ensures that only one connection instance is created and returns it. If no connection exists, it creates a new PDO instance with the provided details and configures error handling attributes for robust error reporting. This class is essential for enabling smooth communication between our application and the database.
`<?php
class Database
{
private ?PDO $conn = null;
public function __construct(
    private string $host,
    private string $name,
    private string $user,
    private string $password
) {
}

public function getConnection(): ?PDO
{
    try {
        if ($this->conn === null) {
            $this->conn = new PDO("mysql:host=$this->host;dbname={$this->name}", $this->user, $this->password);
            $this->conn->setAttribute(PDO::ATTR_ERRMODE, PDO::ERRMODE_EXCEPTION);
            $this->conn->setAttribute(PDO::ATTR_EMULATE_PREPARES, false);
            $this->conn->setAttribute(PDO::ATTR_STRINGIFY_FETCHES, false);
        }


        return $this->conn;
    } catch (PDOException $e) {
        echo "Connection failed: " . $e->getMessage();
        return null;
    }
}
}`
Note: Accessing our API endpoint using any API tool, such as Postman, will retrieve all student data. This setup is integrated into our project template, with data access not guarded by the access token mechanism yet.
register.php
This file makes sure everything needed to create a user is in place, starting by adding the necessary tools through Composer. When we fill the signup form, the file gets the details needed to connect to our database, Once it's connected, it takes care of encrypting passwords before saving them. The signup form itself is designed to be easy to use, with a little extra style to make it look nice.
Note: Registering a user is essential as the provided user details will be utilized to generate an access token on the login endpoint as we progress further, so register a user!
Don't worry, the moment we are waiting for is here! remember, it's not the swift that wins the race.
CREATING AN ACCESS TOKEN
To create an access-token, we will implement a login endpoint in our api folder. the link login.php contains the content of this file.
the login process for accessing an API endpoint is meticulously handled. Firstly, it verifies whether the HTTP request method is POST. If not, it responds with a "405 Method Not Allowed" status code and specifies that only POST requests are permitted. Subsequently, the script ensures that the content type of the request is JSON; otherwise, it returns a "415 Unsupported Media Type" status code along with a message indicating that only JSON content is supported.
Moving forward, the script decodes the JSON data received from the request's body. If the JSON data is invalid, it returns a "400 Bad Request" status code, indicating invalid JSON data. Then, it checks if both the username and password are included in the decoded data. If any of the credentials are missing, it responds with a "400 Bad Request" status code and a message indicating missing login credentials.
After validating the provided credentials, the script retrieves user data from the database based on the provided username using the getByUsername method from the UserGateway class. If the user does not exist or the password is incorrect, the script returns a "401 Unauthorized" status code and a message indicating invalid authentication.
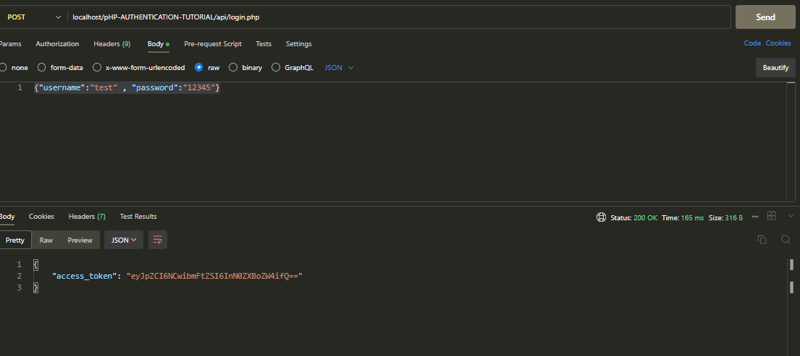
If the authentication process is successful, the script constructs a payload containing the user's ID and name. This payload is then encoded in JSON format and base64-encoded to generate an access token. Finally, the script returns the access token as a JSON response, containing the encoded payload.
NOTE: To access our endpoint, your URL should resemble the following: localhost/PHP-AUTHENTICATION-TUTORIAL/api/login.php. This structure assumes that you've cloned the project with an identical project structure. However, if your project is named differently, ensure that you navigate accordingly to the correct directory.
Testing the endpoint with the correct credentials, for example, will yield the following outcome:
congratulations! for getting to this point!
SECURING OUR STUDENT DATA
To access student data in accordance with the project structure, you would fire the endpoint localhost/PHP-AUTHENTICATION-TUTORIAL/api/index.php or simply localhost/PHP-AUTHENTICATION-TUTORIAL/api/. Initially, you would retrieve user data without any restrictions. However, to enhance security measures, an authentication parameter with a Bearer token must be passed through the header by an authenticated user before accessing the data.
Now to implement this we will simply create an authenticateAccessToken function in our Authenticate class.
IMPLEMENTING authenticateAccessToken in our Authenticate Class
The authenticateAccessToken function is like a security guard for our PHP application. It carefully checks access tokens provided in the HTTP Authorization header to make sure they're valid. It starts by looking at the header to see if it follows the right format. If not, it lets us know something's missing or wrong. Then, it decodes and checks the token to make sure it's not damaged or incorrect. If everything looks good, it lets us know the token is valid, allowing access to protected parts of our app.
`public function authenticateAccessToken(): bool
{
if (!preg_match("/^Bearer\s+(.*)$/", $_SERVER["HTTP_AUTHORIZATION"], $matches)) {
http_response_code(400);
echo json_encode(["message" => "incomplete authorization header"]);
return false;
}
    $plain_text = base64_decode($matches[1], true);

    if ($plain_text === false) {

        http_response_code(400);
        echo json_encode(["message" => "invalid authorization header"]);
        return false;
    }

    $data = json_decode($plain_text, true);


    if ($data === null) {

        http_response_code(400);
        echo json_encode(["message" => "invalid JSON"]);
        return false;
    }

    return true;
}`
NOTE: Depending on your PHP configuration, $_SERVER["HTTP_AUTHORIZATION"] may not function as expected in your application. However, there's no need to worry as an alternative method involves utilizing apache_request_headers(). Additionally, you can enable $_SERVER["HTTP_AUTHORIZATION"] by adding a .htaccess file to your api folder within the project. This .htaccess file should include the following lines:
RewriteEngine On

RewriteCond %{REQUEST_FILENAME} !-f

RewriteCond %{REQUEST_FILENAME} !-d

RewriteCond %{REQUEST_FILENAME} !-l

RewriteRule . index.php [L]

SetEnvIf Authorization "(.*)" HTTP_AUTHORIZATION=$1
After adding the following apache configuration, this would work as expected.
FINALLY
Finally let us add our authenticateAccessToken to our entry point for getting our student data which is the index.php, we call it in our index.php file in our api folder:
if (!$auth->authenticateAccessToken()) {

    exit;

}
** let us test by various instances to get our expected outcomes:**
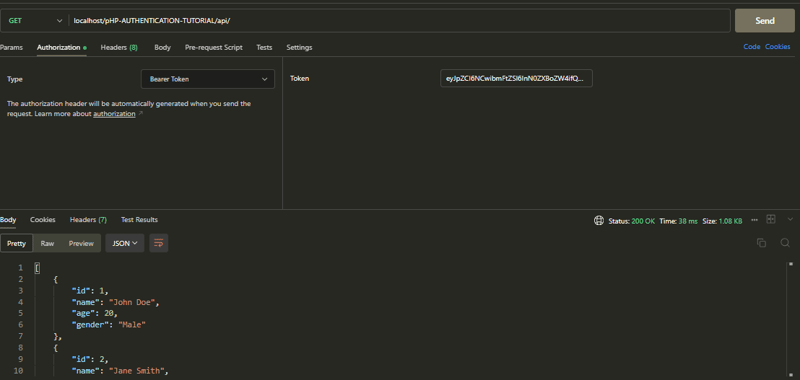
Note: we register a user in the provided frontend interface(register.php) and pass the username and password in the right JSON format to the login endpoint to get our access token, then pass our access token through the header:
Authorization: Bearer access-token to our index.php get our data from the student table.
- Without passing an authorization header, expected outcome:
![Without passing an authorization header(https://dev-to-uploads.s3.amazonaws.com/uploads/articles/6gjqnb7mkgdfe3jjd42b.PNG)
2.With Authorization header:
CONCLUSION
Access Tokens are encoded string that contains the user data or information so we don't have to look it up in the database, this way we don't have to check the database upon every requests, especially in cases where we have complex and multiple endpoints.
final code: [https://github.com/Oghenekparobo/PHP-AUTHENTICATION-TUTORIAL/tree/access-token-final]

Posted on March 7, 2024
Join Our Newsletter. No Spam, Only the good stuff.
Sign up to receive the latest update from our blog.
