How low-coding saves costs, money and your nervous system. Acure.io example

Nik Gan
Posted on May 23, 2022

There are many articles describing how AIOps systems help solve business problems. But not only managers have demands. Increasingly, when creating a product, developers of IT systems turn to the needs of those who will work with this product — IT specialists who will have to implement, maintain and, if necessary, modify systems in the future. Therefore, recently developers often make a choice in favor of a low code engine.
Less code — less cost
Low-code is a software development approach with modeling in a graphical interface and minimal hand-coding. Just drag and drop visual blocks to build the script. With low-code, you can easily improve applications, set up integrations and create automation scenarios without writing hundreds of lines of complex code.
Gartner estimates that low-code will be responsible for more than 65% of application development activity by 2024. No wonder. Low-code saves costs and time for development. There is no need to involve extremely expensive implementation teams to set up the system and maintain it further or wait until the vendor rolls, tests, rolls back, tests and releases a feature. IT generalists without special programming skills can easily do it by themselves.
What about Acure, we keep up with the times too and recently implemented low-code engine. In this article I want to show how low code is realized on our platform.
CMDB Autodiscovery
With the help of automation scripts in Acure, users can significantly expand the functionality of the system. The new service is built into the existing system, allowing you to create arbitrary event processing pipelines. The new automation functionality, built on the low-code visual programming engine and its own scripting and execution system, allows users to create arbitrary event processing scenarios using visual blocks and establishing links between them.
Scenarios can be both custom and supplied by the developers themselves as full-fledged services. The interaction between services in the future will be determined by setting up a route map, which will allow you to combine individual scenarios into a single solution. The route map determines which events a particular type of scenario will work with. In the current version, the CMDB Autodiscovery type is available to the user, which works with events entering the system via streams and is tailored to work with the resource-service model.
Creating a simple scenario
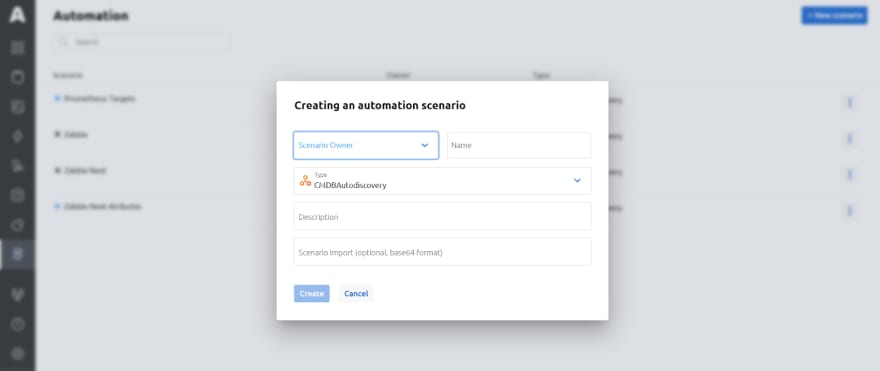
Creation of automation scenario starts from filling out the form with information about its owner and name and choosing the root node.
After creation we get to the scenario builder page.
By default, there is a start block which runs our script every time the corresponding event arrives.
First, we need to create a rule so that the sequence is executed on specific events. To do this, we need some functions in the form of blocks. We add them from the context menu by right-clicking on an empty space.
Let’s build a simple rule that will receive only those events that came from a specific stream.
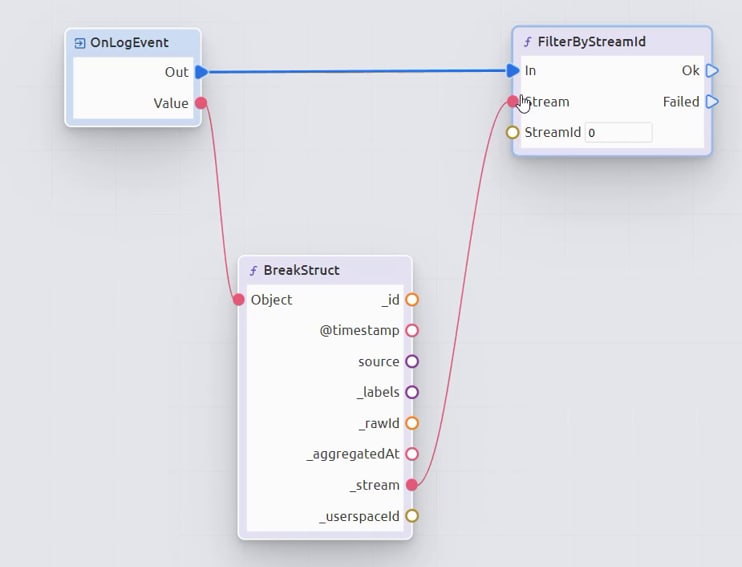
For that we’ll add the FiltredByStreamId function and connect the sequence in such a way that when an event arrives in the system, the script checks the ID of the stream from which it came and, if the filtering is successful, the script will continue to run.
The sequence of execution of script functions is indicated by blue arrows — exact pins.
Note that in addition to exact pins, there are data pins. If the former are responsible for the sequence, then the latter are responsible for transmitting and receiving data.
Now let’s analyze our function. For it to be executed, it must be provided with input data. In our case, the function requests an incoming stream model and filtering parameters (stream id).
We must get the initial data from the primary event, i.e. take away the stream model from there. In order to do this, we decompose the original structure using the base function and establish a connection with our filter.
Now we need to specify the required parameter (we take it from the previously created stream) and copy-paste it into the FiltredByStreamId block.
Done! The simple rule is ready. Now further actions will be executed only if the event came from the stream we specified.
As an action, we can send a test request using a special function: set it up and send our primary event as the request body.
For the scenario to work, it must be compiled and activated.
Let’s reproduce dispatching an event to a thread.
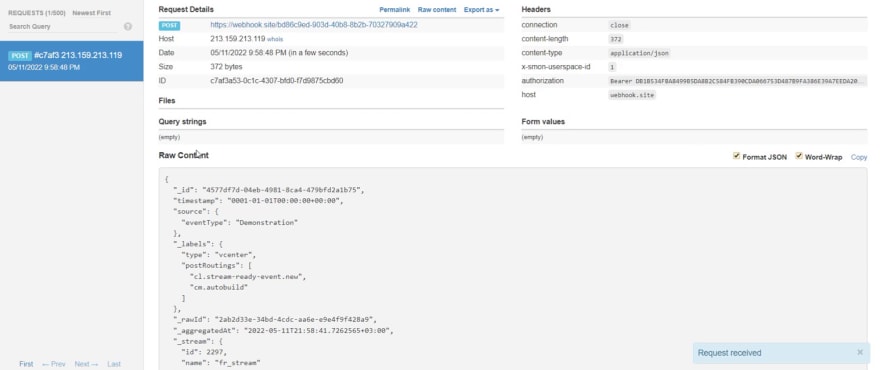
If everything is set up correctly, then a request should be displayed, where the body is our event. We see our request and event, confirming everything is correct.
Let’s look at the other tools that are available in the editor as well.
The left panel contains the objects of the current scenario. Here you can create and manage local variables, structures and entire functions. From here, they can be added to the screen for use in a script or selected for further customization.
The settings are available in the right panel where we fill in all the required fields and, in the case of a local function, write the executable code.
An important feature of this service — the user can export the script and share it with others. In turn, the recipient, using the import tool, creates an exact copy of this script.
Conclusion
In this article, I showed how to build the simple script without hardcoding. Of course, it was just a short intro and the functionality of engine in Acure is much more. In the next articles I will talk about variables, structures, data types and show how to create full scenario. For now, leave your feedback and share your confession: are you an adept of good ol’ text coding or believe in power of visual programming?

Posted on May 23, 2022
Join Our Newsletter. No Spam, Only the good stuff.
Sign up to receive the latest update from our blog.


