How To Replace a lost Key Pair with new one on an EC2 instance

Swapnil Abhimanyu Wagh
Posted on December 5, 2020

Access to Amazon EC2 instances specially the Linux instances are always protected by a private key pair. Private key is only the way to get access to the instance, what if you lost the key? Is your servers lost in black hole? Thankfully nothing is lost you still can access your server, let me show you how can you solve this problem.

Before we proceed please not that to do this we need to stop our running instance that means what ever app or website running on the serer will be offline for that period. In order to do this process we need the EC2 root volume to be an EBS.
Quick Start
Launch New Instance
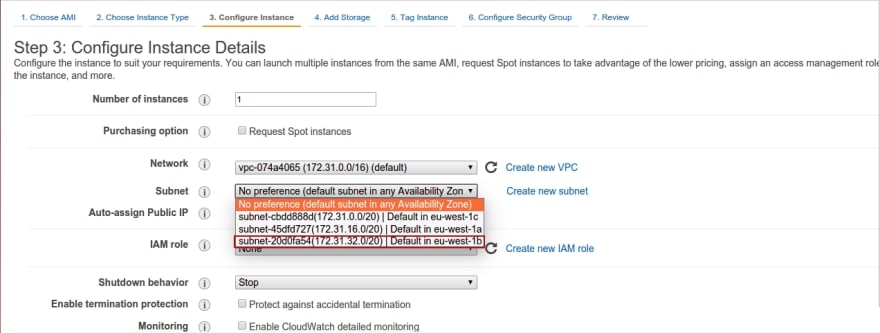
First thing we need is to start and one instance with a key pair that we can access we will use this instance for recovering the old EBS. New instance must be created in same Availability Zone of the original instance. Firstly we will note down the original instance AZ.
Now we will launch the new instance using the Launch Instance wizard, make sure that we are launching the instance same AZ in which our original instance is. You can chose AZ from **subnet **as shown in below image.
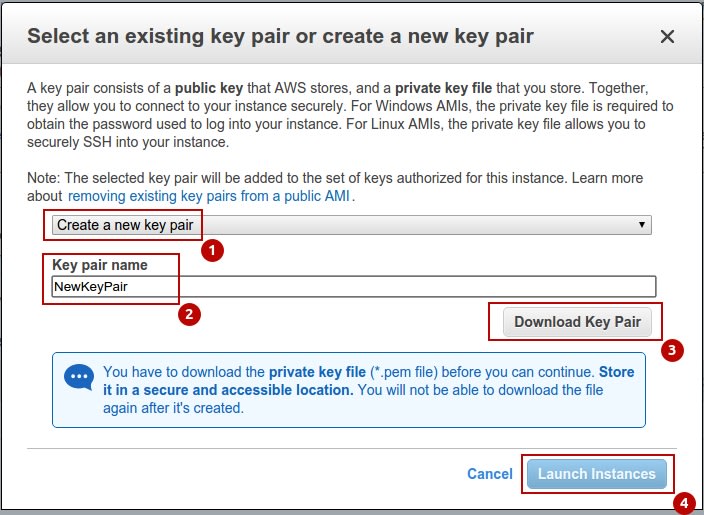
Before we actually launch the instance we will see the key pair section from there we will create and download a new key pair and then we will launch the instance.
Stop Original Instance
When the new instance is ready, now we will detach the volume of original instance and attach it to new instance, in order to do that we need to stop the original instance. To stop the instance right click on the instance go to Instance State and chose Stop option.
Detach Volume
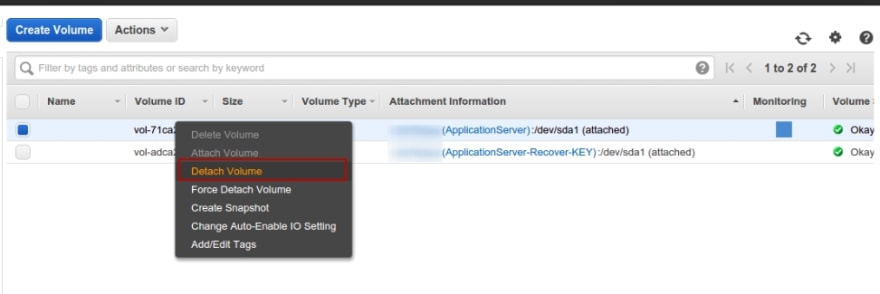
Now our instance is stop then we go to the volume section in EC2 console. Here we will look for the original instance root volume, using the Attachment Information.This column shows to which instance the volume is attach and its device path usually the root drive path is /dev/sad1.Now we will Detach the volume from original instance, in order to do that right click on volume and chose Detach Volume option.
Attach Volume
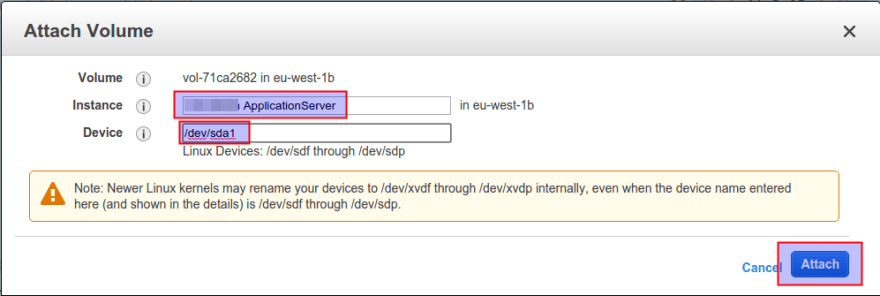
Once we detach the volume, now we need to attach the volume to the Recovery instance, right click on the volume and chose Attach Volume option in dialog we will select the Recovery instance and also add a device path as /dev/xvdf (or /dev/sdf)
Once we attach the volume to recovery instance we are now ready to mount that in same instance. We can access the instance using the key pair generated during the instance launch. To access instance use below command
Setting the rigth permissions for the .pem file:
$ chmod 600 NewKeyPair.pem
Connecting to the instance using the certificate:
$ ssh -i NewKeyPair.pem ubuntu@public_ip
Copy Key
Once you are connected to the instance now we have to mount the attach volume and copy the authorized_keys file from new instance to the mounted drive at same location. Use below command to mount and copy the file.
Becoming root:
$ sudo -i
Creating the mount point:
$ mkdir /mnt/original
Mounting the volume:
$ mount /dev/xvdf /mnt/original
Replace the authorized_keys file with the new one. Now access to the Old instance will be possible only using the new pem. Path and name of file depends on the Linux Flavor you are using.
cat /home/ubuntu/.ssh/authorized_keys > /mnt/original/home/ubuntu/.ssh/authorized_keys
Unmunt the volume:
$ umount /mnt/original/
Once we are done with copying the keys, now we will detach the volume from recovery instance by right clicking on volume and choosing the detach volume option as we do it earlier. After that we will re-attach it to the Original instance, make sure when you are re-attaching the volume that should on on root path so enter /dev/sda1 in device path option.
Access Using New Key
Now we can start the original instance back, and now you can access it using the new key pair.
You can use same steps in case your machine is not accessible and you want access to your data in EBS.
Hope you find this tutorial helpful. Feel free to ask questions! Don’t forget to like or to leave a comment if its really help you.

Posted on December 5, 2020
Join Our Newsletter. No Spam, Only the good stuff.
Sign up to receive the latest update from our blog.


