Getting Started with Hot Chocolate .NET GraphQL Server

Hasura
Posted on January 5, 2022
This article was originally published on the Hasura blog. If there are formatting errors in the article below, we urge you to please go to our blog and read it there. Thanks! :)
Building a GraphQL API server could be as easy as riding a bike down the street or as complex as launching a rocket ship to Mars, depending on your approach and tools.
Hot Chocolate is an open-source GraphQL server built for the Microsoft .NET platform. It removes the complexity of building GraphQL APIs from scratch with built-in features for queries, mutations, and subscriptions. Hasura's Remote Schema feature allows merging remote schemas from multiple remote GraphQL servers to provide a unified GraphQL API layer. With tools like Hot Chocolate and Hasura via Remote Schemas, developers get a fast and straightforward option for building robust, powerful, and extensible GraphQL APIs to cater to custom scenarios such as querying data from multiple data sources.
To demonstrate how these tools can build a robust and extensible GraphQL API to cater to your business needs, we’ll be building a GraphQL API backend with Hot Chocolate GraphQL and integrating it to Hasura via Remote Schema.
Set Up a Few Prerequisites
To get started, install the following prerequisites:
- .NET Core SDK
- Any code editor of your choice (we recommend Visual Studio Code)
Step 1: Create a New .NET Core Web API Project
Create a new folder in your preferred directory and change the current directory to that folder. In the working folder, open your terminal and run the following command to create a new web API project.
dotnet new webapi --no-https
This command creates a new web API project in your current directory with some boilerplate code and disables https for simplicity. Open the project directory with your code editor and review the files.
Step 2: Install Hot Chocolate GraphQL in the .NET Core Project
From within your project directory, open your terminal and install the following dependencies from Nuget: HotChocolate.AspNetCore and HotChocolate.Data .
dotnet add package HotChocolate.AspNetCore
dotnet add package HotChocolate.Data
Step 3: Create Your GraphQL Schema
Every GraphQL server uses a GraphQL schema to specify the structure of data clients can query. In this example, we'll create a GraphQL schema for querying a collection of movie titles and actors.
- Create a folder called Models at the root of your project and create the Actor.cs file inside the folder with the following code snippet
//Actor.cs

namespace Models
{
   public class Actor
   {
       public string FirstName { get; set; }
       public string LastName { get; set; }
   }
}
- Create another C# file called Movie.cs inside the Models folder and add the following code snippet
//Movie.cs

namespace Models
{
    public class Movie
    {
        public int Id { get; set; }
        public string Title { get; set; }
        public List<Actor> Actors { get; set; }
    }
}
These two classes give us a simple model to build our GraphQL schema.
Step 4: Create Your Dataset
Hot Chocolate is not bound to a specific database and can fetch data from any source you connect to (including a database or a REST API). For this article, we'll hardcode some sample data.
- Create a folder called Data at the root of your project, create the SeedData.cs file inside the folder, and add the following code snippet
//SeedData.cs

using Models;

namespace Data
{
    public class Seed
    {
        public static List<Movie> SeedData()
        {
            var actors = new List<Actor>
                {
                    new Actor
                    {
                        FirstName = "Bob",
                        LastName = "Kante"
                    },
                    new Actor
                    {
                        FirstName = "Mary",
                        LastName = "Poppins"
                    }
                };

            var movies = new List<Movie>
            {
                new Movie
                {
                 Id = 1,
                 Title = "The Rise of the GraphQL Warrior",
                 Actors = actors
                },
                new Movie
                {
                 Id = 2,
                 Title = "The Rise of the GraphQL Warrior Part 2",
                 Actors = actors
                }
            };
            return movies;
        }
    }
}
The code snippet defines a sample movie data set clients can query.
Step 5: Define Your Data Resolvers
Resolvers are functions that tell the Hot Chocolate GraphQL server how to fetch the data associated with a particular schema. In simple terms, a resolver acts as a GraphQL query handler. In our example, we’ll create a Query root method that exposes the possible queries a user can drill into.
- At the root of your project, create a folder called Resolvers
- Inside the Resolvers folder, create a C# file called Query.cs and paste the following code snippet
using Data;
using Models;

namespace Resolvers
{
    public class Query
    {
        public List<Movie> GetMovies() =>
            Seed.SeedData();

        public Movie GetMovieById(int id) =>
            Seed.SeedData().FirstOrDefault(x => x.Id == id);
    }
}
The above snippet defines two resolvers. The GetMovies resolver which takes in no parameters and returns the list of movies in the SeedData function we created in step 4. The GetMoviesById takes in the movie Id parameter and allows us to return a movie object based on it’s Id.
We now have everything we need to generate a valid GraphQL API. Let's go ahead and configure our GraphQL server.
Step 6: Configure Your GraphQL Server
Configure your GraphQL server by adding the following code to the ConfigureServices method in the Startup.cs class.
//Startup.cs

public void ConfigureServices(IServiceCollection services)
{
   services
       .AddGraphQLServer()
       .AddQueryType<Query>();
}
The Hot Chocolate GraphQL AddGraphQLServer method adds a GraphQL server configuration to the Dependency Injection(DI), and the AddQueryType() **adds the Query root method for our GraphQL schema we created in **step 5.
Add a GraphQL endpoint to the endpoint configurations by heading over to the Configure method in the Startup.cs and adding MapGraphQL to UseEndpoints, as shown below.
//Startup.cs

public void Configure(IApplicationBuilder app, IWebHostEnvironment env)
{
   app
       .UseRouting()
       .UseEndpoints(endpoints =>
       {
           endpoints.MapGraphQL();
       });
}
Step 7: Execute Your GraphQL Query
Now that the GraphQL schema and resolver have been set up, we can test our GraphQL server.
- Start the GraphQL server with the following command
dotnet run
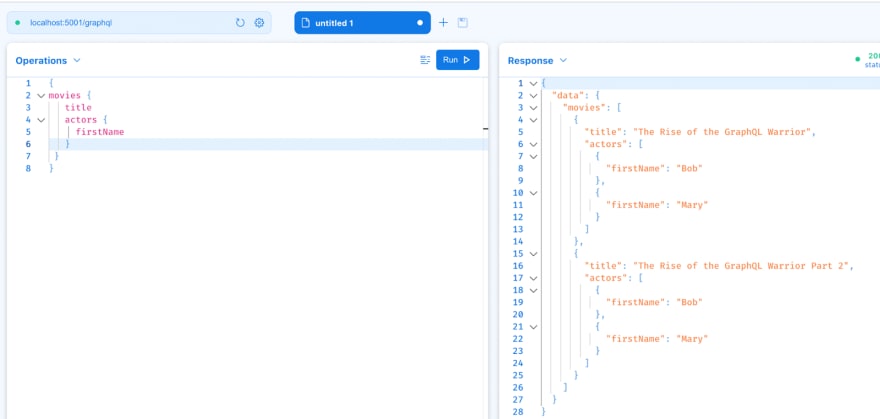
- Open your browser and head over to the port your GraphQL server is listening on (ours is http://localhost:5000/graphql) to open the Hot Chocolate built-in GraphQL IDE Banana Cake Pop
You should see a screen like this:
You can click on the Operations tab and view the schema reference to drill down into the schema structure.
- Copy the following code snippet into the operations window and click on the Run button to test the GraphQL API
query {
  movies {
   title
   actors {
     firstName
   }
 }
}
This query fetches the list of movies with their titles and the first names of the movie actors.
Step 8: Create A Public Endpoint For Your GraphQL API
To integrate your GraphQL server to Hasura, you need a publicly accessible endpoint. For this tutorial, we are using ngrok. ngrok provides public URLs for exposing your local host. Follow the steps below to get a public URL on your local GraphQL API with ngrok.
- Download the current version of ngrok
- Register and get a token
- Open your terminal and set the ngrok token with this command: ngrok authtoken YOUR_AUTHTOKEN
- Create a tunnel with this command: ngrok http -host-header=localhost http://localhost:5000
- The output of the last command will list a public forwarding URL, which will point to your local server
Step 9: Create Your Database on Hasura Cloud
With the Hasura Remote Schema feature you can stitch together schema and data from separate data sources. Let's create another data set on Hasura (different from the original data set we hardcoded earlier).
- Sign in to Hasura Cloud
- Create a project and click on the Launch Console button
- Navigate to the Data tab and create a new Heroku Postgres database
- After the database has been created, click on the Create Table button in the Data tab and create the table Movies with the following columns as shown below
Id (Int)
MovieUrl (text)
ReleaseDate (timestamp now())
- Remember to select Id as the Primary key
Once the table has been created, create a new record by heading to the Insert Row tab of the Movies table and inputting details.
Step 10: Attach Your Hot Chocolate GraphQL Server With Hasura’s Remote Schema
Hasura’s Remote Schema feature is one of the most straightforward methods of consolidating data from separate sources under a single, unified API.
We can integrate our hardcoded data schema with the Heroku Postgres instance data by stitching them together using Hasura’s Remote Schema feature.
- Navigate to the Remote Schemas tab in the Hasura Console to add the Hot Chocolate GraphQL server to Hasura's GraphQL schema, as shown below
Note: The GraphQL server URL will be the /graphql endpoint of the Hot Chocolate GraphQL server obtained from ngrok.
The schema in our Hot Chocolate GraphQL server has now been attached with the Postgres database instance on Hasura.
Step 11: Merge data with Hasura Remote Join
Hasura via Remote Joins allows merging of data between two sources. So we can add the MovieUrl and ReleaseDate data we created in our Hasura Postgres database to the Movie object data we created locally based on its Id.
- Click on the Data tab, select the table Movies and head to the Relationships tab to configure a new Remote Schema Relationship as shown below:
Step 12: Test the GraphQL API
We can then test our unified GraphQL API to check if everything works.
- Navigate to the API tab and examine the query explorer. We can see it contains both the schema in the Hot-Chocolate GraphQL server and the automatically generated schema from the Postgres Hasura database instance
- Paste the following query in the query box. (You can also explore the complete GraphQL schema in the sidebar and toggle based on the fields you want)
query MyQuery {
  Movies {
    Id
    MovieUrl
    ReleaseDate
    movie_metadata {
      title
      actors {
        firstName
      }
    }
  }
}
- Click on the Run button and review the response
When we test the GraphQL API we will see that the data from our Hot Chocolate GraphQL server have been merged with the data from the Heroku Postgres instance. The Data for the Movies ReleaseDate and MovieUrl fields come from the database (Postgres), and movie meta data fields like title and actors first name come from our Hot Chocolate GraphQL server.
Learn More About Hot Chocolate GraphQL and Hasura
To learn more and try out other Hot Chocolate GraphQL features such as batching, pagination, and filtering, check out their documentation site.
Hasura gives you real-time GraphQL APIs on all your databases. Check out our documentation on how to get started.

Posted on January 5, 2022
Join Our Newsletter. No Spam, Only the good stuff.
Sign up to receive the latest update from our blog.
Related
November 10, 2021


