Build Responsive Cross-Platform Vue Apps with Quasar Framework and GraphQL

Hasura
Posted on September 16, 2022
TL;DR : Build responsive SPAs, SSR Apps, PWAs, Hybrid Mobile / Electron Apps using a single codebase with Quasar Framework and the Hasura GraphQL Engine. Instant setup. Tutorial/boilerplate -> quasar-framework-vue-graphql
Quasar Framework
Quasar Framework is a high-performance Vue.js framework that enables developers to build different types of applications with a single codebase.
With Quasar, you can have a single codebase for:
- Single Page Apps (SPA)
- Server-Side Rendered Apps (SSR)
- iOS/Android Mobile Apps
- Desktop Apps
- PWAs
- Hybrid Apps
In simple terms, Quasar allows you to build cross-platform applications.
Although it is powered by Vue.js, it comes with its own set of built-in web components that can be imported to construct user interfaces.
Hasura with Quasar
Hasura is an open-source GraphQL engine that gives you real-time GraphQL APIs on new or existing Postgres databases. It comes with built-in support for stitching custom GraphQL APIs, and it allows you to trigger webhooks on database changes.
Hasura GraphQL fits in this workflow of building cross-platform apps neatly. All the clients (mobile app/electron app) use the same set of APIs controlled by the same set of permissions and auth. That means it can leverage the power of Postgres. Quasar gives endless possibilities with one codebase, and a standard GraphQL API from Hasura adds to the easier development workflow.
In the next step, you will learn how to configure the Apollo Client with Quasar and perform GraphQL Queries.
Quasar App Extensions
Quasar enables developers to extend the application’s functionalities with extensions. An example of an extension would be @quasar/apollo, which allows you to use GraphQL and the Apollo Client in your Quasar app.
In Quasar, you can install extensions as follows:
quasar ext add @quasar/apollo@next
The above command installs the extension and creates two additional files:
-
src/apollo/index.js- you need to add your Hasura app endpoint in this file -
src/boot/apollo.js- you can leave this untouched
The next step is to register the extension in the quasar.config.js file. Open the file and add "apollo.js" in the boot array. See the part of the config file where you need to make the changes:
module.exports = configure(function (ctx) {
  return {
    boot: ["apollo.js"],
   };
});
You are done with the extension installation & configuration. The next step involves using the Apollo Client to perform GraphQL Queries.
Fetch Authors
The main page of the application will list all the authors. You can click on the name of the authors to see their articles.
Quasar comes with all sorts of UI components that you can use to create an application with a native feeling.
In the code snippet below, you make use of those UI components to build the user interface. Add this code in the layouts/MainLayout.vue file:
<template>
  <q-layout view="lHh Lpr lFf">
    <q-header elevated>
      <q-toolbar>
        <q-btn
          flat
          dense
          round
          icon="menu"
          aria-label="Menu"
          @click="toggleLeftDrawer"
        />

        <q-toolbar-title
          class="my-box cursor-pointer q-hoverable"
          @click="this.$router.push(`/`)"
        >
          Quasar App with Hasura GraphQL Engine
        </q-toolbar-title>

        <div>Running on Quasar v{{ $q.version }}</div>
      </q-toolbar>
    </q-header>

    <q-drawer v-model="leftDrawerOpen" show-if-above bordered>
      <q-list>
        <q-item-label header> Author List </q-item-label>

        <q-item v-for="author in authors" :key="author.id">
          <q-item-section class="my-box cursor-pointer q-hoverable">
            <q-item-label @click="fetchArticle(author)">
              {{ author.name }}
            </q-item-label>
            <q-item-label caption>ID: {{ author.id }}</q-item-label>
          </q-item-section>
        </q-item>
      </q-list>
    </q-drawer>

    <q-page-container>
      <router-view />
    </q-page-container>
  </q-layout>
</template>
The above code loops over an array of authors, and it also uses a method named fetchArticles. That means you need to retrieve the authors from the database and define the method for fetching articles.
Write the following code in the same file:
<script>
import { defineComponent, ref } from "vue";
import { useRouter } from "vue-router";
import { useQuery, useResult } from "@vue/apollo-composable";
import gql from "graphql-tag";

export default defineComponent({
  name: "MainLayout",

  setup() {
    const leftDrawerOpen = ref(false);
    const router = useRouter();

    const { result, loading, error } = useQuery(gql`
      query {
        author {
          id
          name
        }
      }
    `);

    const authors = useResult(result, null, (data) => data.author);

    const fetchArticle = (author) => {
      return router.push(`/author/${author.id}`);
    };

    return {
      authors,
      leftDrawerOpen,
      fetchArticle,
      toggleLeftDrawer() {
        leftDrawerOpen.value = !leftDrawerOpen.value;
      },
    };
  },
});
</script>
You use the Apollo Client to query the database and retrieve the authors. You also define the fetchArticle method, which routes users to the right page when clicking on the author’s name.
The code is still the same kind of code you would have written in a Vue.js app to make a GraphQL query with vue-apollo. The difference is the <template> part where Quasar uses native-like components to build hybrid apps.
Fetch Articles
Each author can have one or more articles, so you need to build the "Articles" page to list those articles. You can use the Quasar CLI to create a new page:
quasar new page Articles
The command creates a .vue file in the src/pages folder. Now you need to reference it in the routes file so that the users can access it.
Open the src/router/routes.js and add the route:
{
    path: "/",
    component: () => import("layouts/MainLayout.vue"),
    children: [
      {
        path: "/author/:authorId",
        component: () => import("pages/Articles.vue"),
      },
      { path: "", component: () => import("pages/IndexPage.vue") },
    ],
  },
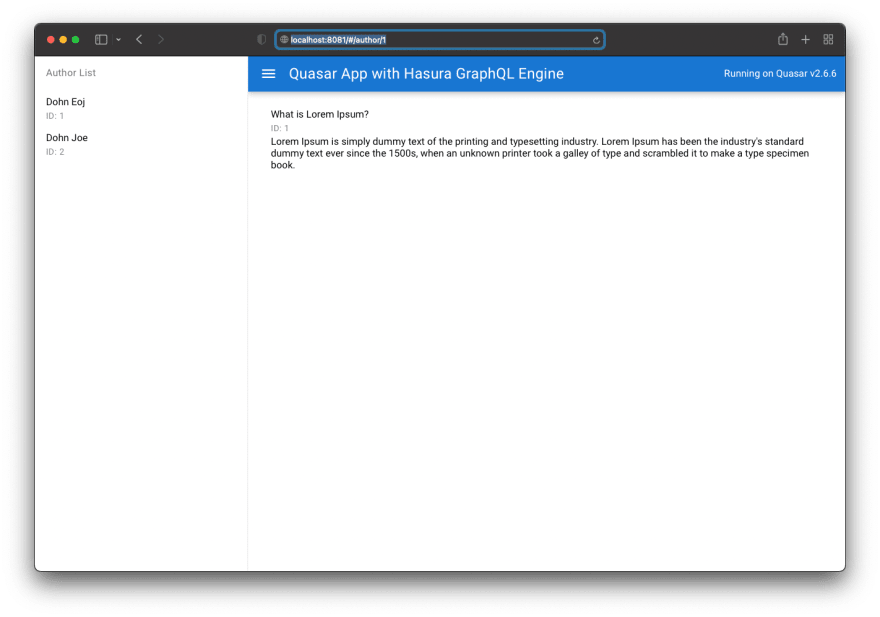
Observe the /author/:authorId path. You can see an example of such a URL in the image below.
When you visit an author, you can see all the articles written by that author.
Go to the src/pages/Articles.vue file and replace the content with this template:
<template>
  <q-page padding>
    <q-item v-for="article in articles" :key="article.id">
      <q-item-section class="my-box cursor-pointer q-hoverable">
        <q-item-label>
          {{ article.title }}
        </q-item-label>
        <q-item-label caption>ID: {{ article.id }}</q-item-label>
        <q-item-label>
          {{ article.content }}
        </q-item-label>
      </q-item-section>
    </q-item>
  </q-page>
</template>
You are using the Quasar UI components to display the article:
- title
- id
- content
Now it's time to fetch the articles from the Hasura backend. Add the following code after the template section:
<script>
import { watch } from "vue";
import { useQuery, useResult } from "@vue/apollo-composable";
import { useRoute } from "vue-router";
import gql from "graphql-tag";

export default {
  name: "PageName",

  setup() {
    const route = useRoute();

    const { result, loading, error, refetch } = useQuery(
      gql`
        query articleQuery($authorId: Int!) {
          article(where: { author_id: { _eq: $authorId } }) {
            id
            title
            content
          }
        }
      `,
      {
        authorId: route.params.authorId,
      }
    );

    const articles = useResult(result, null, (data) => data.article);

    watch(
      () => route.params.authorId,
      async (newId) => {
        refetch({ authorId: newId });
      }
    );

    return {
      articles,
    };
  },
};
</script>
In the above code, you:
- use the Apollo Client to retrieve the articles from the database
- pass the
authorIdparameter, so it fetches the articles for that specific author - re-fetch the articles when the author id (from the URL) changes
Thus, when you visit a URL like https://your-app.com/author/1, the page displays the articles of the author whose ID is "1".
Build Targets
Quasar requires you to specify the mode of the app spa|ssr|pwa|cordova|electron and the target cordova|electron - in case it's a hybrid app. You can also specify themes like material and ios, which will appropriately apply each component’s styles.
You can read more about build targets here.
There is a boilerplate and a short tutorial to help you get started quickly! Check it out on Github.
Take it for a spin and let us know what you think. If you have any questions or run into any trouble, feel free to reach out to us on Twitter, Github, or our Discord server.

Posted on September 16, 2022
Join Our Newsletter. No Spam, Only the good stuff.
Sign up to receive the latest update from our blog.


