Creating an Earth Engine Cloud Project

geedevsnairobi
Posted on October 15, 2023
 Image credits
Google Earth Engine is a Geospatial cloud platform that enable monitoring users to monitor and measure earth and environmental changes at a planetary scale. It hosts 70 plus petabytes of historic and present earth observation data in its’ data catalog. The cloud platform offers intrinsically-parallel computation access to thousands of cloud computers. Even though the initial intent was to enhance the scientists’ operational deployment methods, while strengthening public institutions and NGOs’ ability to understand, manage and report on natural resources, Earth Engine is gradually getting adoption in various industries and commercial operations. Earth Engine cloud platform supports crucial geospatial data preprocessing techniques like:
- Generation of on-demand of spatial and temporal mosaics
- Fast calculation and computation of a range of spectral indices
- Computation of best-pixels composites- removal of image clouds and gaps in imageries
- Machine learning operations in the cloud IDE on satellite imageries
- Creating of publishable geospatial Apps
Earth Engine is integrated with Google Cloud Platform through the Earth Engine REST API. Users make calls to the Earth Engine through a cloud project. It is imperative to register Earth Engine projects to facilitate accessing of Earth Engine API which;
- Enables usage of satellite data in the data catalog
- Monitoring of EE apps at project level
- Manage assets and permissions in the platform
- Monitor success rate of requests send to Earth Engine service – this helps to debug and optimize Earth Engine powered workflows
- Facilitates permissions to configured applications
- Manages project groups or collaborators
Let’s Get started
The first step is to go directly to this page. To make EE calls with Google Cloud Project (GCP), you’ll need to have a Google Account, Google Cloud Project then enable Earth Engine API to that project.
Enabling a Cloud Project with Earth Engine helps to;
- Use the REST API
- Use a service account for authentication
- Create an App Engine app that uses Earth Engine
- Use a Client ID to uniquely identify an App and pass user credentials
The first step is to click on Create a Cloud project button if you did not have it before, then follow the steps to have a successful cloud project.
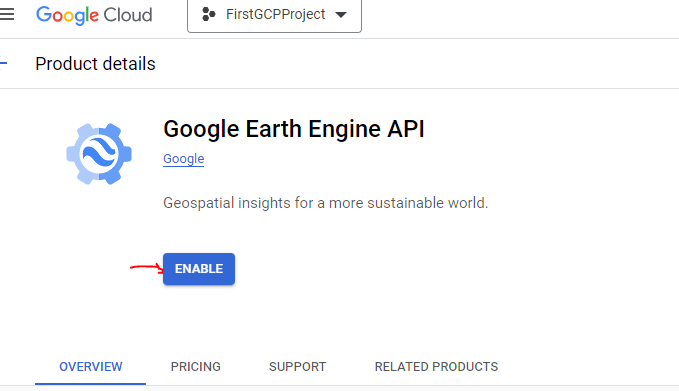
Next is to click the button Enable the Earth Engine API for your created project
The next step is to go to Enable Engine API, the photo below shows you how to go about it,
Up to this point we've created a Google Cloud Project and Enabled our Earth Engine API.
Next is to create an Earth Engine Project, go to this link for easy access of the page. For learning purposes we'll register the noncommercial option, then in the step select Unpaid usage. We have to select our project type. Since we are getting started, we have to Create a new Google Cloud Project then continue to summary.
The next step is to enter our project name, then go to confirm page which upon clicking will prompt us to land on the Google Earth Engine IDE. At this point we're good to get started in working on other Earth Engine projects.
Article Writer: Nicholas Musau

Posted on October 15, 2023
Join Our Newsletter. No Spam, Only the good stuff.
Sign up to receive the latest update from our blog.


