Faris Durrani
Posted on April 15, 2024

How to set up federated SSO login, including Just-in-time (JIT) provisioning, between the Oracle Cloud Infrastructure Identity and Access Management (IAM) and Microsoft Azure AD Entra ID resource, using Azure AD as the identity provider (IdP).
For a YouTube tutorial, see https://youtu.be/9HudJZ65_u0.
After completing this tutorial, you will be able to log in to your Oracle Cloud Infrastructure (OCI) account using Azure's Entra ID.
As of writing, the official documentation from OCI and Microsoft do not provide the accurate IdP user attribute name for JIT provisioning, which will be the main contribution of this article.
Prerequisites
This tutorial assumes you have the following:
- A Microsoft Azure account with Entra ID login policy management access
- An OCI account with login policy management access
1. Get the Service Metadata Provider from OCI IAM
a. Sign in to your OCI tenancy at cloud.oracle.com
b. Go to Identity & Security > Domains > Default (or any other preferred domain)
c. Go to Security > Identity providers

d. Click on Export SAML metadata > Download XML (under Metadata with self-signed certificates)


2. Create an Azure AD Enterprise Application
a. Log in to your Microsoft Azure account on portal.azure.com
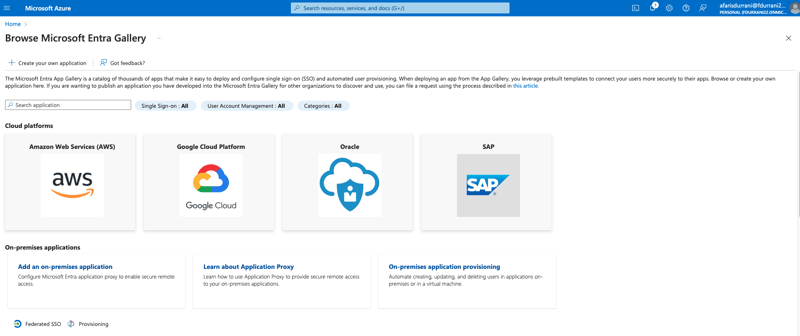
b. Go to Microsoft Entra ID > Enterprise applications > New application
c. Click on Oracle > Oracle Cloud Infrastructure Console > Create
3. Set Up Single Sign-On for the Azure AD Enterprise App
a. Click on 2. Set up single sign on

b. Click on SAML > Upload metadata file. Upload the SAML XML metadata file retrieved from OCI in Step 1
c. After the metadata file has been uploaded, most details should have been filled in. You need to fill Sign on URL according to the format requested (see screenshot below). Click Save.
d. Next, download the Federation Metadata XML file.
4. Edit Attributes and Claims
a. After clicking Save in the previous step, click Edit in Attributes & Claims in the Azure AD Application
b. Under Required claim, click on Unique User Identifier (Name ID). Change the Name identifier format to Persistent. Click Save.
c. Next, click Add a group claim.
d. Add the following details:
- Choose Security groups
-
Source attribute being
Group ID -
Name (optional) being
groupName -
Namespace (optional) being
https://auth.oraclecloud.com/saml/claims
Obviously, the checkbox Customize the name of the group claim must be checked. Click Save.
There then should be five Additional claims items, the newest addition being the claim https://auth.oraclecloud.com/saml/claims.
5. Add a User to the Azure AD Application
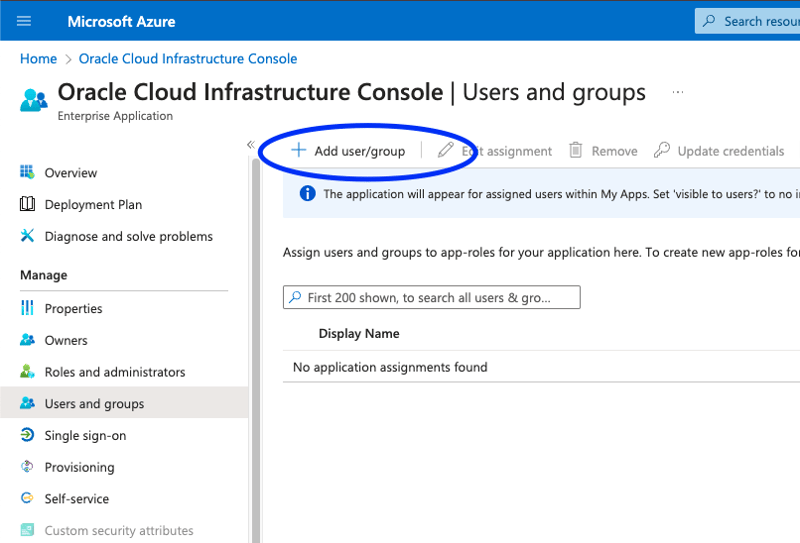
a. On the application homepage, click Assign users and groups. Click Add user/group.
b. Select the users and groups you want to allow access to log in to OCI. Click Assign.
Note: you have to subscribe to Azure AD's Microsoft Entra ID P2 (formerly Azure Active Directory P2) plan to be able to create and add groups. You can still use the IdP if you add individual users but not for groups.
6. Enable Azure AD as IdP for OCI IAM
a. Back to the OCI console, go to Identity Domain > Security > Identity Providers > Add IdP > Add SAML IdP.
b. Give a Name. Click Next.
c. Upload the Federation Metadata XML file from Azure AD. Click Next

d. Change the Requested Name ID format to Email address. Click Next.
e. Review all details and click Create IdP.
f. Afterwards, you are presented with the option to test the login, activate the IdP, and add to the login policy. You can do those but I will be presenting the alternative steps if you accidentally clicked on Close.
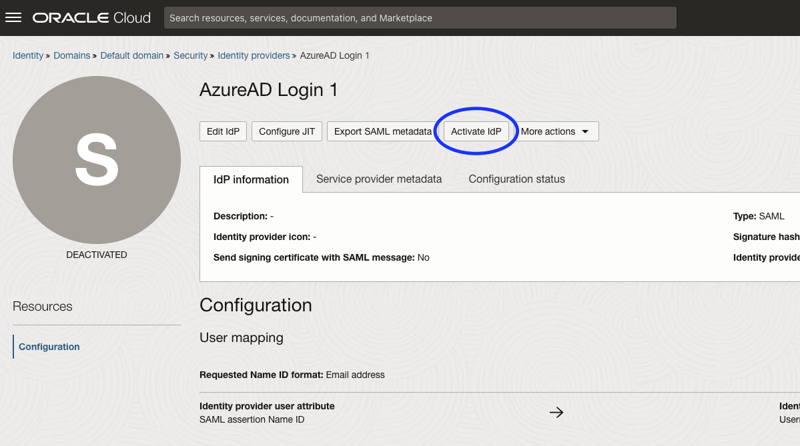
g. Click on Activate IdP.
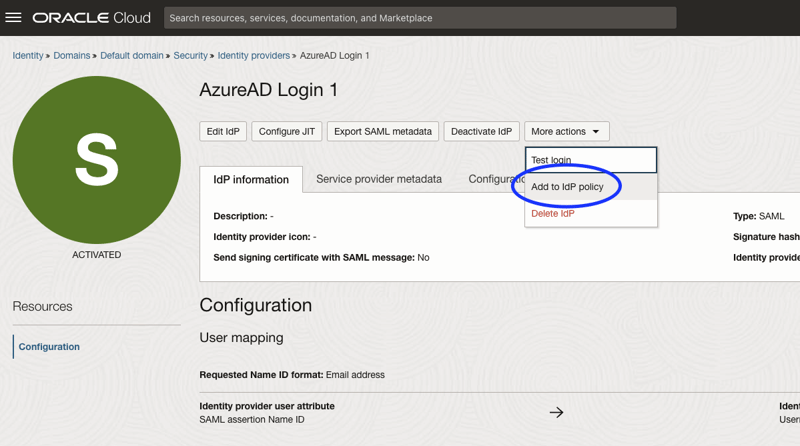
h. Click on More actions > Add to IdP policy.
7. Test SSO Between Azure and OCI
Now you can test your login. Open cloud.oracle.com and click your new IdP login option (mine is named Azure AD Login 1).
On the assumption you have your user with the same Azure email in your OCI account, e.g., farisdurrani@fdurrani492.onmicrosoft.com, your login should have succeeded. If the OCI user does not exist yet, go to Step 8.
8. Configure JIT to create and update user details
SAML Just-In-Time (JIT) Provisioning automates user account creation–if the user doesn't exist–and updates the account details with the new details provided by the IdP, in this case, Azure AD.
Back to the IdP configurations on OCI, click on Configure JIT.
We enable the creation and update of the IdP user by checking these checkboxes. For the user attributes, we designate the following from the following table. We leave out the first name since that's not important.
| IdP user attribute type | IdP user attribute name | Maps to | Identity domain user attribute |
|---|---|---|---|
| NameID | NameID value | -> | userName |
| Attribute | http://schemas.xmlsoap.org/ws/2005/05/identity/claims/surname | -> | familyName |
| NameID | NameID value | -> | primaryEmailAddress |
| Attribute | http://schemas.xmlsoap.org/ws/2005/05/identity/claims/givenname | -> | First name |
9. Configure JIT to assign group mapping
If the IdP user is a part of certain groups on Azure AD, we can configure JIT to add them to certain groups on OCI.
Say you want to assign all Azure AD users who are in the groupfdurraniAzGroup to the OCI group fdurraniOciGroup.
a. First, we retrieve the fdurraniAzGroup's Object Id from Azure AD:
b. Then, we add the groupId to the Assign group mapping section in JIT.
The Group membership mapping service should be https://auth.oraclecloud.com/saml/claims/groupName.
Now, anytime a user from the Azure AD group fdurraniAzGroup logs in to OCI using the IdP, they will be added to the fdurraniOciGroup on OCI.
c. Optionally, we can enable Assign domain group memberships to add all IdP users, no matter which group in Azure AD they are a part of, to the selected OCI groups.
10. Test JIT group mapping
Logging into OCI again using IdP, we see the new group memberships the user is a part of.
Troubleshooting
If you have issues logging in using IdP, check out your OCI Audit logs. Look for the Event of Type com.oraclecloud.identityControlPlane.ReceiveSamlSpSsoResonse [sic].
References
- SSO Between OCI and Microsoft Azure
- Tutorial: Microsoft Entra SSO integration with Oracle Cloud Infrastructure Console
- YouTube: How to Federate IDCS OCI Identity Domain with Azure AD & Google IdP
Safe harbor statement
The information provided on this channel/article/story is solely intended for informational purposes and cannot be used as a part of any contractual agreement. The content does not guarantee the delivery of any material, code, or functionality, and should not be the sole basis for making purchasing decisions. The postings on this site are my own and do not necessarily reflect the views or work of Oracle or Mythics, LLC.
This work is licensed under a Creative Commons Attribution 4.0 International License.

Posted on April 15, 2024
Join Our Newsletter. No Spam, Only the good stuff.
Sign up to receive the latest update from our blog.


