How to work with Spotify API

Diti Arora
Posted on October 24, 2022

For some reason, Spotify's API makes performing even simple tasks complex. It took me a week to understand how things work with this api🥲 And that is why , in this blog, I'll be explaining how to exactly work with the same.
The very first step is to go to Spotify Dashboard and create a new project there. You cannot miss this step because the data you'll be provided with will further help you in the authentication process, we'll get to it later 👀.
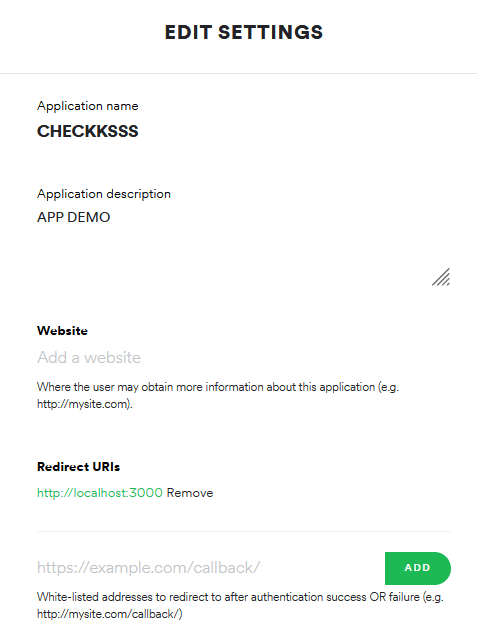
After creating a new project, go to the project's overview(click on the card it forms) and then edit the settings.
In the settings, change the 'redirect uri' and give the URL of your localhost, at least for the time you're working locally. Basically, this is the URL to which the user will be redirected after all the authentication is done. You'll need to change it once the app is deployed.
After you're done setting up your project in your dashboard, head back to your project. Spotify provides something called 'Client ID' and 'Client secret' for every project you have in your dashboard. Store these 2 values in your code, without these ids, the Spotify will not know if you are authorized to fetch data.
const CLIENT_ID = '64929b37c6484a45899de5f0960d6931'
const CLIENT_SECRET = '...'
Make sure you don't disclose your client secret.
Claiming your access token
Now in order to fetch the data, you need to first be authorized, in other words have the access token. Without the access token, spotify API will throw an error that you are unauthorized.
getting the token requires you to make a POST request to the spotify api. Spotify for some reason wants their post, get and other requests to be in very certain manner. So below is the code you need to use 👇🏻
since i coded this whole app in ReactJs, I used useEffect to make the call.
const CLIENT_ID = '64929b37c6484a45899de5f0960d6931'
const CLIENT_SECRET = '...'

useEffect(() => {

  var authParams  = {
    method: 'POST',
    headers:  {
      'Content-Type': 'application/x-www-form-urlencoded'
    },
    body: `grant_type=client_credentials&client_id=${CLIENT_ID}&client_secret=${CLIENT_SECRET}`
  }

  fetch(`https://accounts.spotify.com/api/token`, authParams)
    .then(res => res.json())
    .then(data => console.log(data.access_token))

}, [])
Make sure that the value of Content-Type is should be the same as i wrote above. Also, know you know why i told you to store the client id and client secret in your code before, because without them, this POST request won't work. This code should give the access token in your console. Since you'll be needing it futhur, it's better to store it in a useState.
const [token, setToken] = useState('')
const CLIENT_ID = '64929b37c6484a45899de5f0960d6931'
const CLIENT_SECRET = '...'


useEffect(() => {

  var authParams  = {
    method: 'POST',
    headers:  {
      'Content-Type': 'application/x-www-form-urlencoded'
    },
    body: `grant_type=client_credentials&client_id=${CLIENT_ID}&client_secret=${CLIENT_SECRET}`
  }

  fetch(`https://accounts.spotify.com/api/token`, authParams)
    .then(res => res.json())
    .then(data => setToken(data.access_token))

}, [])
Fetching data
At this point, our code might vary, because it depends on what data you want to fetch. It could be anything from creating a fully functioning search bar to tinkering with playlists and everything in between, A LOT COULD BE DONE. And for that, the parameters required while fetching the data will depend.
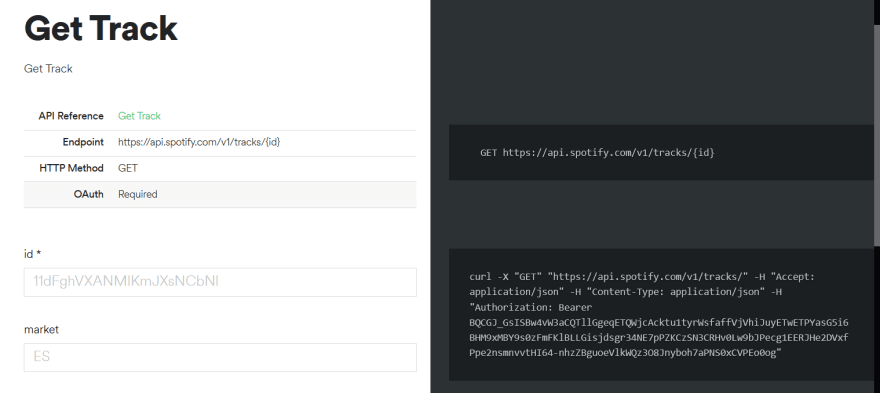
Spotify even provides its own console to play around with different stuff by providing some sample data. The link which needs to be fetched will be mentioned in the end points in the console itself. Do have a look at it, might make things easier to understand ;)
But for now, what i wanted to do was pretty straight forward. I wanted to simply identify the track through the id of the song which was being played at the moment.
So I went through the console and found the End point i had to hit
developer.spotify.com/console/get-track/
Pretty straight forward, this is how the code needs to be written 👇🏻
  var trackParams = {
    method: 'GET',
    headers: {
      'Content-Type': 'application/json',
      'Authorization': 'Bearer ' + token
    }
  }

  await fetch(`https://api.spotify.com/v1/tracks/${id}?market=ES` , trackParams)
  .then(resp => resp.json())
  .then(res => console.log(res))
}
As i mentioned, spotify api wants their requests to be very certain. Frankly, I'm not sure if the Content-Type remains the same in all the cases, but its always provided in the console on the right side. In my case, it was application/json.
Even in the Authorization parameter, you need to have the it like the way i wrote above.
After writing all this code, you should have the data in your console. And that is how you play with SpotifyAPI :)
Hope i was clear while explaining things! ✨

Posted on October 24, 2022
Join Our Newsletter. No Spam, Only the good stuff.
Sign up to receive the latest update from our blog.


