Animesh Bhadra 🎯
Posted on April 23, 2021
Introduction
This is the shortest, easiest, and a beginner friendly step by step guide to launch and run a free tier AWS EC2 instance.
I am going to teach you everything, launch a free tier EC2 instance, connect to the EC2 instance using SSH or RDP. This post will teach you just enough to be dangerous.
If you ever wanted, just be able to launch a server (EC2) in the cloud and use that server, without worrying about the inner details. Even worried that it may cost you a fortune. This is the post you were waiting for.
In seven days, God Created the world.
You need only seven steps to create an AWS EC2 instance in cloud.
Let's say Hello World to the cloud.
What is AWS EC2 ?
EC2 stands for Elastic Compute Cloud, AWS's virtual server in the cloud.
In order to create an AWS EC2 instance, you should understand
What is AWS EC2?
Why to use EC2?
What is the benefit over your existing on premise server?
Cloud computing is all about collection of servers running on someone else premise. In case of AWS it is Amazon's premise.
AWS EC2 is that single server in the school of servers on the cloud. AWS EC2 is one of the ingredients in the cloud recipe.
AWS EC2 is that virtual server running in the cloud. It is also referred to as an instance sometimes. You can select the amount of memory, storage and compute power each of your AWS EC2 should have.
You can even commission and decommission AWS EC2 on demand. This is was makes it a preferred choice compared to the on premise server. Due to this facility, cloud can always manage the traffic coming to them. When the load is high you can have more EC2 instance, and less instance when the load is low.
Cloud computing is all about paying what you use. You never pay for anything which you are not using.
How do you create this AWS EC2 instance?
Lets jump right into it.
How to create EC2 instance in AWS ?
You have learned about AWS IAM before this, if not please read it. You have become comfortable with AWS Management console. You have still not seen anything happening in the cloud.
The purpose of this Blog, is to get your own private server running in the cloud. You will learn about all the inner details of the AWS EC2 instance, in future series of Blog.
In short you have still not said Hello, World! to cloud. You will learn it today. Login into AWS Management console and follow along. You are entering The Matrix.
EC2 DashBoard
In the AWS Management console, search for the service called EC2. It should launch an EC2 Dashboard just like this one.
You have to select the Launch Instance. There are two ways to launch instances,
- Launch Instance
- Launch Instance with a template.
- This is a basic configuration which can be saved as a template and be used to launch multiple instance with the same configuration.
- You will learn more about this in future, when you learn Auto Scaling Group.
You will have this screen next.
You can clearly see that creating an EC2 instance is a 7 step process. These steps are.
- Choose AMI
- Choose Instance Type
- Configure Instance
- Add Storage
- Add Tags
- Confirm Security Group.
- Review
You will have to proceed with these 7 steps to create your AWS EC2 Instance.
Step 1: Choose an Amazon Machine Image (AMI)
An AMI or Amazon Machine Image, is a template which provide these information
- Operating System
- Application Server
- Application
An AMI is just like kids Stencil, which they use draw same diagram multiple times. Hope you remember these...
There are multiple vendor for AMIs, but you will not focus on them here. This is a battle for another day.
Please note, all the AMI listed at Quick Start are not free, please select the check box Free tier only , to list only 16 AMIs out of 40 AMIs. See the below image for reference.
Broadly the AMI's are divided based on Operating System, Linux and Windows, and Linux is subdivided primarily based on its flavor.
You should go with Ubuntu Server 20.04 LTS (HVM), SSD Volume Type, Select 64-bit (x86) version and move to the next step to Choose the instance type.
Step 2: Choose an Instance Type
This step is analogous to choosing the hardware for your server. You have hardware which is optimized for database operation, some are optimized for Machine learning and AI application, some web application. You will understand the details on this in the very short future.
This screen looks like this.
The instance type tells us in detail about the family of hardware, the number of CPU cores it has, what type of instance storage it supports, Network performance, etc.You will learn about this, but as of now focus on the free tier instance type.
You have a t2.micro, which is eligible for free tier. You get 750 hrs of usage each month for the first year of joining. Please select this instance and proceed to the next step of, Configure Instance.
Step 3: Configure Instance Details
This is the step which will require an article on its own. Just look at the configuration you can do on this screen.
You can configure all the below option.
- Number of instances you want to launch
- Do you need spot instance, a type of instance which is very cheap and can be used for non production work
- Do you want to use the default VPC, which will have an Internet gateway, making it easier for the instance to connect to the Internet.
- Do you want it to launch in the default subnet of into your own subnet, also do you want to Auto assign public IP.
- Do not worry if you do not understand anything above 2 points, will make all of this information very easy to digest in a future Blog.
- What placement group, capacity reservation to do, any join directory, or any specific IAM role to use.
- How does the machine shutdown, hibernation needs to be enabled, any detailed Cloud watch monitoring to be done, please note this is a paid option so do not enable details cloud watch monitoring.
- What type of tenancy will you choose, dedicated instance, dedicated host or shared instance.
- Do you want your instance to burst from baseline performance in case of high load.
- Do you want to mount an EFS file system on the creation time?
- In certain advanced details, you can select to enable the Metadata information access, version, response hop limit etc.,
- There is also an option to create a bootstrapping script.
For the matter of simplicity, do not change any option in this screen and just proceed to the next step to Add Storage.
Step 4: Add Storage
Every computer, be it server or desktop needs a hard disk. The hard disk can be magnetic or SSD. AWS provides all the options for hard drive. Depending on the type of instance chosen in the step two the option of Hard drive may change.
The screen will look like this.
If you see the option carefully, you can observe that there is also option to encrypt the data. Even you can attach additional storage (EBS) later. Select the default option and move to the next step, Add Tags.
Step 5: Add Tags
AWS gives you an option to add tags for everything. This will help in finding a particular instance and execute some script on those instances. The tags are case-sensitive.
The Add Tags screen looks like this.
Add a Name and value as Webserver tag. Proceed to next step a very important step to Configure the security group.
Step 6: Configure Security Group
Security is important in AWS, and as you learned in the Shared Responsibility model. The security of the instance is the user's responsibility.
The screen looks like this
You have to understand few things about security group. Security group is basically a firewall to the instance. The default is to deny all traffic. The port which you open is the only traffic allowed.
You may be aware, there are two needs to communicate with your AWS EC2 instance.
- SSH to the AWS EC2 instance
- You should open port 22 for this.
- You can open it from anywhere in the world, denoted by
0.0.0.0/0Source, in the above screen shot. - You can even restrict the Source to be from just our public IP.
- The AWS EC2 instance, should behave as a Web Server
- You can just open port 80 for this.
The default set in the above screen is allowing SSH to this particular AWS EC2 instance from anywhere in the world. This is good for our first AWS EC2 instance launch.
Select next and go to the last and final step of every AWS operation - Review.
Step 7: Review Instance Launch
Here you are in the EndGame. This screen looks like this.
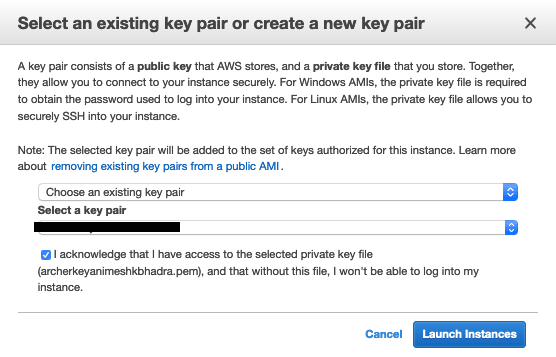
This gives all the six steps you have done till now. This is the place you can review it. If you still want to change anything you can change it now. Press Launch if you have no changes to be done. It provides with a pop-up.
This Key Pair is necessary for SSH-ing to the Linux AWS EC2, and you can use this Key-Pair to generate RDP (Remote desktop) credentials in case of Windows AWS EC2. Save the eye pair (PEM file) in your local machine.
You are now ready to launch into Cloud, click Launch instance.
Once the AWS EC2 is created, you will be presented with this screen. This means the AWS EC2 is launching
Congratulation on launching your first AWS EC2 instance. Welcome to the Cloud.
What next? Login to AWS EC2 using ssh
You have launched your first AWS EC2 instance. What Next....
What do you do with it?
How do you run the application on this server?
You have to SSH to the AWS EC2 instance. To SSH into the AWS you need some information.
You should go to EC2 Dashboard > Instance, the screen will look like this.
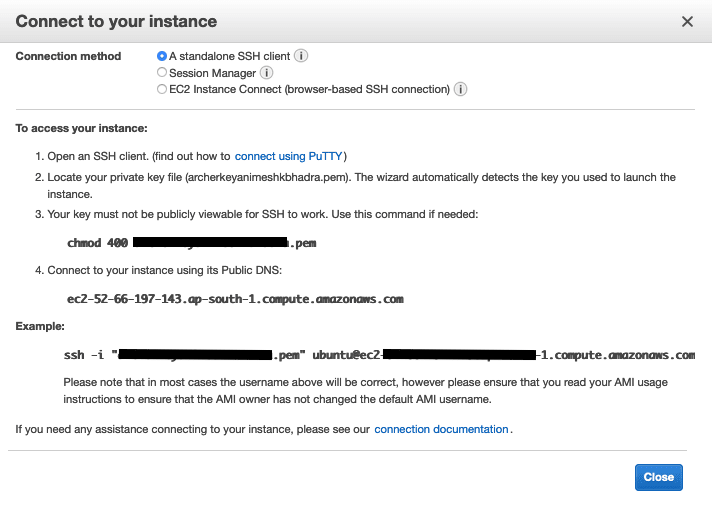
If you see in the above screen, the AWS EC2 is still in Initializing phase. Please click the Connect button to get the connect information, which would look like this.
The above screen tells you all the information you need to connect.
To elaborate on the step, it is a two step process
- Reduce the permission on the PEM key.
- Connect to the AWS EC2 using the SSH command.
Reduce permission of PEM File
You should have the PEM file downloaded before, saved locally. Navigate to the directory where the PEM file is present. Execute this command to reduce the permission
chmod 400 <key_file>.pem
The chmod command above will only provide the read permission to only owner. Groups and Others have no permission on the files. Once you have reduced the permission move to the next step.
SSH connect to AWS EC2
This is the big step, where you actually connect to AWS EC2. The general structure of the command is,
ssh -i "key_file_name.pem" ubuntu@ec2-12-66-176-143.<region>.compute.amazonaws.com
Once you have the SSH executed your terminal should look like this.
You can execute some command on the SSH terminal, like for Ubuntu the most popular commands to execute is
sudo apt update && sudo apt upgrade -y
This is will update the software on the server.
Please think how you can launch an Apache2 Web Server in this AWS EC2 instance.
Terminate of launched AWS EC2
You have launched the AWS EC2 instance, in the free tier, it does not mean that you have infinite free usage. You should terminate the launched AWS EC2 instance. This will prevent you from unwanted cost.
Go to EC2 Dashboard > Instance, and click on Action, it will look like this.
Select the Instance State > Terminate. This will ask for confirmation like this,
Once selecting Yes, Terminate, it will start the termination process, and once done you should a screen like this.
With this, you have safely launched, executed and terminated an AWS EC2 instance. Congratulation on the big step.
Conclusion
When this article started, you may not have known what is an AWS EC2 instance, How to make it work. You may have never thought it could be so easy to create one.
You may still do not understand a lot of options which were selected in the above process, but you will understand each and every detail in the coming series of article.
Launching a new free-tier EC2 instance is a 7 Step process, and you can login to the instance by SSH in case of Linux OS and RDP for Windows.
Now you have your own piece in the cloud, do not forget to terminate the instance else, this piece of cloud will put a hole in your pocket.
Reference
- Image by Comfreak from Pixabay
- Photo by Anna Shvets from Pexels
- Technology photo created by onlyyouqj - www.freepik.com
- Photo by Wil Stewart on Unsplash

Posted on April 23, 2021
Join Our Newsletter. No Spam, Only the good stuff.
Sign up to receive the latest update from our blog.


