Understanding State in React JS - Part 4

Yuvaraj
Posted on July 6, 2021

Hello everyone 👋,
In the previous article of Learn React JS Series, we learned about,
- What is a Component?
- When to use a Component?
- How to create a Component?
- How to separate a big component into smaller components?
In this Part 4 of Learn React JS Series, we will learn about what is State, how to use it, and when to use it.
What is State?
State is similar to props, but it is private and fully controlled by the component.
When to use State?
In the previous part of this series, we created a SearchResults functional component that accepts props as an argument and renders the URL, title, and description.
function SearchResult(props) {
  return (
    <div>
      <div className="search-url">{props.url}</div>
      <h2 className="search-title">{props.title}</h2>
      <div className="search-description">{props.description}</div>
    </div>
  );
}
export default SearchResult;
Assume that you wanted to update the URL to localhost on the click event of a button.
function SearchResult(props) {
  // newly added - handler for button click
  function updateURL() {
    props.url = "localhost";
  }

  return (
    <div>
      <div className="search-url">{props.url}</div>
      <h2 className="search-title">{props.title}</h2>
      <div className="search-description">{props.description}</div>
       // newly added
      <button onClick={updateURL}>Update URL</button>
    </div>
  );
}
export default SearchResult;
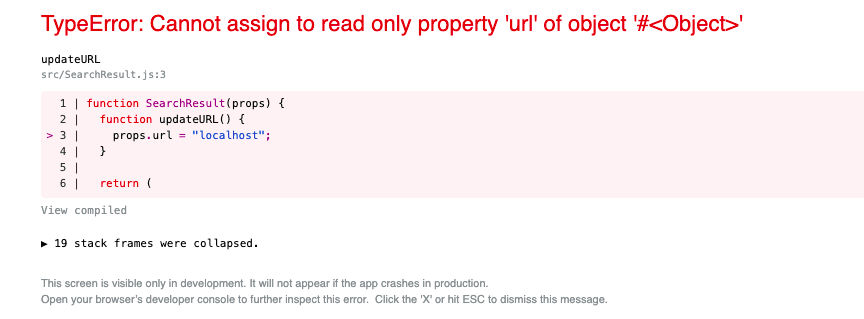
When the click event happens on the button, updateURL function is triggered to update the URL in props. But, when it tries to update the URL, the following error will be displayed.
This is because props are the read-only property and the props values are obtained from the parent component. Props cannot be directly updated in the Component.
Similarly, taking a Counter example, if we have a Counter component, the counter value should be controlled by the Counter component. In this case, we should use State instead of Props to maintain the state for each component on its own. Let's see it in the next section on how to use it.
How to use State?
- Create a class Component with for
Counterand extend theReact.Component.
import React from "react";

export class Counter extends React.Component {

}
- Override the constructor and pass
propsto the base class.
import React from "react";

export class Counter extends React.Component {

constructor(props) {
    super(props);
  }

}
- Define the state with its initial values. In our case,
countis initialized to 0 andisStartedas false.isStartedflag is used to toggle the label. (start/stop)
export class Counter extends React.Component {

constructor(props) {
    super(props);
    this.state = { count: 0, isStarted: false };
  }

}
- Override the
rendermethod. Render() method should return a value JSX. In the render() method, we have a button that displays either Stop/Start based onisStartedflag from the state object &spantag to show counter value.
export class Counter extends React.Component {

constructor(props) {
    super(props);
    this.state = { count: 0, isStarted: false };
  }

  render() {
    return (
      <div className="counter">
        <button className="btn">
          {this.state.isStarted ? "Stop" : "Start"}
        </button>

        <span>Count is {this.state.count}</span>
      </div>
    );
  }

}
- To start the counter on the
buttonclick, listen to theonClickevent on the button with the handler function.
export class Counter extends React.Component {

constructor(props) {
    super(props);
    this.state = { count: 0, isStarted: false };
    // This binding is necessary to make `this` work in the callback. eg (toggleButton)
    this.toggleButton = this.toggleButton.bind(this);
  }

 toggleButton() {
    if (!this.state.isStarted) {
     // clicked Start button, so start the timer
    } else {
    // clicked stopped button, so clear the timer
    }
  }Ï

  render() {
    return (
      <div className="counter">
        <button className="btn" onClick={this.toggleButton}>
          {this.state.isStarted ? "Stop" : "Start"}
        </button>

        <span>Count is {this.state.count}</span>
      </div>
    );
  }

}
To increment the counter, we should use this.setState instead of directly changing the counter by this.state.counter = this.state.counter + 1.
Read more on why States should not be directly modified
There are 2 ways to update the State.
this.setState({})accepts an object to update the state of the component with key-value pair. Eg:this.setState({count: this.state.count})this.setState()also accepts a function rather than an object with the previous state as the first argument, and the props at the time the update is applied as the second argument.
As state update are asynchronous, it is better to use this way whenever the previous state is used to calculate new values. Syntax : this.setState((state, props) => { } )
In our case, we can update the count state by,
 this.setState((state) => ({
       count: state.count + 1,
 }));
Our final code for the Counter component,
import React from "react";

export class Counter extends React.Component {
  constructor(props) {
    super(props);
     // local state
    this.state = { count: 0, isStarted: false };
    // This binding is necessary to make `this` work in the callback. eg (toggleButton)
    this.toggleButton = this.toggleButton.bind(this);
  }

  toggleButton() {
    if (!this.state.isStarted) {
       // clicked Start button, so start the timer
      this.counterInterval = setInterval(() => {
        // Update the counter state
        this.setState((state) => ({
          count: state.count + 1,
        }));
      }, 1000);
    } else {
       // clicked stopped button, so clear the timer
      clearInterval(this.counterInterval);
    }
    // update the isStarted state
    this.setState({
      isStarted: !this.state.isStarted,
    });
  }

  render() {
    return (
      <div className="counter">
        <button className="btn" onClick={this.toggleButton}>
          {this.state.isStarted ? "Stop" : "Start"}
        </button>

        <span>Count is {this.state.count}</span>
      </div>
    );
  }
}
Use the counter component in the App.js
import React from "react";
import { Counter } from "./Counter";

function App(props) {
  return (
    <div className="container">
      <h1>Understanding State</h1>
      <Counter></Counter>
      <Counter></Counter>
    </div>
  );
}

export default App;
Output
We have used the Counter component 2 times. You can clearly see the counter state is maintained by its own Counter component instance. The count value is different as we started the 2nd one after some seconds.
Resource
Here's my Github repo where you can find all the files in the part-4 branch. You can clone and try it out!
Thanks for reading the article. I hope you like it!

Posted on July 6, 2021
Join Our Newsletter. No Spam, Only the good stuff.
Sign up to receive the latest update from our blog.
Related

November 12, 2024


