How to Enhance Passport MRZ Detection in Python by Correcting Image Orientation

Xiao Ling
Posted on September 13, 2023
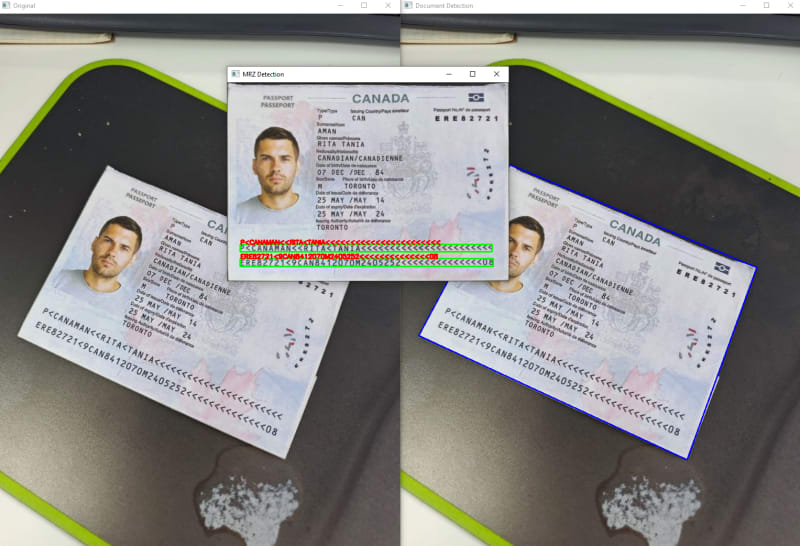
Passport Machine Readable Zone (MRZ) detection is sensitive to the orientation of the passport. If the passport is not right side up, the MRZ detection rate will be low. In this article, we will discuss how to improve the MRZ detection rate from rotated images with Python. Edge detection, perspective transformation and face detection will be used to correct the orientation of the passport.
Installation
pip install mrz-scanner-sdk document-scanner-sdk dlib mediapipe retina-face opencv-python
- mrz-scanner-sdk: Dynamsoft MRZ Scanner SDK for MRZ detection. A valid license key is required to use the SDK. You can get a free trial license from here.
- document-scanner-sdk: Dynamsoft Document Scanner SDK for edge detection and perspective transformation.
- dlib: An open-source software library that provides highly accurate and efficient face detection algorithm.
- mediapipe: A Google-developed, open-source, cross-platform framework designed for rapid, real-time face detection.
- retina-face: A deep learning based cutting-edge facial detector for Python coming with facial landmarks.
- opencv-python: Used to display images and draw lines.
Passport Edge Detection and Perspective Transformation
Let's get started with a passport image taken in the correct orientation.
Using the following Python code can successfully detect the MRZ area:
import argparse
import mrzscanner
import sys
import numpy as np

def scanmrz():
    parser = argparse.ArgumentParser(description='Scan MRZ info from a given image')
    parser.add_argument('filename')
    parser.add_argument('-l', '--license', default='', type=str, help='Set a valid license key')
    args = parser.parse_args()
    try:
        filename = args.filename
        license = args.license

        # set license
        if  license == '':
            mrzscanner.initLicense("LICENSE-KEY")
        else:
            mrzscanner.initLicense(license)

        scanner = mrzscanner.createInstance()
        scanner.loadModel(mrzscanner.load_settings())

        import cv2
        image = cv2.imread(filename)
        results = scanner.decodeMat(image)
        for result in results:
            print(result.text)
            s += result.text + '\n'
            x1 = result.x1
            y1 = result.y1
            x2 = result.x2
            y2 = result.y2
            x3 = result.x3
            y3 = result.y3
            x4 = result.x4
            y4 = result.y4

            cv2.drawContours(image, [np.int0([(x1, y1), (x2, y2), (x3, y3), (x4, y4)])], 0, (0, 255, 0), 2)
            cv2.putText(image, result.text, (x1, y1), cv2.FONT_HERSHEY_SIMPLEX, 0.4, (0, 0, 255), 2)

        cv2.imshow("MRZ Detection", image)
        cv2.waitKey(0)

    except Exception as err:
        print(err)
        sys.exit(1)

if __name__ == "__main__":
    scanmrz()
If the image is rotated at a significant angle, MRZ detection may fail.
To address this issue, we can use edge detection and perspective transformation to correct the orientation of the passport.
Here are the steps:
-
Initialize the document scanner:
import docscanner doc_scanner = docscanner.createInstance() doc_scanner.setParameters(docscanner.Templates.color) -
Detect the edges of the passport:
results = doc_scanner.detectMat(image) result = results[0] x1 = result.x1 y1 = result.y1 x2 = result.x2 y2 = result.y2 x3 = result.x3 y3 = result.y3 x4 = result.x4 y4 = result.y4 -
Rectify the passport image:
rectified_document = doc_scanner.normalizeBuffer(image, x1, y1, x2, y2, x3, y3, x4, y4) rectified_document = docscanner.convertNormalizedImage2Mat(rectified_document) -
Detect the MRZ area from the rectified passport image:
def detect_mrz(image, scanner):
    s = ""
    results = scanner.decodeMat(image)
    for result in results:
        # print(result.text)
        s += result.text + '\n'
        x1 = result.x1
        y1 = result.y1
        x2 = result.x2
        y2 = result.y2
        x3 = result.x3
        y3 = result.y3
        x4 = result.x4
        y4 = result.y4

        cv2.drawContours(image, [np.int0([(x1, y1), (x2, y2), (x3, y3), (x4, y4)])], 0, (0, 255, 0), 2)
        cv2.putText(image, result.text, (x1, y1), cv2.FONT_HERSHEY_SIMPLEX, 0.4, (0, 0, 255), 2)

    cv2.imshow("MRZ Detection", image)

detect_mrz(rectified_document, mrz_scanner)
Rotating Images Based on Facial Orientation
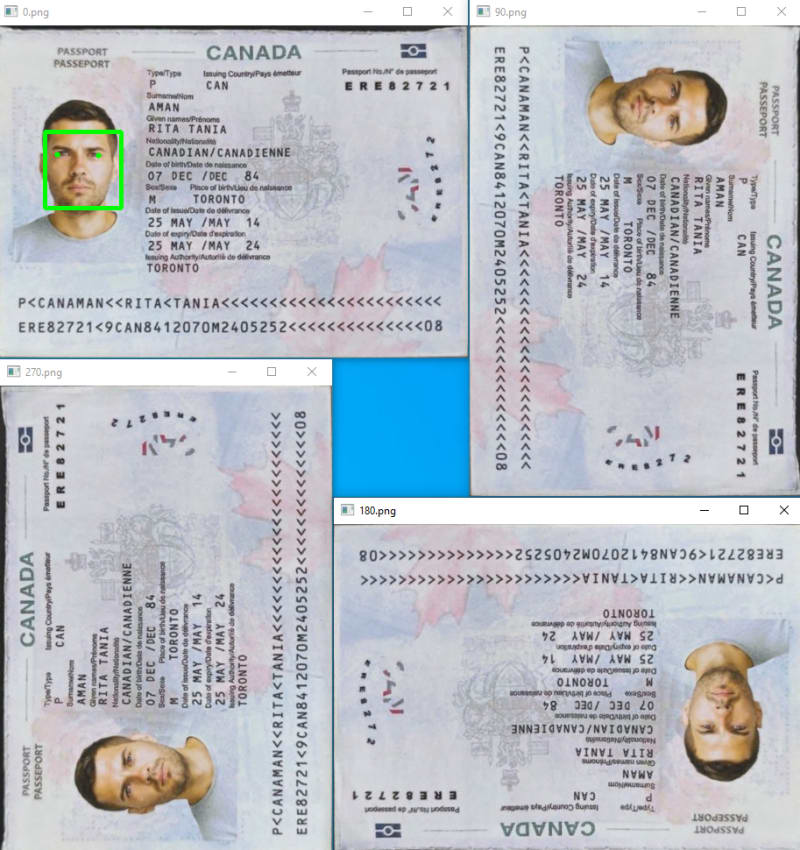
After perspective transformation, the image may be oriented in one of four directions: 0 degrees, 90 degrees, 180 degrees, or 270 degrees.
If you run the code above, you will find only the 0-degree orientation allows for normal MRZ detection. Thus, we aim to rotate the other three orientations to this correct angle. Considering that the orientation of the face on the passport is consistent with that of the Machine-Readable Zone, we can use face detection to rotate the image accordingly.
Numerous face detection algorithms exist, each with varying levels of performance. In this article, we will compare the effectiveness of three prominent algorithms: Dlib, MediaPipe, and RetinaFace.
Dlib
- Download the pre-trained model from here.
- Unzip the file and put it in the same folder as the Python script.
-
Create the Dlib face detector:
import dlib detector = dlib.get_frontal_face_detector() predictor = dlib.shape_predictor("shape_predictor_68_face_landmarks.dat") -
Detect the faces from the rectified passport image:
mg = cv2.imread(filename)
gray = cv2.cvtColor(img, cv2.COLOR_BGR2GRAY)

start_time = time.time()
faces = detector(gray)
end_time = time.time()
print("Elapsed Time:", end_time - start_time)
The dlib face detection algorithm is typically trained on datasets where faces are upright or near-upright. The features learned by the classifier assume that the faces in the images will be oriented in a specific way, usually right side up. When a face is rotated significantly (like upside-down or tilted at 90 degrees), the learned features may not match well, making it difficult for the algorithm to detect the face.
Mediapipe
Download the pre-trained model from here. At present, only BlazeFace (short-range) is available, which is a lightweight model for detecting single or multiple faces.
Put the model in the same folder as the Python script.
-
Create the MediaPipe face detector:
import mediapipe as mp from mediapipe.tasks import python from mediapipe.tasks.python import vision mp_face_detection = mp.solutions.face_detection mp_drawing = mp.solutions.drawing_utils base_options = python.BaseOptions(model_asset_path='blaze_face_short_range.tflite') options = vision.FaceDetectorOptions(base_options=base_options) detector = vision.FaceDetector.create_from_options(options) -
Detect the faces from the rectified passport image:
img = cv2.imread(filename)
img = cv2.cvtColor(img, cv2.COLOR_BGR2RGB)
image = mp.Image(image_format=mp.ImageFormat.SRGB, data=img)

start_time = time.time()
detection_result = detector.detect(image)
end_time = time.time()
print("Elapsed Time:", end_time - start_time)
Compared to Dlib, Mediapipe is faster and more accurate. However, it still falls short of our requirements because it fails to detect some facial landmarks correctly.
Retinaface
RetinaFace is a deep learning-based face detection model aimed at identifying faces in images with high accuracy. Let's explore whether it meets our objectives.
from retinaface import RetinaFace
img = cv2.imread(filename)
obj = RetinaFace.detect_faces(img_path=img)

if type(obj) == dict:
    for key in obj:
        identity = obj[key]

        facial_area = identity["facial_area"]
        facial_img = img[facial_area[1]: facial_area[3],
                            facial_area[0]: facial_area[2]]

        landmarks = identity["landmarks"]
        left_eye = landmarks["left_eye"]
        right_eye = landmarks["right_eye"]
        nose = landmarks["nose"]
        mouth_right = landmarks["mouth_right"]
        mouth_left = landmarks["mouth_left"]

        cv2.rectangle(img, (facial_area[0], facial_area[1]),
                        (facial_area[2], facial_area[3]), (0, 255, 0), 2)
        cv2.circle(img, (int(left_eye[0]), int(
            left_eye[1])), 2, (255, 0, 0), 2)
        cv2.circle(img, (int(right_eye[0]), int(
            right_eye[1])), 2, (0, 0, 255), 2)
        cv2.circle(img, (int(nose[0]), int(nose[1])), 2, (0, 255, 0), 2)
        cv2.circle(img, (int(mouth_left[0]), int(
            mouth_left[1])), 2, (0, 155, 255), 2)
        cv2.circle(img, (int(mouth_right[0]), int(
            mouth_right[1])), 2, (0, 155, 255), 2)

cv2.imshow(filename, img)
RetinaFace takes the longest time for face detection, but it is the most accurate. It correctly identifies facial landmarks in all four directions, which we can use to rotate the image.
def rotate(img, left_eye, right_eye, nose):

    nose_x, nose_y = nose
    left_eye_x, left_eye_y = left_eye
    right_eye_x, right_eye_y = right_eye

    if (nose_y > left_eye_y) and (nose_y > right_eye_y):
        return img # no need to rotate
    elif (nose_y < left_eye_y) and (nose_y < right_eye_y):
        return cv2.flip(img, flipCode=-1) # 180 degrees
    elif (nose_x < left_eye_x) and (nose_x < right_eye_x):
        transposed = cv2.transpose(img)
        return cv2.flip(transposed, flipCode=0) # 90 degrees
    else:
        transposed = cv2.transpose(img)
        return cv2.flip(transposed, flipCode=1) # 270 degrees
Combining Document Detection and Retina Face Detection for MRZ Detection
We can now combine the above steps to detect the MRZ area in rotated passport images.
import argparse
import mrzscanner
import sys
import numpy as np
import cv2
import docscanner
import time
import face_retina

def detect_mrz(image, scanner):
    ...

def detect_doc(image, scanner):
    ...

    return mat

def scanmrz():
    parser = argparse.ArgumentParser(description='Scan MRZ info from a given image')
    parser.add_argument('filename')
    parser.add_argument('-l', '--license', default='', type=str, help='Set a valid license key')
    args = parser.parse_args()
    try:
        filename = args.filename
        license = args.license

        # set license
        if  license == '':
            defaultLicense = "LICENSE-KEY"
            mrzscanner.initLicense(defaultLicense)
            docscanner.initLicense(defaultLicense)
        else:
            mrzscanner.initLicense(license)
            docscanner.initLicense(license)

        mrz_scanner = mrzscanner.createInstance()
        mrz_scanner.loadModel(mrzscanner.load_settings())
        doc_scanner = docscanner.createInstance()
        doc_scanner.setParameters(docscanner.Templates.color)

        image = cv2.imread(filename)
        copy = image.copy()
        copy = detect_doc(copy, doc_scanner)
        copy = face_retina.detect(copy)
        detect_mrz(copy, mrz_scanner)

        cv2.imshow("Original", image)


    except Exception as err:
        print(err)
        sys.exit(1)

if __name__ == "__main__":
    scanmrz()
    cv2.waitKey(0)
Source Code
https://github.com/yushulx/python-mrz-scanner-sdk/tree/main/examples/enhanced

Posted on September 13, 2023
Join Our Newsletter. No Spam, Only the good stuff.
Sign up to receive the latest update from our blog.
Related
September 13, 2023


