Building VSCode Extension: Angular Snippets for Dynamic Web TWAIN

Xiao Ling
Posted on October 31, 2022
There are many web developers who prefer using Angular and Dynamic Web TWAIN to build web document scanning and management applications. The official Dynamic Web TWAIN samples are written in JavaScript. Although TypeScript is compatible with JavaScript, it is not just a copy-and-paste job to use these JavaScript code in an Angular project. In this article, we will demonstrate how to migrate Dynamic Web TWAIN samples from JavaScript to Angular, as well as how to build a vscode extension that contains the Angular code snippets and sample project.
Download from Visual Studio Code Marketplace
Angular Snippets for Dynamic Web TWAIN
Migrating Dynamic Web TWAIN Samples from JavaScript to Angular
Dynamic Web TWAIN samples are written in JavaScript. You can find them on GitHub.
The samples can be categorized into two types: document scanning and document editing. Therefore, we create a new Angular project and add two Angular components for them respectively.
npm install -g @angular/cli
ng new dwt-angular-samples
ng generate component acquire-image
ng generate component image-editor
To make Web TWAIN API work, we need to set the license key and configure the resource path, which could be implemented using an Angular service. Run the following command to create a service.
ng generate service dynamic-web-twain
The command generates a dynamic-web-twain.service.ts file, in which we add the code for global settings.
import { Injectable, Optional } from '@angular/core';
import Dynamsoft from 'dwt';

@Injectable({
  providedIn: 'root'
})
export class DynamicWebTWAINService {

  constructor() {
    Dynamsoft.DWT.ProductKey = "LICENSE-KEY";
    Dynamsoft.DWT.ResourcesPath = "assets/dynamic-web-twain";
  }
}
If you don't have a license key, you can get it from the online customer portal.
The resource path must be configured in angular.json file as well.
{
"glob": "**/*",
"input": "./node_modules/dwt/dist",
"output": "assets/dynamic-web-twain"
}
Next, we inject the service into the components.
export class AcquireImageComponent implements OnInit {

  constructor(private dynamicWebTwainService: DynamicWebTWAINService) {
  }
}

export class ImageEditorComponent implements OnInit {

  constructor(private dynamicWebTwainService: DynamicWebTWAINService) { }
}
The preparation work is done. A quick test is to run ng serve and verify the app status through the console log. If there is no resource loading error, we can get started to migrate JavaScript to TypeScript.
Document Scanning
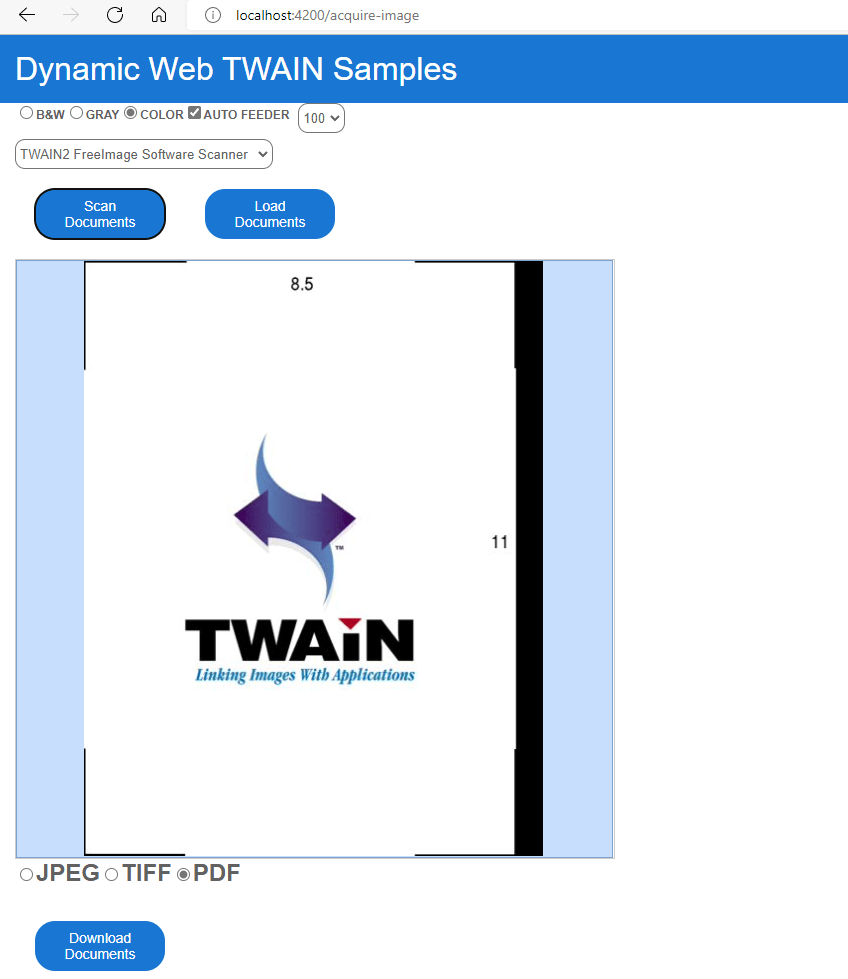
The document scanning sample includes the following features:
- Acquire documents from a scanner.
- Load images from local disk.
- Save images as JPEG, TIFF, and PDF.
Here is the UI implementation in HTML:
<div class="row">
<label for="BW">
<input type="radio" value="0" name="PixelType">B&W </label>
<label for="Gray">
<input type="radio" value="1" name="PixelType">Gray</label>
<label for="RGB">
<input type="radio" value="2" name="PixelType" checked="checked">Color</label>
<label>
<input type="checkbox" id="ADF" checked="checked">Auto Feeder</label>
<div> </div>
<select id="Resolution">
<option value="100">100</option>
<option value="150">150</option>
<option value="200">200</option>
<option value="300">300</option>
</select>
</div>
<select id="sources"></select><br />
<button (click)="acquireImage()">Scan Documents</button>
<button (click)="openImage()">Load Documents</button>
<div id="dwtcontrolContainer"></div>
<div class="row">
<label style="font-size: x-large;">
<input type="radio" value="jpg" name="ImageType" id="imgTypejpeg" />JPEG</label>
<label style="font-size: x-large;">
<input type="radio" value="tif" name="ImageType" id="imgTypetiff" />TIFF</label>
<label style="font-size: x-large;">
<input type="radio" value="pdf" name="ImageType" id="imgTypepdf" checked="checked" />PDF</label>
</div>
<button (click)="downloadDocument()">Download Documents</button>
It's almost the same as the JavaScript version. The only difference is that we use the click event instead of onclick in the button element.
Now we make comparisons between the JavaScript code and TypeScript code.
-
Initialize Dynamic Web TWAIN object.
JavaScript
Dynamsoft.DWT.Containers = [{ContainerId:'dwtcontrolContainer', Width:600, Height:800}];
Dynamsoft.DWT.Load();
Dynamsoft.DWT.RegisterEvent('OnWebTwainReady', onReady);
function onReady() {
  dwtObject = Dynamsoft.DWT.GetWebTwain('dwtcontrolContainer');
}
TypeScript
ngOnInit(): void { Dynamsoft.DWT.Containers = [{ ContainerId:'dwtcontrolContainer', Width:600, Height:800 }]; Dynamsoft.DWT.Load(); Dynamsoft.DWT.RegisterEvent('OnWebTwainReady', () => { this.onReady(); }); } onReady(): void { this.dwtObject = Dynamsoft.DWT.GetWebTwain(this.containerId); } -
Scan documents.
JavaScript
dwtObject.SelectSourceByIndex(document.getElementById("source").selectedIndex);
const onAcquireImageSuccess = () => { if (this.dwtObject) this.dwtObject.CloseSource(); };
const onAcquireImageFailure = onAcquireImageSuccess;
dwtObject.OpenSource();
var pixelType = 2;
var pixelTypeInputs = document.getElementsByName("PixelType");
for (var i = 0; i < pixelTypeInputs.length; i++) {
    if (pixelTypeInputs[i].checked) {
    pixelType = pixelTypeInputs[i].value;
    break;
    }
}
dwtObject.AcquireImage(
    {
    IfShowUI: document.getElementById("ShowUI").checked,
    IfFeederEnabled: document.getElementById("ADF").checked,
    PixelType: pixelType,
    Resolution: parseInt(document.getElementById("Resolution").value),
    IfDisableSourceAfterAcquire: true
    },
    onAcquireImageSuccess,
    onAcquireImageFailure
);
TypeScript
this.dwtObject.SelectSourceByIndex(this.selectSources.selectedIndex) const onAcquireImageSuccess = () => { if (this.dwtObject) this.dwtObject.CloseSource(); }; const onAcquireImageFailure = onAcquireImageSuccess; this.dwtObject.OpenSource(); let pixelType = '2'; var pixelTypeInputs = document.getElementsByName("PixelType"); for (var i = 0; i < pixelTypeInputs.length; i++) { if ((<HTMLInputElement>pixelTypeInputs[i]).checked) { pixelType = (<HTMLSelectElement>pixelTypeInputs[i]).value; break; } } this.dwtObject.AcquireImage({ IfFeederEnabled: (<HTMLInputElement>document.getElementById("ADF"))!.checked, PixelType: pixelType, Resolution: parseInt((<HTMLSelectElement>document.getElementById("Resolution"))!.value), IfDisableSourceAfterAcquire: true }, onAcquireImageSuccess, onAcquireImageFailure); -
Load images.
JavaScript
dwtObject.LoadImageEx("", Dynamsoft.DWT.EnumDWT_ImageType.IT_ALL, () => {}, () => {})TypeScript
this.dwtObject.LoadImageEx("", Dynamsoft.DWT.EnumDWT_ImageType.IT_ALL, () => {}, () => {}); -
Download documents as PDF, TIFF, or JPEG.
JavaScript
if (document.getElementById("imgTypejpeg").checked == true) {
    if (dwtObject.GetImageBitDepth(dwtObject.CurrentImageIndexInBuffer) == 1)
        dwtObject.ConvertToGrayScale(dwtObject.CurrentImageIndexInBuffer);
    dwtObject.SaveAsJPEG("DynamicWebTWAIN.jpg", dwtObject.CurrentImageIndexInBuffer);
}
else if (document.getElementById("imgTypetiff").checked == true)
    dwtObject.SaveAllAsMultiPageTIFF("DynamicWebTWAIN.tiff", OnSuccess, OnFailure);
else if (document.getElementById("imgTypepdf").checked == true)
    dwtObject.SaveAllAsPDF("DynamicWebTWAIN.pdf", OnSuccess, OnFailure);
TypeScript
if ((<HTMLInputElement>document.getElementById("imgTypejpeg")).checked == true) {
    if (this.dwtObject.GetImageBitDepth(this.dwtObject.CurrentImageIndexInBuffer) == 1)
        this.dwtObject.ConvertToGrayScale(this.dwtObject.CurrentImageIndexInBuffer);
    this.dwtObject.SaveAsJPEG("DynamicWebTWAIN.jpg", this.dwtObject.CurrentImageIndexInBuffer);
}
else if ((<HTMLInputElement>document.getElementById("imgTypetiff")).checked == true)
this.dwtObject.SaveAllAsMultiPageTIFF("DynamicWebTWAIN.tiff", () => { }, () => { });
else if ((<HTMLInputElement>document.getElementById("imgTypepdf")).checked == true)
this.dwtObject.SaveAllAsPDF("DynamicWebTWAIN.pdf", () => { }, () => { });
The primary difference between the JavaScript and TypeScript code is that the TypeScript requires type casting. Besides, because Angular has its own lifecycle, we also need to destroy the Dynamic Web TWAIN object when ngOnDestroy() is triggered.
ngOnDestroy() {
    Dynamsoft.DWT.Unload();
}
Document Editing
The document editing sample does not only demonstrates the basic image editing APIs of Dynamic Web TWAIN, but also shows how to use the built-in image editor.
<select id="sources"></select><br />
<div class="row">
    <button (click)="acquireImage()">Scan</button>
    <button (click)="openImage()">Load</button>
</div>

<div class="row">
    <div id="dwtcontrolContainer"></div>
    <div id="dwtcontrolContainerLargeViewer"></div>
</div>

<div style="width: 800px;">
    <input style="font-size: x-large;" type="button" value=" |< " (click)="firstImage()"/>
    <input style="font-size: x-large;" type="button" value=" < " (click)="preImage()"/>
    <input style="font-size: x-large;" type="text" size="2" id="DW_CurrentImage" readonly="readonly" value="0" /> /
    <input style="font-size: x-large;" type="text" size="2" id="DW_TotalImage" readonly="readonly" value="0" />
    <input style="font-size: x-large;" type="button" value=" > " (click)="nextImage()"/>
    <input style="font-size: x-large;" type="button" value=" >| " (click)="lastImage()"/> Preview Mode:
    <select style="font-size: x-large;" size="1" id="DW_PreviewMode" (change)="setMode()">
        <option value="0">1X1</option>
        <option value="1">2X2</option>
        <option value="2">3X3</option>
        <option value="3">4X4</option>
        <option value="4">5X5</option>
    </select>
</div>
<div class="row">
    <button (click)="removeSelected()">Remove Selected</button>
    <button (click)="removeAll()">Remove All</button>
    <button (click)="rotateLeft()">Rotate Left</button>
    <button (click)="rotateRight()">Rotate Right</button>
    <button (click)="mirror()">Mirror</button>
    <button (click)="flip()">Flip</button>
    <button (click)="showImageEditor()" id="imageEditor">Hide Editor</button>
</div>
The corresponding implementation of button click events is as follows:
removeSelected() {
    this.dwtObject.RemoveAllSelectedImages();
}

removeAll() {
    this.dwtObject.RemoveAllImages();
}

rotateLeft() {
    this.dwtObject.RotateLeft(this.dwtObject.CurrentImageIndexInBuffer);
}

rotateRight() {
    this.dwtObject.RotateRight(this.dwtObject.CurrentImageIndexInBuffer);
}

mirror() {
    this.dwtObject.Mirror(this.dwtObject.CurrentImageIndexInBuffer);
}

flip() {
    this.dwtObject.Flip(this.dwtObject.CurrentImageIndexInBuffer);
}

createImageEditor() {
    this.imageEditor = this.dwtObject!.Viewer.createImageEditor({
    element: <HTMLDivElement>document.getElementById('dwtcontrolContainerLargeViewer'),
    width: 750,
    height: 800,
    buttons: {
        visibility: {
        close: false
        }}
    });
    this.imageEditor.show();
}
Building a VSCode Extension for Dynamic Web TWAIN Angular Development
To facilitate the development of Angular applications with Dynamic Web TWAIN, we can create a VSCode extension, which includes TypeScript code snippets and Angular project templates.
Create a VSCode Extension Skeleton
According to Microsoft's documentation, we can create a VSCode extension skeleton by running the following command in the terminal:
npm install -g yo generator-code
yo code
Add TypeScript Code Snippets
- Create a
typescript.jsonfile under thesnippetsfolder. -
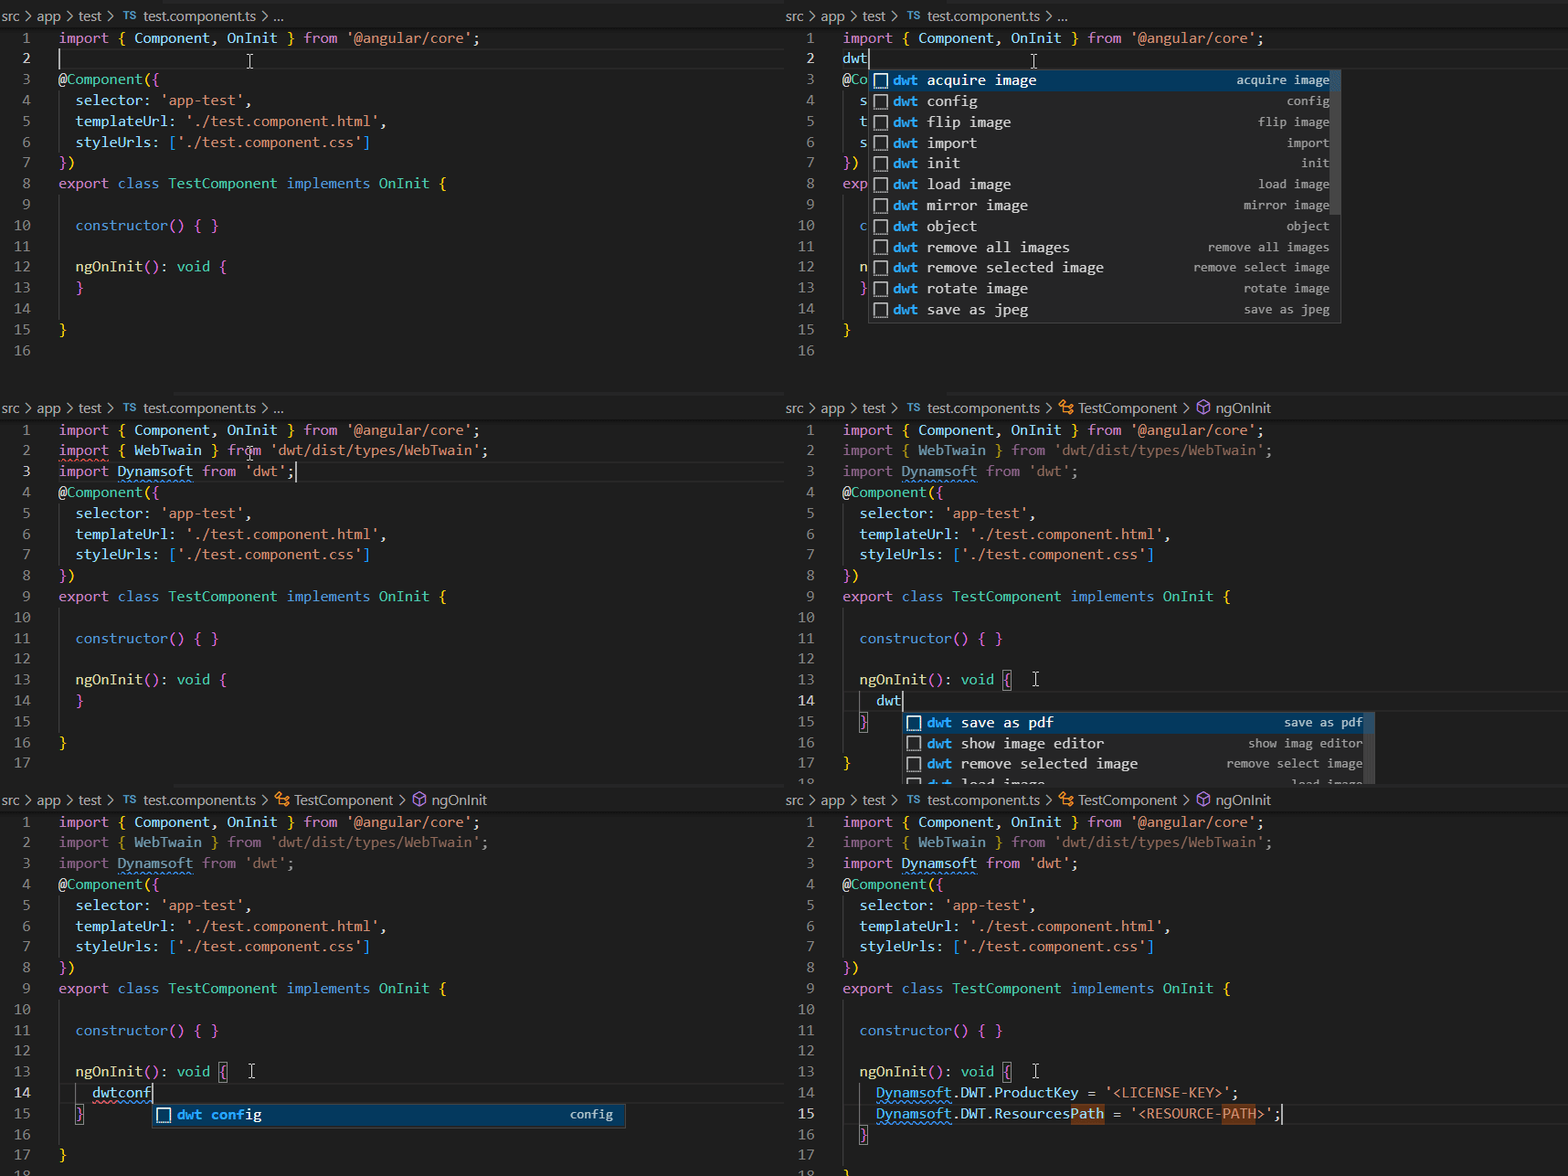
Follow the Snippet Guide to add the snippets for using Dynamic Web TWAIN.
{ "import": { "prefix": "dwt import", "description": "Import Dynamic Web TWAIN", "body": [ "import { WebTwain } from 'dwt/dist/types/WebTwain';", "import Dynamsoft from 'dwt';" ] }, ... } -
Configure the file path of code snippets in
package.json.
"contributes": { "snippets": [ { "language": "typescript", "path": "./snippets/typescript.json" } ] } -
Use the snippets in a TypeScript file.
Add Angular Project Templates
-
Copy the Angular project we created in the previous section to the extension project. To avoid compiling the Angular project when debugging the VSCode extension, we need to exclude the project folder in
tsconfig.json.
"exclude": [ "<angular-project-template>" ] -
Register a command named
quickstartinpackage.json.
"activationEvents": [ "onCommand:dwt.quickstart" ] "contributes": { "commands": [ { "command": "dwt.quickstart", "title": "dwt: Create Angular Project for Dynamic Web TWAIN" } ] } -
In
extension.ts, create a new project viavscode.window.showInputBoxand then copy the Angular project template to the new project folder.
async openFolder() { const projectName = await vscode.window.showInputBox({ prompt: 'Enter a name for the new project', validateInput: (value: string): string => { if (!value.length) { return 'A project name is required'; } return ''; } }); if (!projectName) { return ''; } let workspace = ''; const folderUris = await vscode.window.showOpenDialog({ canSelectFolders: true, canSelectFiles: false, canSelectMany: false, openLabel: 'Select folder' }); if (!folderUris) { return ''; } let workspaceFolderUri = folderUris[0]; workspace = workspaceFolderUri.fsPath; let projectFolder = path.join(workspace, projectName); if (!fs.existsSync(projectFolder)) { fs.mkdirSync(projectFolder); } console.log("Open " + projectFolder); await vscode.commands.executeCommand("vscode.openFolder", Uri.file(projectFolder), { forceNewWindow: true }); return projectFolder; } async createProject() { let src: string = path.join(__dirname, '../res/quickstart/'); // Select the project folder const answer = await vscode.window.showQuickPick(['Yes', 'No'], { placeHolder: 'Do you want to create a new folder?' }); if (!answer) { return; } let des: string = ''; if (answer === "Yes") { des = await this.openFolder(); if (des !== '') { copyFolder(src, des); } } else { let folders = vscode.workspace.workspaceFolders; if (!folders) { des = await this.openFolder(); if (des !== '') { copyFolder(src, des); } } else { des = folders[0].uri.fsPath; vscode.window.showInformationMessage(folders[0].uri.fsPath); copyFolder(src, des); } } } -
Press
F2to run thedwt.quickstartcommand.
Build and Publish the VSCode Extension
-
Build the extension package:
vsce packageIf some important template files are missing, check out whether they are included in the
.vscodeignorefile. For example, if*.tsis included in the.vscodeignorefile, all*.tsfiles will not be packaged into the extension. Sign in Visual Studio Marketplace to upload the extension package.
Source Code
https://github.com/yushulx/vscode-web-twain-angular-snippets

Posted on October 31, 2022
Join Our Newsletter. No Spam, Only the good stuff.
Sign up to receive the latest update from our blog.


