Deploy NFTs with Truffle, IPFS OpenSea & Polygon

Archie Smyth
Posted on September 12, 2021

Intro to me. My first post
Hello, I have been learning Information Technology all my life (21 now), it's my profession. For the past 18 months, studying JS and Solidity has been ideal. Considering the position I was in, which was 2 years of messing with industries I had no interest in, programming has helped me hugely with my adult life. It has provided me meaning and something to structure my life with/around, and taught me to organise my life. I was confused after leaving college in 2018, finishing my course in IT, but having no clue of where I was going to be. As I was growing up, I was scared of anything more than simple, like programming. I was not curious to learn anything and would be anxious of what others thought of me when I succeeded/failed. Slowly, I came out of this hole. This required me to be more self-aware. I learn't my skills, starting in small baby steps (helloWorld.js, print to console and all that :D.) which is definitely the way to go. Patience was key. With experience in React.js and Express.js, as well as Solidity, I am aiming for a career as a full-stack blockchain app dev.
The OLD GitHub Repo
The New Hardhat repo with MetaTXs on Polygon
A New Hardhat repo with MetaTXs and ERC1155 support
Here you will learn the basics of deploying a simple ERC-721 contract to the Mumbai testnet and how it all works.
Feel free to skip through the guide, taking only what you need and moving on. However, this is not a 'do this, then do this' tutorial (or whatever the slang is for that). I want to explain what is going on in the code, creating some knowledge for you, albeit with basic tools. Prepare for this to get verbose.
This is inspired by the ERC-721 Opensea Tutorial, as well as the Openzeppelin ERC-721 Tutorial. I plan on building my own tutorial with additional detail, and smoother guidance. You could just delegate the deploying and minting to Opensea with their frontend, but this is a basic start for developers to build project ideas off of.
I have found that the following are great for delving into Solidity: CryptoDevHub for direction and Solidity By Example for code examples.
This project uses the Truffle dev framework, as it is easy to begin with, and will give you experience with a node.js environment. Hardhat is preferred in the community. However, my knowledge of hardhat isn't up to standard at this moment. For the scope of this tutorial, Truffle will do nicely, but a Hardhat tutorial is due in the future. If you have 0 knowledge in solidity, you can always check out Remix for a quicker, smaller dev tool in the browser to get pracitising the basics of solidity.
My next tutorial will be focused on ERC-1155, the improvement on ERC-721. This newer standard allows the developer to have multiple collections of fungible and non-fungible tokens in 1 contract, reducing gas.
Token Metadata Storage
I will be using Pinata for fast, simple uploads to IPFS. This is a third-party service. Although, In future, I would recommend grabbing IPFS for desktop so that you can run a node on a Raspberry pi or such. At the time of writing this, the performance of the IPFS network has been fluctuating. Hosting an IPFS node would be the super professional way, but out of the scope of this tutorial. You may be interested in an alternative like Arweave. Arweave is similar to IPFS in that its a distributed network. However, Arweave use a Blockweave approach, more similar to a chain. Basically, you can pay gas to store immutable files.
Let us go through some prerequisites that you will need, and links to learn more about the tools you will be using. Previous coding knowledge is a big bonus. I am using Windows 10 with default cmd, not ps, but MACos and most Linux distros should function the same for this tutorial.
Prerequisites
- Basic/intermediate knowledge of the Ethereum blockchain (from an app developer view)
- Basics of Solidity, the most popular language for ethereum contracts. This includes the trusted ERC interfaces for contracts to extend, provided by OpenZeppelin.
- Node JS installed on your OS. Intermediate knowledge of JavaScript, node.js in particular.
- Truffle CLI installed on your OS. Basics of Truffle dev tool
- Basics of IPFS
- VS Code or another text editor IDE like atom , sublime text or eclipse
- MetaMask browser extension, with Polygon Mumbai testnet configured. You can make a new wallet when installing it on another/new browser, to avoid using your main.
- Git CLI for cloning the repo.
- Create an account at Pinata for 1gb of metadata storage.
- Create an account at MaticVigil for a polygon (fka matic) node url. Easiest third-party polygon node.
Links
- Eth docs for devs
- Solidity
- OpenZeppelin's ERC-721 docs
- JS docs
- Node.js
- Truffle docs
- IPFS docs + Pinata
- VS code dl
- Metamask
- Configure matic networks on Metamask
- Git
If you dont have all of these, or none, I would start by installing Node and then the rest (Truffle framework uses node.js and requires node to install it). Once you have node, you can enter npm i -g truffle in a fresh terminal.
Setup Environment
You could start entering git into the console. Then, check node as well. With that, boot VS Code, make a new workspace or folder. Open a new terminal in the folder and clone The Repo with git clone https://github.com/YourNewEmpire/Truffle-Tutorial-ERC721. Once its cloned, enter npm install to install all the modules we need for this project, rudimentary npm at work here.
Create the file '.env' in the roof the project. This file will hold your wallet seed phrase/mnemonic and free matic node url for your scripts. Write the following lines in the file
MNEMONIC=
NODE_KEY=
Wallet
To begin, lets configure metamask to connect with the mumbai testnet. Go here to find the network details of matic/mumbai. Select the Mumbai Testnet and copy name, chainid, any 1 of the rpc urls, MATIC as the currency. Type them into your metamask here
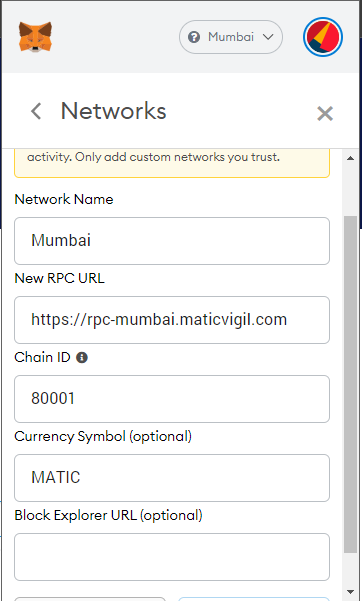
This can be cumbersome, as metamask will close when you interact with the site again. It can be easier to type them in manually.
Lets get your wallet seed phrase for the environment variables so we can send transactions. Click your avatar in the top right, then settings.
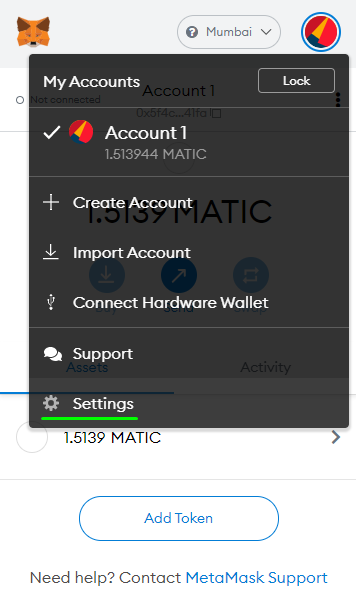
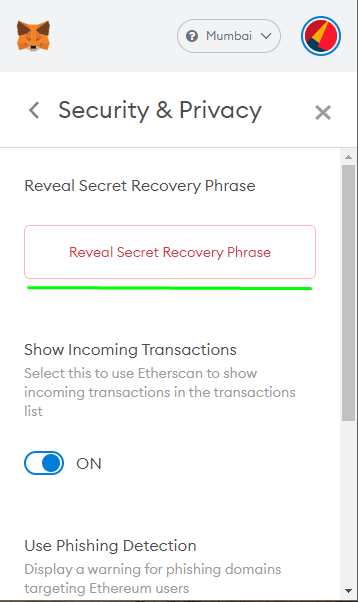
Scroll to find Security & Privacy. Then click the red Reveal Seed button, with your password ready.
Copy the seed phrase, paste it into your .env, MNEMONIC=private key here. Now you can use this var in your deploying and minting scripts. They are already binded in the JS scripts using Template Literals
You will need your eth address for the web3 scripts when minting items to yourself. Copy your address from here
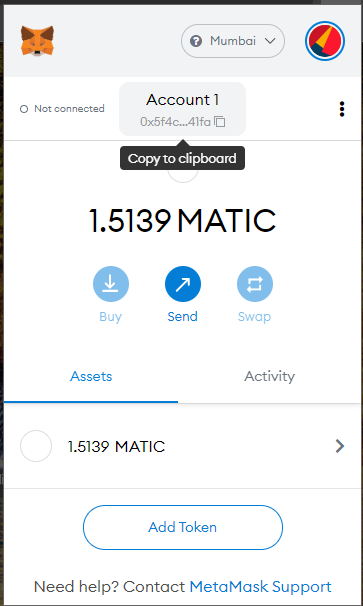
Go to truffle-tutorial\scripts\mint.js in your project. Finally, paste your address into line 14 const OWNER_ADDRESS = "HERE with the string quotes".
Head over to Matic Faucet,
Matic/Mumbai node url.
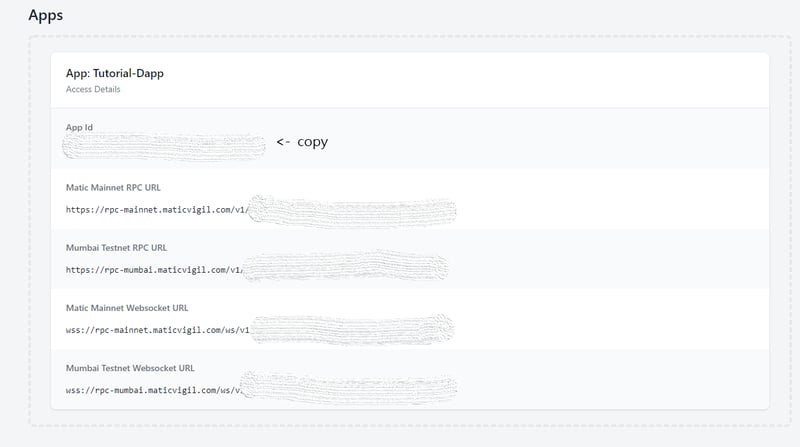
Creating an account at MaticVigil will give you a dedicated rpc url key for smooth contract interactions.
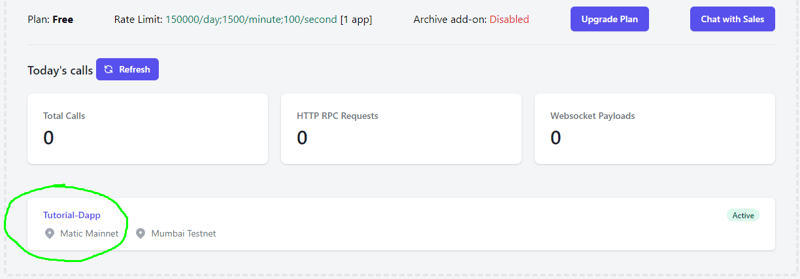
Once logged in and on the Dashboard, you can Create a new app, this should appear straight away on your Dashboard.
Paste it into your .env NODE_URL=key.
Ok. With your environment setup, let's move on to getting token metadata ready for when tokens are minted
Metadata format for Opensea
To begin here, let's look at minting NFTs at the contract level.
    function mintItem(address player, string memory tokenURI)
        public
        onlyOwner
        returns (uint256)
    {
        _tokenIds.increment();
        uint256 newItemId = _tokenIds.current();
        _mint(player, newItemId);
        _setTokenURI(newItemId, tokenURI);
        return newItemId;
    }
The mint function takes 2 arguments. The important one is the tokenURI. The mintItem function calls the _setTokenURI function, which takes in the id (index), which was just assigned and the URI. The URI is just a link to the token resource. In our case, it's on IPFS.
The point here is that Opensea will be querying that tokenURI through the method tokenURI, part of the ERC-721 standard interface.
You could also set a baseURI, as mentioned here in the OZ docs. This will be the prefix for token URIs, so that when you mint or query an NFT, you can just pass the id, and the prefix does the rest of the URI format.
So how does Opensea deal with a resource once it's got a URI to fetch? Here is where Opensea's Metadata Standards get introduced. Following these standards are required for Opensea to read and display your metadata, you do not want a blank image for an NFT.
Every token URI is gonna be a JSON file looking something like this:
{
  "description": "Friendly OpenSea Creature that enjoys long swims in the ocean.",
  "external_url": "https://openseacreatures.io/3",
  "image": "https://storage.googleapis.com/opensea-prod.appspot.com/puffs/3.png",
  "name": "Dave Starbelly",
  "attributes": [ ... ],
}
Opensea is specifically looking for the names above, 'image', 'name' etc.
I will be using Name, Desc and Image. If you want to try audio and video, animation_url is the one as mentioned in the standards page I linked above. The image or animation url will point to another resource, also on IPFS. This is the image or video that will appear on Opensea
As well as NFT metadata, there is Collection metadata fetched from the contractUri() function in the GameItem.sol contract. Each NFT contract is a Collection. Each minted token on the contract is an NFT. We will need to upload metadata for the Collection in the form of, image, name, desc.
Create and upload token metadata
Now that we know the guidance on NFT metadata, we shall write some up before deploying any contracts. Because of IPFS, I have decided to organise my folders, separating collection data from nft data. I follow this pattern because I usually mint more than 1 nft, therefore I want to upload my media in folders. Feel free to organise them in any way you want.
Start by creating 2 folders in the root of the project. collection-data and nft-data, you should consider adding this to gitignore if you ever push this to GitHub. Within collection-data, have your collection image and json file like so:
Of course, use your own values. The external_link is not crucial, but worth testing, and say if you leave name empty, Opensea will make a name.
As you may notice the image value is empty. We need to upload the collection image first, to get the image URI for the JSON file to point to, which we will upload next. Despite that they are together in a folder in the project, the image needs to be uploaded before the json.
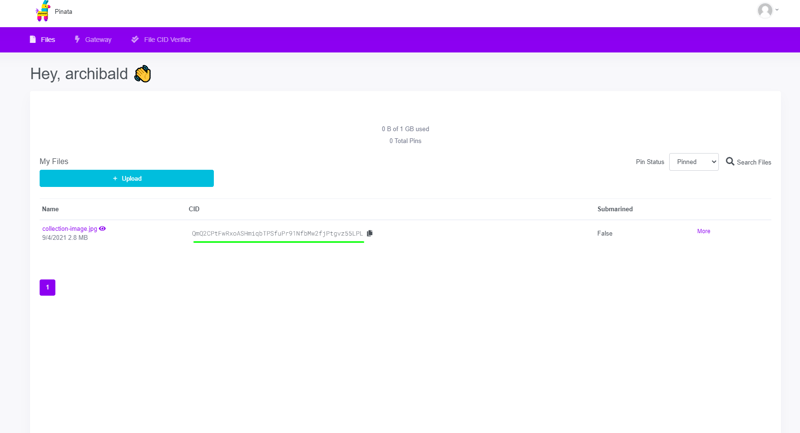
Once you have your test collection image ready, open up Pinata IPFS from the prerequisites and upload it. After logging in, you will land straight at the uploading page. Click Upload a File and pick the collection image from your project in the file explorer.
In your dashboard, you will see the file has a CID or Content Identifier. As described in the IPFS docs, the CID is an address/hash based on the content, not a location. Not necessarily important for us but interesting nonetheless.
Clicking on the image will send you to a pinata gateway url. I have had my best experiences in using this URI format: https://ipfs.io/ipfs/your-collection-cid. Copy this, and your CID from Pinata and paste it into the collection JSON in your project:
{
      "name": "Collection Name",
      "description": "A test collection for ERC721 tutorial",
      "image":
"https://ipfs.io/ipfs/QmQ2CPtFwRxoASHmiqbTPSfuPr91NfbMw2fjPtgvz55LPL"
}
You can do the same for your nft-data. Upload the test nft image first, then copy and paste the cid into 'nft.json'. The JSON may look like this:
{
    "name": "Example Coffee #1",
    "description": "I am a coffee but, this .jpg extension allows me to be warm forever.",
    "image": "https://ipfs.io/ipfs/QmSXSHaUDJTorFReSJA24HjruRo2yqYbxPUSbxG7xTi31c"
}
Finally, you can upload your JSON files for both collection, and nft[s]. When minting multiple NFTs, I like to upload all my media in one folder, so the uri will look like: https://ipfs.io/ipfs/folder-hash/nft1.jpg. However, for this post I shall upload 1 jpg.
With that, we are done with the metadata. You will need the collection and NFT JSON CIDs for the next stage, when we will deploy and mint, ooh exciting.
Deploying and Minting the NFT
With the metadata and environment all set, we can begin this stage by viewing the GameItem.sol in the contracts folder of the project. It will look like this
pragma solidity ^0.8.0;

import "../node_modules/@openzeppelin/contracts/token/ERC721/extensions/ERC721URIStorage.sol";
import "../node_modules/@openzeppelin/contracts/utils/Counters.sol";
import "../node_modules/@openzeppelin/contracts/access/Ownable.sol";

contract GameItem is ERC721URIStorage, Ownable {
    using Counters for Counters.Counter;
    Counters.Counter private _tokenIds;

    // set contract name and ticker.
    constructor() ERC721("Contract Name", "TIC") {}

    //get the current supply of tokens
    function totalSupply() public view returns (uint256) {
        return _tokenIds.current();
    }

    // for opensea collection
    function contractURI() public pure returns (string memory) {
        return "https://ipfs.io/ipfs/your-collection-ipfshash";
    }


    function mintItem(address player, string memory tokenURI)
        public
        onlyOwner
        returns (uint256)
    {
        _tokenIds.increment();
        uint256 newItemId = _tokenIds.current();
        _mint(player, newItemId);
        _setTokenURI(newItemId, tokenURI);
        return newItemId;
    }

}
If you are new to Solidity, there is a bit to talk about here. Starting with pragma. Pragma simply sets the solidity compiler version to use when compiling the file. The project is using 0.8.0, the highest minor version of Solidity available, which can be set in the truffle-config.js.
We are then importing Ownable, for modifying function calls to owners only (you, the deployer), then Counters for the tokenId's, this is a trusted utility for keeping track of tokens safely. ERC721URIStorage inherits the classic ERC721 interface, and adds some token URI help to the contract, recently added in Openzeppelin version 4.x . You should definitely have a look at these libraries, and abstract contracts, as they are great examples for building your own interfaces.
The most important bit for us, is the contractURI function. As I was saying earlier, 1 ERC-721 contract is 1 collection. This function returns a string that is the URI to your collection JSON. Opensea will call this method when displaying your collection on their frontend.
Copy your collection JSON ipfs URI into the return statement.
function contractURI() public pure returns (string memory) {
        return "https://ipfs.io/ipfs/your-collection-ipfshash";
    }
Optionally, you may set the ticker and the token/contract name in the Constructor function. This function is ran once at deployment for initialising something. In our case, its inheriting ERC-721 through ERC721URIStorage, expecting ticker and name arguments. This a test, so I shall leave it default.
Providing your wallet phrase and node url are in the .env file, we can now deploy this contract. Open a new terminal in the project and enter truffle develop. Powershell might need the npx prefix. This command will prep the truffle cli for deploying, compiling and more. You could enter compile for a single compile without having to deploy, but when you deploy, truffle will compile anyway.
To deploy run migrate --network mumbai in the terminal. ** You may experience errors here**, especially with specific environments. These tools are certainly not perfect. A good troubleshoot would be to run migrate --network development to eliminate where the error is.
I got this:
Starting migrations...
======================
> Network name:    'mumbai'
> Network id:      80001
> Block gas limit: 20000000 (0x1312d00)


1_initial_migration.js
======================

   Replacing 'Migrations'
   ----------------------
   > transaction hash:    0x4f703c7184a36b92af5fdd5d7751a7ed444670031475dfc90009927b96949d82
   > Blocks: 2            Seconds: 8
   > contract address:    0xb6e5A1B174C1CA435cB43Cf61fF9064F87f5f0Ec
   > block number:        18792256
   > block timestamp:     1631363185
   > account:             0x5f4c3843495Babe89cB3516cEbD8840024e741fa
   > balance:             1.408520183748380055
   > gas used:            245600 (0x3bf60)
   > gas price:           3 gwei
   > value sent:          0 ETH
   > total cost:          0.0007368 ETH

   Pausing for 2 confirmations...
   ------------------------------
   > confirmation number: 2 (block: 18792258)

   > Saving migration to chain.
   > Saving artifacts
   -------------------------------------
   > Total cost:           0.0007368 ETH


2_deploy_token.js
=================

   Replacing 'GameItem'
   --------------------
   > transaction hash:    0x2a0bc70f5c77c9c28e4a237de7adf72bac55c5d05d744a013c1dbd67fd1f245b
   > Blocks: 2            Seconds: 4
   > contract address:    0x87E67eBEBb785060d4Ed85Bff7E67dEc9Efa87F4
   > block number:        18792264
   > block timestamp:     1631363201
   > account:             0x5f4c3843495Babe89cB3516cEbD8840024e741fa
   > balance:             1.400152706748380055
   > gas used:            2743246 (0x29dbce)
   > gas price:           3 gwei
   > value sent:          0 ETH
   > total cost:          0.008229738 ETH

   Pausing for 2 confirmations...
   ------------------------------
   > confirmation number: 2 (block: 18792266)

   > Saving migration to chain.
   > Saving artifacts
   -------------------------------------
   > Total cost:         0.008229738 ETH


Summary
=======
> Total deployments:   2
> Final cost:          0.008966538 ETH


- Blocks: 0            Seconds: 0
- Saving migration to chain.
- Blocks: 0            Seconds: 0
- Saving migration to chain.
Do not close the terminal, we are not done here. Above you can see that Truffle ran the Migration script, to deploy the Migrations.sol contract, which is follwed by the token script. This is truffle's way of deploying contracts. You could order more deployments by creating more js scripts in the migrations folder of the project. If you're deployment was successful, very well done to you, you have deployed your contract.
We need the token contract address for minting, and you could get this from the Mumbai Tesnet Block Explorer, under your address. Conveniently, the address was printed to the console by truffle after deployment to the blockchain.
Copy the contract address: your token address line from the console under the 2_deploy_token.js log. Paste this into your scripts/mint.js file on line 13 like so:
const NFT_CONTRACT_ADDRESS = "0x87E67eBEBb785060d4Ed85Bff7E67dEc9Efa87F4"
The web3 script will need this constant variable for instantiating the contract, to call/send methods on it.
The script will also need YOUR account address in the OWNER_ADDRESS variable to mint to YOU, and for you to send this transaction.
You may notice that we are reading the contract artifact JSON with fs:
let rawdata = fs.readFileSync(path.resolve(__dirname, "../build/contracts/GameItem.json"));
let contractAbi = JSON.parse(rawdata);
const NFT_ABI = contractAbi.abi
This might need to be reworked for Linux and MACos. I am not super experienced with linux file systems. All the script is doing here is reading the contract ABI from another file in the project
Web3.js will need this JSON for reference when calling/sending. Therefore, if you compiled a completely different contract in the same project, you would overwrite the artifacts. Make a new project for new contracts after you're finished with this one
For the final requirement of this script, you need the CID hash of the NFT JSON you uploaded to Pinata IPFS earlier for the argument of the mintItem function. Paste it into your script here on line 43:
await nftContract.methods
.mintItem(OWNER_ADDRESS, `https://ipfs.io/ipfs/your-tokenjson-cid`)
.send({ from: OWNER_ADDRESS })
.then(console.log('minted'))
.catch(error => console.log(error));
With the script ready, run node scripts/mint.js in the project terminal. You can open a new terminal to do this or press CTRL+C to exit the truffle cli in the current terminal.
Provided that there are no errors here, 'Minted' should be printed to console and you can check your account on the block explorer to ensure that it was minted. Post any errors in the comments and google them.
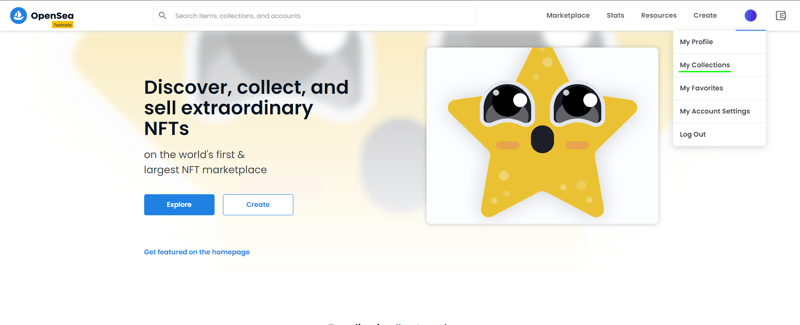
With your Metamask logged in on your browser, let's view our NFT on Opensea via an existing contract. Go to the Opensea Testnet frontend. Open the profile icon dropdown to sign in, then click My Collections:
Next, tap the 3 dots menu icon, next to Create a Collection, then 'import an existing contract'. You will then be asked whether the nft is on a mainnet, testnet. Select testnet of course.
Now you can pass your nft contract address into the field, and select 'Mumbai' in the dropdown on the left like so:
You may receive the following message: 'We couldn't find this contract. Please ensure that this is a valid ERC721 or ERC1155 contract deployed on Mumbai and that you have already minted items on the contract'.
This is a common issue, as Opensea will display your tokens when they can. As long as you can see the token contract and transactions on Polygon Scan, you know it is a valid ERC-721 contract and has minted 1 item. Some dev's have waited 24 hours + to get their NFTs to appear.
Here is my NFT. I made the mistake of not adding the collection hash to the contractURI function in my first attempt. Despite redeploying the contract with the fix, Opensea still cant read the collection metadata. Fortunately, you can change this by editing the collection. At least my 'Example Coffee' NFT metadata worked.
Final notes and Conclusion
With all the action behind us, let's have a review.
You have learnt a simple way of deploying ERC-721 tokens to the Polygon testnet, nice. You can repeat this process for Matic mainnet, providing you have MATIC tokens on your mainnet balance, and you edit your mint script to instantiate with the MATIC keyword as oppose to MUMBAI on line 31 of mint.js.
There are few extras that I missed for this tutorial.
Firstly, I could have verified the contracts for a more professional look. Although, it is easier to do this in Hardhat, despite the fact that I cannot get a working example with Hardhat yet. Truffle requires more configuration for verifying contracts, therefore I will leave this for the next tutorial.
Optionally, you can add extra code to your contract to avoid gas fees when selling items from Opensea. The Opensea documentation explains how to work it. Simply, you set Opensea's matic contract address as your operator for your contract. With this, Opensea can transfer NFTs for you, saving you, or any owner gas.
In addition to these extras, you might want to check out freezing your metadata in production. This is a feature by Opensea to stop mutable metadata. NFT buyers and sellers will be comforted to see that their metadata is frozen.
Finally, I would like to guide you towards bigger and better tutorials with these links:
- ERC-721 doc - The old standard we used
- ERC-1155 doc - The improved community standard for fungible AND non-fungibles
- Filip from Moralis on ERC-1155
I wish you the best and hope you learn't something.
Edit
New Hardhat repo with OpenSea MetaTXs and support for ERC-1155/721

Posted on September 12, 2021
Join Our Newsletter. No Spam, Only the good stuff.
Sign up to receive the latest update from our blog.
