4 Steps to Create Survey Forms in WordPress that Only Certain People Can Access

WP Meta Box Plugin
Posted on February 2, 2021

Want to create a survey, poll, etc. on your WordPress site? Easy peasy! But how can you allow only certain people to access these survey forms, and then hide or remove them after a few days? Sounds difficult, right? But don't worry, we are right here to help you!
First, you just need to create a survey form and then allow the reader to create an account to log in to your WordPress website. Afterward, use a user roles management plugin to limit who can access the survey form. Finally, create an expiration date for the survey / poll. Everything can be done within 4 steps below:
Step 1: Create a Survey Form on Your WordPress Website
There are many ways to create survey forms in WordPress such as using plugins, using custom fields, coding manually, using page builders, etc.
In this article, I use the Gravity Form plugin (premium only). Although there are many free contact form plugins used to create survey forms, polls, etc., I choose this premium plugin because it has many advanced customization options and settings. These advanced settings will be useful in the future when you need more than a simple form.
First, purchase Gravity Form, and then go to Dashboard > Add New > Upload to install and activate the plugin.
Once activating, go to Forms > Add New.
This is the interface to create forms of Gravity Form plugin:
After you finished creating the survey form, insert it to any post / page you want.
If you're using Gutenberg editor, look for the Gravity Forms block and choose the desired form:
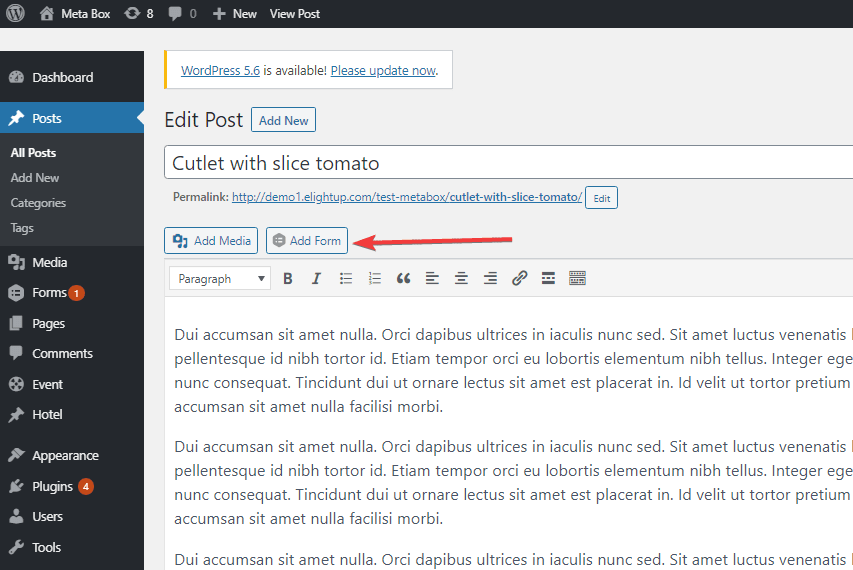
If you're using Classic Editor, you will see the button to insert forms like this:
Simpler, you can use the following shortcode to display the survey form wherever you want:
[gravityform id="1" title="false" ajax="true" tabindex="49"]
Note: id="1" is the ID of the survey form that you've created.
Step 2: Choose Who Can Access the Survey Form
I'm going to use Member plugin to control who can see and fill in the survey form that we've created in step 1. This is a free plugin that allows you to quickly manage, add user roles and permissions in WordPress.
Upon activation, go to Members > Add New Role. You can grant certain permissions to this user role. However, if you just want to allow them to see and interact with the form, you better choose only the "Read" option in the General section.
Once finishing, go to the survey page, edit it, and drag to the bottom. Here you can choose the user role that is allowed to access and take part in the survey (in this article, it's Form User).
Done! You've finished allowing only Form Users to see and respond to the survey.
Step 3: Allow Users to Create Their Accounts
In this step, we are going to allow users to create their accounts on the front end. Once they have their accounts, they will be granted the "Form User" role.
To do that, you need core Meta Box plugin (create custom fields) and MB User Profile extension (create registration and login forms, manage accounts on the front end).
We have an article on how to create an account page on the front end, you can refer to it here.
Once finishing, I went to the front end and took a test. As you can see, when I hadn't logged in yet, I couldn't view the survey. But when I logged in with the account registered as a Form User, I could already see and fill in the survey form.
Step 4: Automatically Hide / Remove the Survey Forms
Normally, we just do the survey in a certain term of time. If you want to hide or remove the survey form when the survey ends, you can use Post Expirator plugin (free).
To get more details, refer to this article.
Last Words
This is an easy and straightforward method to create survey forms to collect user feedback and allow certain people to see and participate in the survey. Moreover, you can also automatically hide the survey after it ends. Very convenient, right?
If you're getting stuck with troubles related to meta boxes and custom fields, feel free to share them with us in the comment section or in the Meta Box users group.

Posted on February 2, 2021
Join Our Newsletter. No Spam, Only the good stuff.
Sign up to receive the latest update from our blog.


![How to Add Google Ads to WordPress [Beginners Guide]](https://media2.dev.to/dynamic/image/width=1000,height=420,fit=cover,gravity=auto,format=auto/https%3A%2F%2Fdev-to-uploads.s3.amazonaws.com%2Fuploads%2Farticles%2Fo1ro60x2ja8pe2falf4g.jpg)