How I built a Contentful App combined with Commerce.js (I)

William Iommi
Posted on September 16, 2021

Oh Hi 👋 and welcome to my very first blog post ever 🚀 ... be nice 😊.
Why I'm here?
Interested in the JAM stack architecture, I recently started playing with Contentful, a headless CMS. I started an e-commerce POC project and after a week or two, I felt the need to dive deeper and try to build a Custom App. This is my journey about it (or at least a part of it 😄)...let's go.
Prerequisites
- Node.js installed on your machine (Contentful suggests the latest LTS version).
- Basic CLI knowledge.
- Javascript knowledge? Of course. Typescript? Yes, but not mandatory.
- Contentful knowledge and an account on their platform.
- Contentful Apps use React, so a basic knowledge is required (Hooks and Functional Components).
- An account on Commerce.js. I used it for convenience, it has a free-plan and webhooks for products and categories.
Warm up...
First thing first...What is a Contentful App and why do I need it in my project? The 'need' is subjective but yeah ok let's say we need it 😁
The What
Even if Contentful is a great headless CMS, it can't cover all the business requirements of a real project. The App Framework lets you customize their web app for your needs.
A customer wants a blog post with a section that shows a pin on a google map? You can build a custom field that allows your customer to work directly with the map and pin a point without inserting coordinates.
This is just a simple example, the framework lets you customize the following sections of the cms:
- Entry Field
- Entry Sidebar
- Entry Editor
- Page
- Dialog
- App Configuration
If you want to know more about every single customization, you can go directly on this page of the Contentful website.
For our scenario, we will customize: App Configuration, Dialog and Entry Field.
When your app is complete, you can deploy it directly on Contentful (there is a bundle size limitation though) or host it somewhere else providing a public URL.
The Why
So... apart from learning purposes, why do I need it?
Like I mentioned before, I'm working on an e-commerce POC using Nextjs, Contentful and Commerce.js.
I have editorial content (pages and components) defined on Contentful, Category and Product pages that gets data directly from Commerce.js.
But, what if I want to have a link in my navigation menu or in some Hero banner that points directly to a Product or a Category page? The quick solution of course is to have maybe a Link component on Contentful with a simple text field that contains the relative path...easy...done 😁 ...
What about typos? Or maybe ... what if I'm a lazy content editor and I want to just click buttons or more realistic, I'm a restricted user and I don't have access to the e-commerce platform in order to see myself the permalink/SKU of the product.
We should make life easier for our customers, we should provide a UX that lets our customers select a category or a product without leaving the Contentful interface... 💡 💡 💡 ... let's finally build our App...
Getting Started...
Contentful has a CLI tool that lets you start very quickly.
We can create our project folder (commerce-selector) with the following command:
npx @contentful/create-contentful-app init commerce-selector
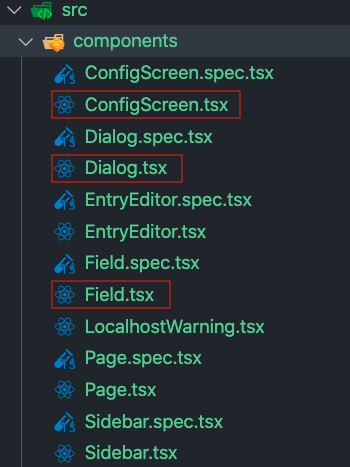
This creates a commerce-selector folder. Inside of it, under the src folder we can find our components folder which contains the sections/locations we want to customize for our app (we will work on the highlighted files).
But wait a second, this is a create-react-app boilerplate under the hood, let's try to run npm run start on our terminal and visit http://localhost:3000 ...
Hmm...interesting...the message is pretty clear, our local environment is not meant to run on our machine but directly on the Contentful web app... let's see how...
Creating the AppDefinition on Contentful
In our space on Contentful, we need to create an AppDefinition. Doing this we let Contentful know that our app exists.
With this configuration, we can deploy the final app once finished but we can also use it as our development playground.
In our Organization settings, we need to go to the App Section and click the Create App button.
We need to give our app a name and a frontend location. At the moment the URL will be our localhost.
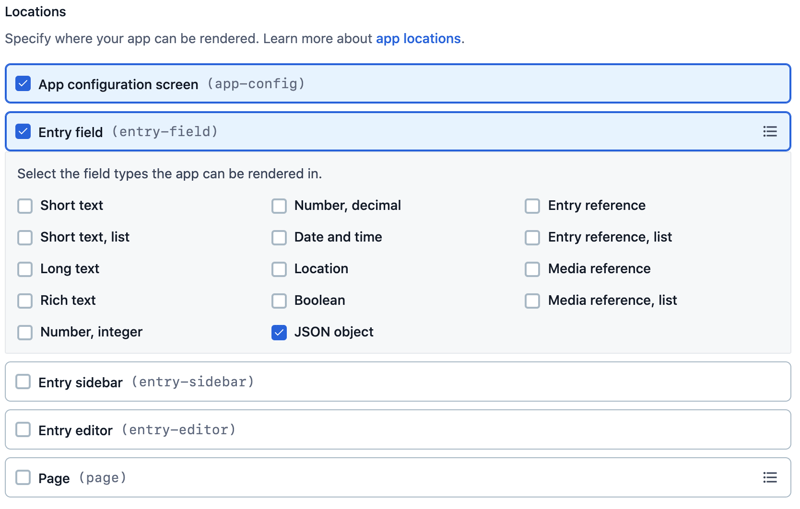
As soon as we start typing the URL a bottom section will appear. Here we can choose which locations we want to customize. This is how Contentful knows where to show our app.
We need to check App configuration screen and Entry Field (the Dialog Location will be used by the Entry Field itself).
For the Entry field, we need to specify also the data type of the field, in our case will be a JSON object.
Instance parameters
For our scenario, we need to do an extra step and define an instance parameter.
This kind of parameter is requested when you define the entry field in your content type, its value is specific for that field only.
The why for this parameter is because in my mind this app will be used not only for define category/product URLs but also for saving info about products/categories, used for example in some editorial components.
Of course, nobody stops you to create specific apps for specific tasks, especially now that Contentful increased the amount of installable apps for Team and Enterprise accounts.
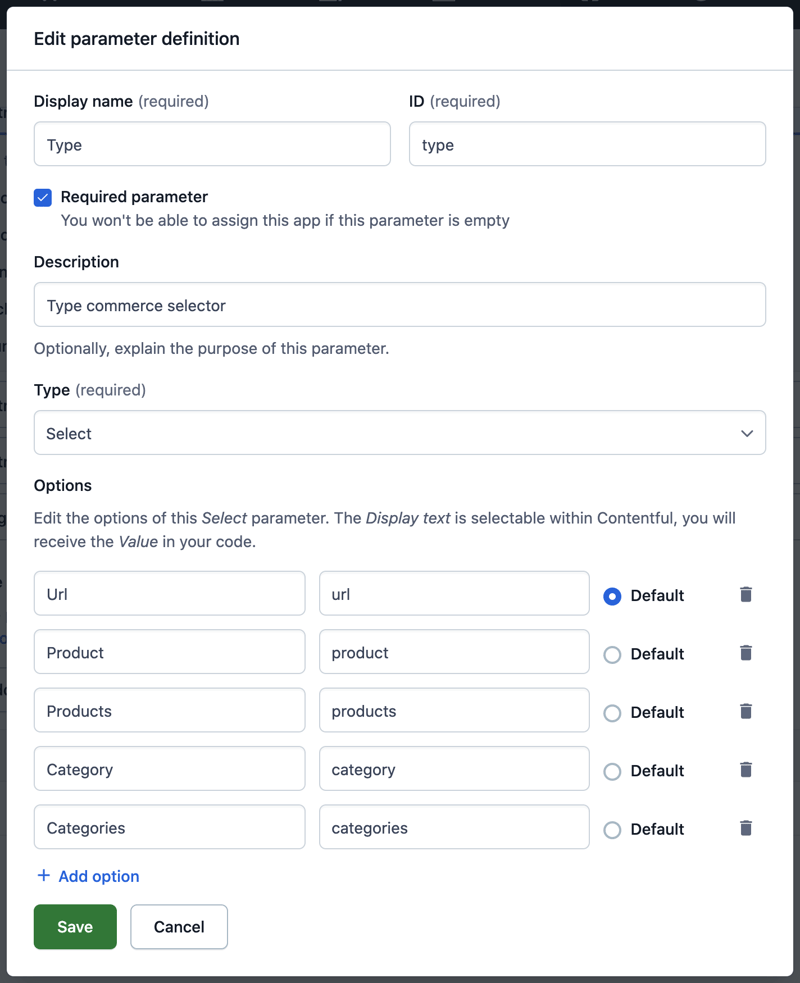
Anyway...back on track...we need to define an instance parameter called 'type' (If you have more fantasy than me, use a different name 😄).
It will be a required parameter, the Type will be Select and the Options will be the following:
- Url (we will focus on this one)
- Product
- Products
- Category
- Categories
Save and then click on Create button.
Congratulations 🥳 🥳 you have created your first app...but the party is not over yet...
In the next episode...
In part 2 we'll install the app in our space, we'll create our sample content type with a customized field...and we will start code something...or maybe not 😄...
Stay 📻
❤️

Posted on September 16, 2021
Join Our Newsletter. No Spam, Only the good stuff.
Sign up to receive the latest update from our blog.


