Waji
Posted on February 7, 2023

👉 I am working inside a VMWare workstation with a windows 10 and a Linux server (CentOS7) installed in separate VMs
Both devices are in 192.168.1.0/24 network
💡 I will be sharing two short hands on with the iptables command and also a short configuration using the firewall-cmd command
Setting up the client PC (Windows)
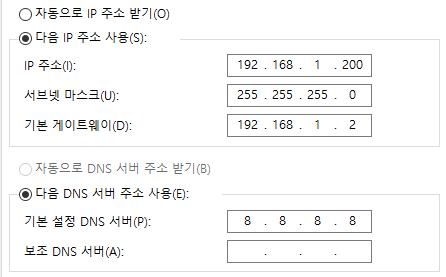
The network settings
Accepting ICMP (ping) signals from a client PC
👉 I am connected to the Linux Server via XShell SSH
Disabling the firewalld service first as we will be using iptables
systemctl stop firewalld
Checking the firewall policies
iptables -L
Chain INPUT (policy ACCEPT)
target     prot opt source               destination

Chain FORWARD (policy ACCEPT)
target     prot opt source               destination

Chain OUTPUT (policy ACCEPT)
target     prot opt source               destination
We can see that the "Chain INPUT" policy is set to "ACCEPT". We need to set this to "DROP" in order to begin the firewall configurations using iptables
iptables -P INPUT DROP
this will kick us out from the XShell as it removed the SSH rules
To re-establish the SSH connection to our XSHELL, we will use
iptables -A INPUT -s 192.168.1.0/24 -p tcp –-dport 22 -j ACCEPT
This will make the Chain INPUT list to
iptables -L
Chain INPUT (policy DROP)
target     prot opt source               destination
ACCEPT     tcp  --  192.168.1.0/24       anywhere       tcp dpt:ssh

Chain FORWARD (policy ACCEPT)
target     prot opt source               destination

Chain OUTPUT (policy ACCEPT)
target     prot opt source               destination
This will allow us to connect to our Linux server using XShell once again
Now, we want the Linux Server to accept ping (ICMP) signals from the windows client. For this, we will add this using the iptables command
iptables -A INPUT -s 192.168.1.200/24 -p icmp --icmp-type echo-request -j ACCEPT
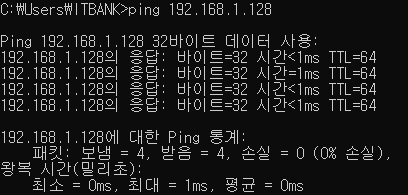
Confirming from the windows pc,
We can confirm the entry using,
iptables -L

Chain INPUT (policy DROP)
target     prot opt source               destination
ACCEPT     tcp  --  192.168.1.0/24       anywhere             tcp dpt:ssh
ACCEPT     icmp --  192.168.1.0/24       anywhere             icmp echo-request
If we remove this icmp using,
iptables -D INPUT 2

iptables -L
Chain INPUT (policy DROP)
target     prot opt source               destination
ACCEPT     tcp  --  192.168.1.0/24       anywhere             tcp dpt:ssh
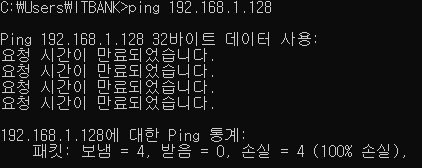
Now if we do the ICMP ping test from our Windows client,
Accessing the Web Server as a client (Windows PC)
We need to install the httpd package using the yum installer.
However, as we have disabled the firewalld daemon we will need to accept the source port 53/udp so that it can actually connect to the DNS server and install the required httpd packages using yum.
iptables -A INPUT -p udp --sport 53 -j ACCEPT
Now we can install the httpd package
yum -y install httpd-*
After the installation is complete, we can add a custom html file,
cd /var/www/html    # moving to the right directory

cat > index.html
Welcome to my Web Server!
Lastly, we just need to ACCEPT the port 80/tcp so that the Windows client PC can access the web server page
iptables -A INPUT -p tcp --dport 80 -j ACCEPT
Also, we need to start the httpd daemon
systemctl start httpd
Checking the results from the client PC,
Accessing the Web Server using firewalld
Now we can achieve the same results using the firewalld daemon
For this purpose, we have to start the daemon first
firewall-cmd --permanent --add-service=http
# OR
firewall-cmd --permanent --add-port=80/tcp

firewall-cmd --reload            # restarting the daemon
Again, checking from the client browser

Posted on February 7, 2023
Join Our Newsletter. No Spam, Only the good stuff.
Sign up to receive the latest update from our blog.
Related

November 28, 2024

November 20, 2024


