Waji
Posted on February 21, 2023

Introduction
Web server is a software application that runs on a computer and serves web content to clients over the internet. HTTP (Hypertext Transfer Protocol) is the protocol used for communication between web servers and web browsers(Clients). HTTP operates on top of the TCP/IP (Transmission Control Protocol/Internet Protocol) protocol suite, which provides reliable communication between devices over the internet.
Apache server, also known as Apache HTTP Server, is one of the most popular web servers on the internet and is used by a large number of websites worldwide. Apache server uses the HTTP protocol to communicate with web browsers and serves the requested content over the internet.
Apache is highly configurable, and its performance can be optimized for different environments and workloads. Apache does come with only static website support but it can serve both static and dynamic websites
Another key point to remember, a WEB server serves static content such as HTML pages and images to clients, while a WAS server provides the ability to run and manage web applications developed using Java or other programming languages
💡 Static websites contain fixed and unchanging content that is served directly to clients, while dynamic websites generate content in real-time in response to user requests using server-side scripts or applications
👉 I will be setting up a basic Apache Web server on my Linux system that processes static content
Installation
Installing the Apache package
yum -y install httpd-*
After the installation, we will be able to find
ls -l /etc/httpd/
합계 0
drwxr-xr-x 2 root root  37  2월  7 16:37 conf
drwxr-xr-x 2 root root 101  2월  7 16:37 conf.d
drwxr-xr-x 2 root root 169  2월 21 09:51 conf.modules.d
lrwxrwxrwx 1 root root  19  2월  7 16:37 logs -> ../../var/log/httpd
lrwxrwxrwx 1 root root  29  2월  7 16:37 modules -> ../../usr/lib64/httpd/modules
lrwxrwxrwx 1 root root  10  2월  7 16:37 run -> /run/httpd
👉 All of the above files are the Apache Web Server's configuration files that have different tasks
We will be working on the main config file
vi /etc/httpd/conf/httpd.conf
31 ServerRoot "/etc/httpd"
👉 Specifies the directory where the Apache configuration files are located
42 Listen 80
👉 Port number for the Apache Server. We can add more ports right under this Listen statement for multiple port listening
41 #Listen 12.34.56.78:80
👉 We can also allow only specific IP addresses as well
56 Include conf.modules.d/*.conf
👉 This includes all of the modules .conf files under conf.modules.d to this main config file
66 User apache
67 Group apache
👉 This sets the user and group under which the Apache HTTP Server process runs
💡 We know that TCP works with session establishment. Apache uses TCP so each process establishes a session under
httpd
86 ServerAdmin root@localhost
👉 This indicates the address where the problems with the server will be e-mailed to
95 #ServerName www.example.com:80
👉 registered DNS name will be entered here
102 <Directory />
103     AllowOverride none
104     Require all denied
105 </Directory>
👉 This is used to set access control and permission settings for a particular directory. The directory being configured is the root directory of the server
💡 The
AllowOverridedirective on line 103 specifies that no.htaccessfiles will be allowed to override the settings defined in this block >> TheRequire all denieddirective on line 104 specifies that access to the root directory is denied to all clients
119 DocumentRoot "/var/www/html"
👉 The directory which we will server our files in response to the clients
139 <IfModule dir_module>
140     DirectoryIndex index.html
141 </IfModule>
👉 This sets the default directory index file for the Apache HTTP Server
147 <Files ".ht*">
148     Require all denied
149 </Files>
👉 These lines prevent .htaccess and .htpasswd files from being viewed by Web clients
124 <Directory "/var/www">
125     AllowOverride None
126     Require all granted
127 </Directory>
128
129 <Directory "/var/www/html">
130     Options Indexes FollowSymLinks
131     AllowOverride None
132     Require all granted
133 </Directory>
👉 These lines help to ensure the security and integrity of the server by setting access control and permission settings for critical directories also allowing clients to access the web content stored in the document root directory
160 <IfModule log_config_module>
161     LogFormat "%h %l %u %t \"%r\" %>s %b \"%{Referer}i\" \"%{User-Agent}i\"" combined
162     LogFormat "%h %l %u %t \"%r\" %>s %b" common
163
164     <IfModule logio_module>
165       LogFormat "%h %l %u %t \"%r\" %>s %b \"%{Referer}i\" \"%{User-Agent}i\" %I %O" combinedio
166     </IfModule>
167     CustomLog "logs/access_log" combined
168 </IfModule>
169
👉 These lines are used to configure logging settings for the Apache HTTP Server
💡 It defines the log formats for the
combinedandcombinedioformats, and specifies the path and filename of the access log file to which the server writes the log entries
278 # Customizable error responses come in three flavors:
279 # 1) plain text 2) local redirects 3) external redirects
280 #
281 # Some examples:
282 #ErrorDocument 500 "The server made a boo boo."
283 #ErrorDocument 404 /missing.html
284 #ErrorDocument 404 "/cgi-bin/missing_handler.pl"
285 #ErrorDocument 402 http://www.example.com/subscription_info.html
👉 We can uncomment these lines or customize them to display custom error responses
297 #EnableMMAP off
298 EnableSendfile on
👉 The EnableSendfile enables the use of the sendfile() system call for file transfers. The EnableMMAP directive is commented out, which means the default value is used, allowing memory-mapped files for serving static files to be enabled
🚫 This is not a setting that should be altered as it is used case by case
Simple Static Page Viewing
We will navigate to
cd /var/www/html
From here,
cat > index.html
Welcome to my Web Server!
Now we just need to navigate to the IP address for our Linux system after starting, enabling and adding the httpd server to the firewall
systemctl start httpd
systemctl enable httpd

firewall-cmd --permanent --add-service=http
firewall-cmd --reload

# We can also confirm using the `netstat` command

netstat -antp | grep httpd
tcp6       0      0 :::80                   :::*                    LISTEN      1337/httpd
From our browser,
👉 We can also create a sub path
mkdir sub
cd sub
cat > sub.html
Sub Web Page!!
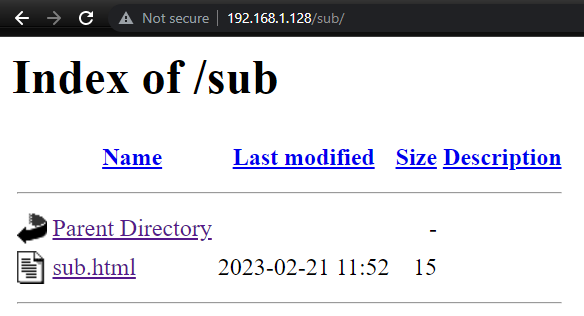
So now if we write the following in the browser after restarting the httpd service
systemctl restart httpd
From the browser,
If we only write /sub,
💡 This index page is visible to us because we enabled this inside the main config file
Options Indexes FollowSymLinks
Creating a custom directory
In this part, I will be changing the default directory from where the Apache server gets the files to be shown on the web
I have created an index.html in a custom directory
mkdir -p /apache/www
cd /apache/www
cat > index.html
WWW Site!!
Now, from the main config file for Apache
vi /etc/httpd/conf/httpd.conf

    119 DocumentRoot "/apache/www"
    120
    121
    122 <Directory "/apache/www">
    123     AllowOverride None
    124     Require all granted
    125 </Directory>
If we check the results from the browser after restarting the server
VirtualHost
💡 In the Apache web server, a virtual host (or virtualhost) refers to the ability to host multiple domains or websites on a single server. Virtual hosts allow multiple websites to be hosted on a single server, each with their own domain name and content.
👉 I have already added the following entries in the DNS lookup waji.zone under /var/named (192.168.1.128 already working as the local DNS server)
        IN      NS      ns1.waji.com.
        IN      NS      ns2.waji.com.
ns1     IN      A       192.168.1.128
ns2     IN      A       192.168.1.129
www     IN      A       192.168.1.128
cafe    IN      A       192.168.1.128
blog    IN      A       192.168.1.128
To begin setting up the virtualhost, we will navigate to
vi /etc/httpd/conf/httpd.conf

# 95th line
ServerName www.waji.com:80

# 126th line
<VirtualHost *:80>
        Redirect "/" "https://www.waji.com"
</VirtualHost>
We will create a new configuration file (the name can be anything you want)
vi /etc/httpd/conf.d/vhost.conf

#### cafe Host Name ####

<VirtualHost *:80>
    ServerAdmin root@localhost
    DocumentRoot /apache/cafe
    ServerName cafe.waji.com
    ErrorLog logs/cafe.waji.com-error_log
    CustomLog logs/cafe.waji.com-access_log combined
</VirtualHost>

<Directory "/apache/cafe">
    AllowOverride None
    Require all granted
</Directory>


### blog Host Name ###

<VirtualHost *:80>
    ServerAdmin root@localhost
    DocumentRoot /apache/blog
    ServerName blog.waji.com
    ErrorLog logs/blog.waji.com-error_log
    CustomLog logs/blog.waji.com-access_log combined
</VirtualHost>

<Directory "/apache/blog">
        AllowOverride None
        Require all granted
</Directory>
As we have set the DocumentRoot for both cafe and blog, we need to create them
mkdir /apache/cafe
mkdir /apache/blog

# Creating the page
cd /apache/cafe
cat > index.html
Cafe!

cd /apache/blog
cat > index.html
Blog!
Restarting the web server
systemctl restart httpd
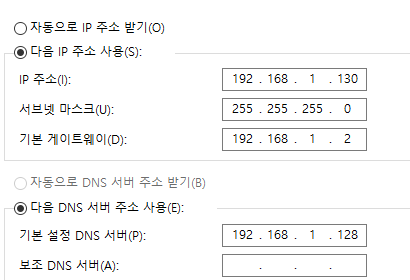
👉 Lucky enough I have a windows PC Virtual Machine in my VMWare workstation that will set the DNS server address for my local DNS server
From this client Windows PC,
If we navigate to cafe.waji.com
And see our blog.waji.com
If we want these virtualhost to have https as well,
vi /etc/httpd/conf.d/vhost.conf

Redirect "/" "https://cafe.waji.com"
Redirect "/" "https://blog.waji.com"
👉 This will provision https on both cafe and blog pages as well
I discussed installing the Apache Web Server on Linux CentOS7 in this post. Also, I included a simple demo to view a custom static page using Apache. Lastly, I discussed briefly regarding virtualhost and set up simple pages using virtualhost. In the next post, I will be enabling HTTPS using SSL/TLS certificate ✔

Posted on February 21, 2023
Join Our Newsletter. No Spam, Only the good stuff.
Sign up to receive the latest update from our blog.
Related

November 24, 2024


