Creating a simple Django site with a contact form and saving the received information in the database

Eugene
Posted on August 13, 2022
I will be using PyCharm Community, you can use your favorite code editor. Activate the virtual environment with the command:
source projectvenv/bin/activate
Install Django:
pip3 install Django
A new Django project is created with the django-admin startproject command (choose your project name yourself):
django-admin startproject projectsite
The application is created with the command python3 manage.py startapp (choose the name of your project yourself):
python3 manage.py startapp mysite
Structure of our project:
Let's start the Django web server:
python3 manage.py runserver
Let's register the newly created application in the project. Let's find the settings.py file in the configuration package, open it in a text editor and find the following code snippet:
INSTALLED_APPS = [
    'django.contrib.admin',
    'django.contrib.auth',
    'django.contrib.contenttypes',
    'django.contrib.sessions',
    'django.contrib.messages',
    'django.contrib.staticfiles',
    'mysite', #new app
]
Now let's create our model. Let's open the models.py file and add this code:
from django.db import models


class Task(models.Model):
    title = models.CharField(max_length=50)
    task = models.TextField()

    def __str__(self):
        return self.title


class Note(models.Model):
    title = models.CharField(max_length=50)
    task = models.TextField()

    def __str__(self):
        return self.title


class About(models.Model):
    title = models.CharField(max_length=50)
    task = models.TextField()

    def __str__(self):
        return self.title


class Contact(models.Model):
    email = models.EmailField()
    subject = models.CharField(max_length=255)
    message = models.TextField()

    def __str__(self):
        return self.email
CharField - A string field, for small- to large-sized strings.
TextField - A large text field. The default form widget for this field is a Textarea.
EmailField - A CharField that checks that the value is a valid email address using EmailValidator.
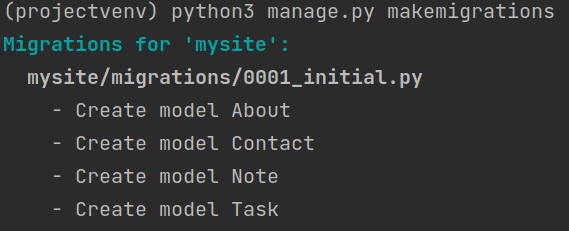
Next, we generate and execute migrations with the commands:
python3 manage.py makemigrations
python3 manage.py migrate
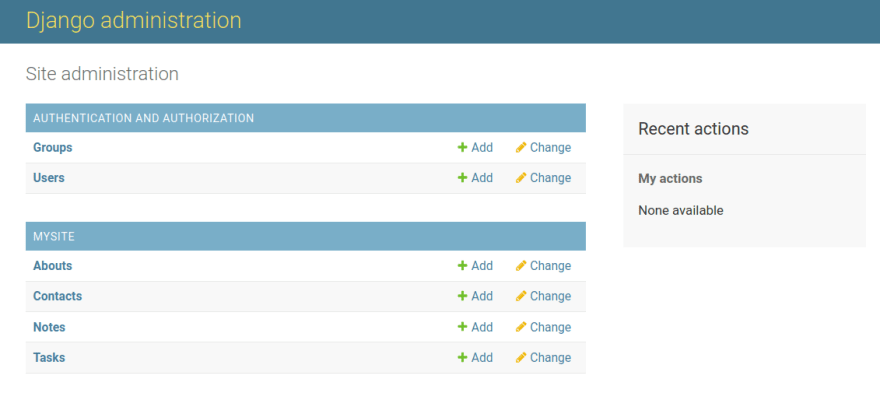
Now we can start using the admin panel. But for this we need a user. You can create it like this: python manage.py createsuperuser. After that, we start the server and we go to http://127.0.0.1:8000/admin/. You will see:
Then, let's open admin.py file of the mysite app and add this code:
from django.contrib import admin
from .models import Task, Note, About, Contact

admin.site.register(Task)
admin.site.register(Note)
admin.site.register(About)
admin.site.register(Contact)
Here's what happens in the end:
Let's create forms.py in mysite application directory:
from django.forms import ModelForm
from .models import Contact


class ContactForm(ModelForm):
    class Meta:
        model = Contact
        fields = '__all__'
Let's open views.py of your mysite app and add this code:
from django.shortcuts import render
from .models import Task, Note, About
from .forms import ContactForm


def index(request):
    tasks = Task.objects.all()
    return render(request, 'index.html', {'tasks': tasks})


def about(request):
    self = About.objects.all()
    return render(request, 'about.html', {'self': self})


def blog(request):
    notes = Note.objects.all()
    return render(request, 'blog.html', {'notes': notes})

def contact_view(request):
    if request.method == 'POST':
        form = ContactForm(request.POST)
        if form.is_valid():
            form.save()
            return render(request, 'success.html')
    form = ContactForm()
    context = {'form': form}
    return render(request, 'contacts.html', context)
Let's create urls.py in mysite application directory:
from django.urls import path
from . import views

urlpatterns = [
    path('', views.index, name='home'),
    path('about', views.about, name='about'),
    path('blog', views.blog, name='blog'),
    path('contact', views.contact_view, name='contacts'),
]
Let's open urls.py of projectsite directory and add this code:
from django.contrib import admin
from django.urls import path, include
from mysite import views as contact_views

urlpatterns = [
    path('admin/', admin.site.urls),
    path('', include('mysite.urls')),
    path('contacts/', contact_views.contact_view, name='contacts'),
]
Let's open settings.py and add this code:
import os
...
STATICFILES_DIRS = [
   os.path.join(BASE_DIR, "static"),
]
Let's create a static directory and create a contact.css file in it:
input[type=text], input[type=email], textarea {
 width: 100%;
 padding: 12px 20px;
 margin: 8px 0;
 display: inline-block;
}
Let's create a templates folder, and there we'll create:
base.html
{% load static %}
<!doctype html>
<html lang="en">
<head>
    <meta charset="UTF-8">
    <meta name="viewport"
          content="width=device-width, user-scalable=no, initial-scale=1.0, maximum-scale=1.0, minimum-scale=1.0">
    <meta http-equiv="X-UA-Compatible" content="ie=edge">
    <link rel="stylesheet" href="https://cdn.jsdelivr.net/npm/bootstrap@5.0.2/dist/css/bootstrap.min.css">
    <link href="{% static "/contact.css" %}" rel="stylesheet">
    <title>MySite{% block title %}{% endblock title %}</title>
</head>
<body>
    <div class="d-flex flex-column flex-md-row align-items-center pb-3 mb-4 border-bottom">
      <a href="/" class="d-flex align-items-center text-dark text-decoration-none">
        <svg xmlns="http://www.w3.org/2000/svg" width="40" height="32" class="me-2" viewBox="0 0 118 94" role="img"><title>Bootstrap</title><path fill-rule="evenodd" clip-rule="evenodd" d="M24.509 0c-6.733 0-11.715 5.893-11.492 12.284.214 6.14-.064 14.092-2.066 20.577C8.943 39.365 5.547 43.485 0 44.014v5.972c5.547.529 8.943 4.649 10.951 11.153 2.002 6.485 2.28 14.437 2.066 20.577C12.794 88.106 17.776 94 24.51 94H93.5c6.733 0 11.714-5.893 11.491-12.284-.214-6.14.064-14.092 2.066-20.577 2.009-6.504 5.396-10.624 10.943-11.153v-5.972c-5.547-.529-8.934-4.649-10.943-11.153-2.002-6.484-2.28-14.437-2.066-20.577C105.214 5.894 100.233 0 93.5 0H24.508zM80 57.863C80 66.663 73.436 72 62.543 72H44a2 2 0 01-2-2V24a2 2 0 012-2h18.437c9.083 0 15.044 4.92 15.044 12.474 0 5.302-4.01 10.049-9.119 10.88v.277C75.317 46.394 80 51.21 80 57.863zM60.521 28.34H49.948v14.934h8.905c6.884 0 10.68-2.772 10.68-7.727 0-4.643-3.264-7.207-9.012-7.207zM49.948 49.2v16.458H60.91c7.167 0 10.964-2.876 10.964-8.281 0-5.406-3.903-8.178-11.425-8.178H49.948z" fill="currentColor"></path></svg>
        <span class="fs-4">MySite</span>
      </a>

      <nav class="d-inline-flex mt-2 mt-md-0 ms-md-auto">
        <a class="me-3 py-2 text-dark text-decoration-none" href="/">Home</a>
        <a class="me-3 py-2 text-dark text-decoration-none" href="/blog">Blog</a>
        <a class="me-3 py-2 text-dark text-decoration-none" href="/about">About</a>
        <a class="me-3 py-2 text-dark text-decoration-none" href="/contacts">Contact</a>
      </nav>
    </div>

        <div class="container">
        {% block content %}

        {% endblock content %}
        </div>

</body>
</html>
index.html
{% extends 'base.html' %}
{% block content %}
    {% for el in tasks %}
        <div class="container">
        <h3>{{ el.title }}</h3>
        <p>{{ el.task }}</p>
        </div>
    {% endfor %}

{% endblock content %}
blog.html
{% extends 'base.html' %}
{% block content %}

    {% for el in notes %}
        <div class="container">
        <h3>{{ el.title }}</h3>
        <p>{{ el.task }}</p>
        </div>
    {% endfor %}

{% endblock content %}
contacts.html
(Here we use csrf_token, it is needed to protect against cross-site request forgery, each internal form should use it)
{% extends 'base.html' %}
{% block content %}

    <form action="" method="post">
        {% csrf_token %}
        {{ form }}
        <input type="submit" value="Submit">
    </form>

{% endblock content %}
about.html
{% extends 'base.html' %}
{% block content %}
    {% for el in self %}
        <div class="container">
        <h3>{{ el.title }}</h3>
        <p>{{ el.task }}</p>
        </div>
    {% endfor %}
{% endblock content %}
success.html
<h1>We have received your letter</h1>
<p>We will consider it and we will answer you.</p>
Let's start the Django server and go to the site's admin panel, then go to the Tasks section. Fill in the fields and save:
Our entry will be displayed on the website in the Home section:
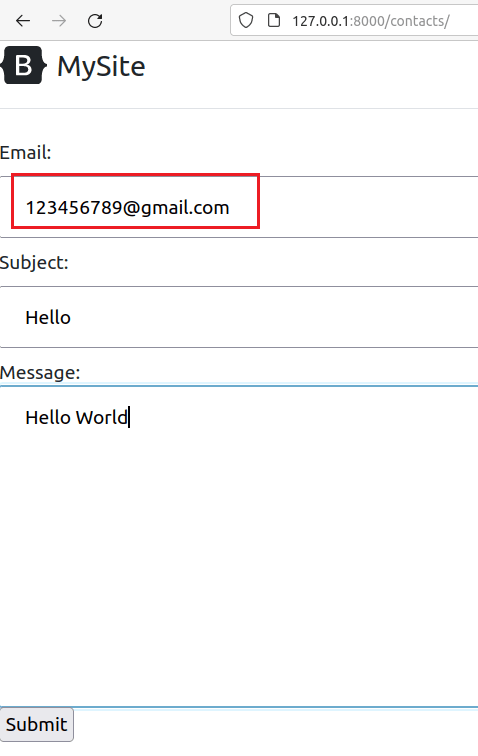
Open the Contact section and fill it in:
After sending, the following message will appear on the screen:
We go to the administrative panel of the site, then go to the Contact section and you can see your message:
That's it, our tutorial project is over.

Posted on August 13, 2022
Join Our Newsletter. No Spam, Only the good stuff.
Sign up to receive the latest update from our blog.


