Catch Them If You Can: Quality Locators for Stable End 2 End Tests

vladimirbag
Posted on August 29, 2019

Each test automation beginner encounters many difficulties in writing effective tests, especially for websites, since websites have a DOM tree in their structure. Sometimes finding the element we need on the page is not so simple, especially if it's not labeled. And no AI has normally resolved this problem so far. The way the user sees a website is not the same as we see it in our tests. When a user sees a link or a button, we have only an HTML element. How can we automate the user's actions then?
Yes. This is a huge question. And in order to understand it and find the answer, you need to use help. I propose two candidates for this role.
There are two most common types of locators. Each tester and developer considers this or that type to be the most effective and is ready to prove it in the battle for adherence.
Still, as practice shows, out of the many types of locators, the two most powerful and effective are XPath locators and CSS locators. However, they were never designed to be used for test automation.
However, they were never designed to be used for test automation. Why? Let's see.
CSS
All browsers implement the CSS engine so that developers can use CSS in their projects. CSS has patterns, according to which styles created by a developer are applied to page elements (DOM). These patterns are called selectors. Selenium WebDriver uses the same principle to find elements.
The strong points of the CSS are simplicity in perception, reading, and compilation. The weak point is that the CSS can search for an element only by moving up and down the DOM tree, search for the third or fifth element in a row(if it can, the locator will be very long and difficult to read), for example, search for the third checkbox in an account, or look for specific items while working with drop-down lists).
Let's look at some basic locators using CSS:
Absolute path:
html body form input
Relative path:
input
Search for an immediate child:
div>a
Search for a child of any level:
div a
Search by item ID:
input#username
Search by class:
input.classname
XPath
XPath is a language used to search for nodes in an XML document tree. And it works for web pages because HTML is actually a subset of an XML document, so we can query its elements by XPath. XPath goes beyond simple search methods for the id or name attributes (and at the same time supports them) and opens up a range of new features, such as searching for the third checkbox by its text, for example.
A good reason to use XPath is when you cannot use attributes that are suitable as pointers, such as an identifier or name, for the element you want to get. You can use XPath to search for an element in either the absolute path (not recommended) or the relative path (for elements with given id or name). XPath pointers can also be used to define elements using attributes other than id and name.
The biggest advantages of XPath are:
- The ability to search upwards, that is, to search for a parent element by its descendant.
- Ability to use built-in functions.
- You can do vertical navigation on the DOM.
- The ability to search by text. But there are certain disadvantages: too long, difficult to build and read, too strict, not quite optimised for HTML search. For example, It is difficult to specify an element with one of the classes:
//div[contains(concat(' ', normalize-space(@class), ' '), ' test ')]
Let's look at some basic locators using XPath:
Absolute path:
//html/body/div/div/form/input
Relative path:
//input
Search for an immediate child:
//div/a
Search for a child of any level:
//div//a
Search for an item in the text:
.//[text()='First link']/..*
Search by attribute values:
//input[@id
='username']
Search by attribute name:
//img[@alt]
So what should a locator really be?
For myself, I defined three criteria which, in my opinion, should be met by a well-designed locator:
- Stable:
- the shorter the locator, the more stable it will be, for example,
//ul[@role ="listbox"]/li[1]
- when compiling a locator, initially work with the attributes "id", "name", "class";
- do not use unstable classes and attributes, for example, @ aria-controls (this is not a standard attribute for an element) or "id = 123rth45bvj" (it is clear that the id is generated and may change in the future).
2.Readable (you need to be able to read the locator that was compiled. For example, // input [@id
= "fsc-origin-search"] - find input where the attribute id = "fcs-origin-search". And such the locator is hard to read:
// div / div / div / div [contains (concat ('', normalize-space (@class), ''), 'test')]
3.Semantic (it should correlate with what the element does. For example, input # city-from explicitly displays that it is an element for entering text, but *** [@ react-select-bla = "asdsad"]) it is not clear what it does )
It is very difficult for a beginner automation tester to understand all the intricacies of writing the locators correctly because they should be **short and stable and semantic so that given any possible changes in the DOM tree, you would not have to rewrite them again. And I began looking for an alternative because there should be something simpler and more comprehensive. And you know, I found a way that helped me understand that you should not be afraid of Locators, they need to be commanded.
These are Semantic locators in CodeceptJS - when you don't even look at the source code of the page, but simply write which links to click and which fields to fill in since CodeceptJS works through XPath inside. Various strategies are used to locate semantic elements. However, CodeceptJS Semantic locators may run slower than specifying an exact locator by XPath or CSS.
CodeceptJS can guess an element's locator from context. For example, upon clicking, CodeceptJS will try to find a link or button by their text value. When typing into a field, this field can be located by its name and placeholder.
If you are not familiar with CodeceptJS - check my previous post, how I discovered it and wrote my first test.
JavaScript End 2 End Testing for Mere Mortals
(https://medium.com/@vladimirbaginskiy/javascript-end-2-end-testing-for-mere-mortals-e055db5e80d4)
The article describes how, step by step, a beginner will become able to make his first autotest without any knowledge about JavaScript and Locators. This, at least, saved me a ton of time and nerves.
With a basic knowledge of locators, I could start writing a test for a real website.
I will use SkyScanner (https://www.skyscanner.com) to get a list of flights from Kyiv to Berlin. Just follow my steps to see how locators worked for me. However, I can't guarantee that Skyscanner team won't change their booking page in the future, and the same locators will work for you as well.
Skyscanner expects the user to enter their origin and destinations, and pick the correct city names from a list. And picking an item from popping out dropdown was a bit tricky.
I will use CodeceptJS + Puppeteer setup. I can install it with just two commands.
npm init -y
npm install codeceptjs puppeteer --steps
Puppeteer is a tool from Google Chrome that allows executing tests directly in a browser, without Selenium. And that's cool, cause I don't need to install anything extra!
After you have walked the entire installation path and created a test file (I have sky_test), we will go to our experimental site and try to write an XPath locator which, as already mentioned, will be responsible for selecting an item in a drop-down list.
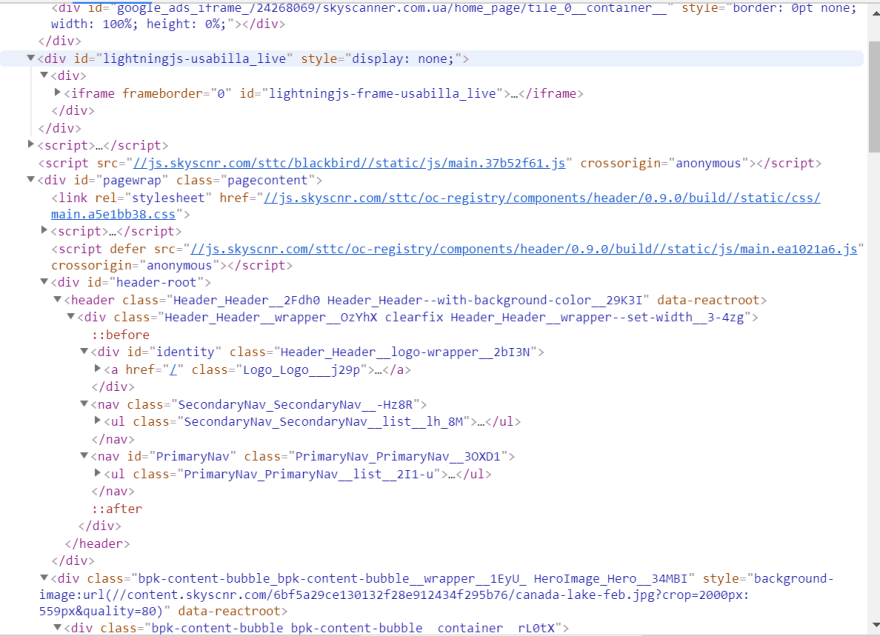
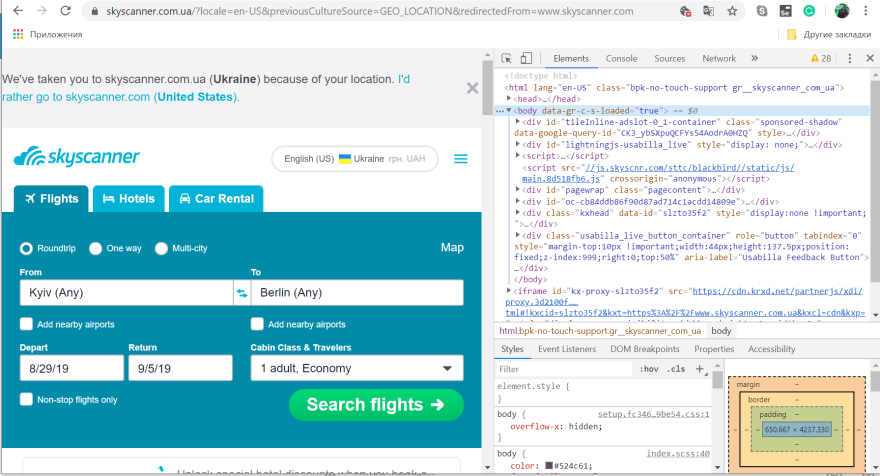
- With the help of Dev Tools (F12), we are looking for elements corresponding to "From" and "To" fields.
1.1.In the field "From" enter Kyiv and when the list appears, right-click the mouse on the list and select "Inspect element".
The same thing with Dev Tools (F12), we are looking for elements corresponding to the "To" field.
2.We press "Ctrl + F" and enter our locator in the window that appears. The locator can be attached to "id" or "name" or "class"(if you are sure that they are unique and stable, that is, developers will not change them in the future), but in our case, this is a drop-down list where you need to select the element from. Therefore, after conducting many experiments with finding the right locator, I got this:
//ul[@role="listbox"]/li[1]
With the second element of the "To" window drop-down list, I got this:
//ul[@role="listbox"]/li[1]
3.We'll open our code editor (I have this "Visual Studio Code"), open the javascript file that you created when installing the CodeceptJS, and write the script for our test:
Scenario('test something',(I) =>{
I.amOnPage('/');
I.fillField('From',' Kyiv');
I.click('//ul[@role="listbox"]/li[1]]');
I.fillField('To',' Berlin');
I.click('//ul[@role="listbox"]/li[1]]');
I.click('Search flight');
})
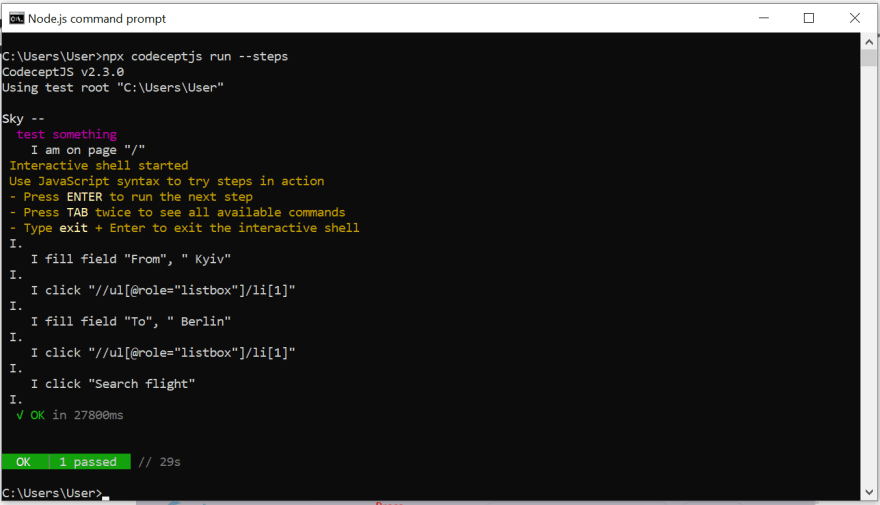
4.Let's open our Node.js command prompt and use the npx codeceptjs run -- steps command to run the test.
npx codeceptjs run --steps
If everything is done correctly, the site will open.
Now press "Еnter" and check the test.
5.My final result:
In my article, I showed how a beginner testing automation tool that does not know practically anything about locators, does not have super knowledge in the field of the Java programming language can write self-tests and simultaneously study the area that he needs, thereby sharpening his skills without wasting time on a simple dull theory.
XPath is not as scary as you think it is. The shorter and simpler your locator, the easier it will be to use it in the future. Try to look for unique static elements that will not be changed a priori.
If you are unsure if this locator is good enough, test it with locator adviser:
https://davertmik.github.io/locator/
I hope he helps you write the correct locators.

Posted on August 29, 2019
Join Our Newsletter. No Spam, Only the good stuff.
Sign up to receive the latest update from our blog.


