Spring Boot: Auto Configuration and Projects

Hamdamboy
Posted on March 19, 2020

What is the Spring Boot?
Spring Boot is basically an extension of the Spring framework which eliminated the boilerplate configurations required for setting up a Spring application.
Indeed, you may find source code github, open source.
It takes an opinionated view of the Spring platform which paved the way for a faster and more efficient development eco-system.
These components, or beans, are wired together inside the Spring application context to make a complete application,much like bricks, mortar, timber, nails, plumbing, and wiring are bound together to make a house.
The act of wiring beans together is based on a pattern known as # dependency injection (DI). Rather than have components create and maintain the lifecycle of other beans that they depend on, a dependency-injected application relies on a separate entity (the container) to create and maintain all components and inject those into the beans that need them. This is done typically through constructor arguments or property accessor methods. More information you may download Spring, and Annotation resource.
Spring Boot Primary Goals
Provide a radically faster and widely accessible getting-started experience for all Spring development. Be opinionated out of the box but get out of the way quickly as requirements start to diverge from the defaults.
Provide a range of non-functional features that are common to large classes of projects (such as embedded servers, security, metrics, health checks, and externalized configuration). Absolutely no code generation and no requirement for XML configuration.
Key Spring Boot features. Let me a list of a few key features of the Spring boot and we will discuss each:
KEY FEATURES briefly
- (Step-1) Spring Boot starters
- (Step-2) Spring Boot auto-configuration
- (Step-3) Elegant configuration management
- (Step-4) Spring Boot actuator
- (Step-5) Easy-to-use embedded servlet container support
(Step-1) Spring Boot starters
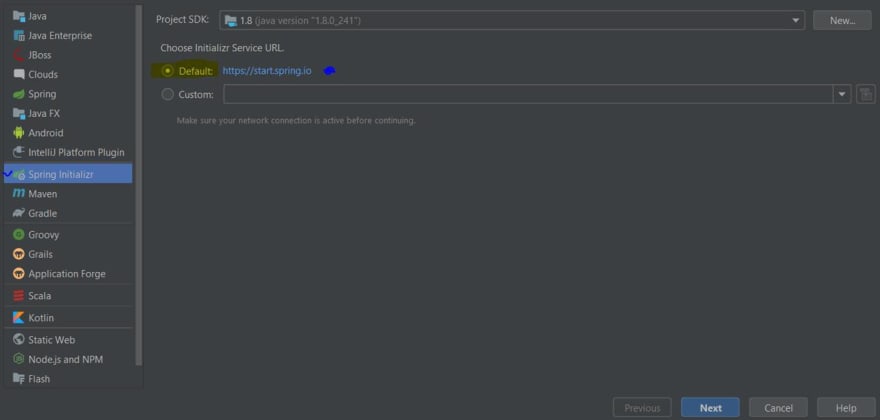
The Spring Initialiser is both a browser-based web application and a REST API, which can produce a skeleton Spring project structure that you can flesh out with whatever functionality you want. Several ways to use Spring Initialiser follow:
* From the web application at http://start.spring.io
* From the command line using the curl command
* From the command line using the Spring Boot command-line interface
* When creating a new project with Spring Tool Suite
* When creating a new project with IntelliJ IDEA
* When creating a new project with NetBeans
For instance, the spring-boot-starter-data-jpa starter module includes all the dependencies required to use Spring Data JPA, along with Hibernate library dependencies, as Hibernate is the most commonly used JPA implementation.
(Step-2) Spring Boot auto-configuration
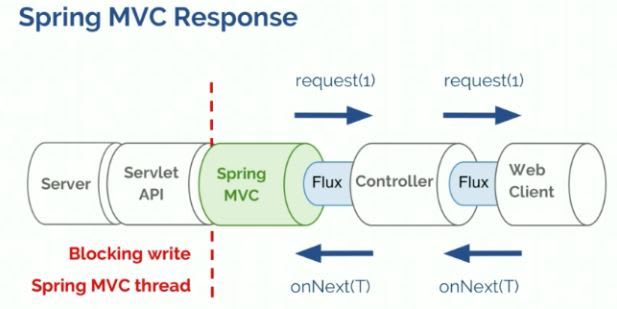
Spring comes with a powerful web framework known as Spring MVC. At the center of Spring MVC is the concept of a controller, a class that handles requests and responds with information of some sort.
Spring Boot takes an opinionated view of the application and configures various components automatically, by registering beans based on various criteria. The criteria can be:
- Availability of a particular class in a classpath
- Presence or absence of a Spring bean
- Presence of a system property
- An absence of a configuration file
For example, if you have the spring-webmvc dependency in your classpath, Spring Boot assumes you are trying to build a SpringMVC-based web application and automatically tries to register Dispatcher Servlet if it is not already registered. If you have any embedded database drivers in the classpath, such as H2 or HSQL, and if you haven’t configured a DataSource bean explicitly, then Spring Boot will automatically register a DataSource bean using in-memory database settings.
(Step-3) Elegant configuration management
Spring supports externalizing configurable properties using the @PropertySource configuration.More information you may get .
Spring Boot takes it even further by using the sensible defaults and powerful type-safe property binding to bean properties. Spring Boot supports having separate configuration files for different profiles without requiring many configurations.
(Step-4) Spring Boot actuator
The Spring Boot actuator provides a wide variety of such production-ready features without requiring developers to write much code. Some of the Spring actuator features are:
- Can view the application bean configuration details
- Can view the application URL mappings, environment details, and configuration parameter values
- Can view the registered health check metrics
(Step-5) Easy-to-use embedded servlet container support
Easy to use embedded servlet container supports while building web applications, you need to create WAR type modules and then deploy them on external servers like Tomcat, WildFly, etc. But by using Spring Boot, you can create a JAR type module and embed the servlet container in the application very easily so that the application will be a self-contained deployment unit. Also, during development, you can easily run the Spring Boot JAR type module as a Java application from the IDE or from the command-line using a build tool like Maven or Gradle.
Servlet Containers
Servlet vs. Reactive more details
How to handle Default Context Path
How to Change the Default Context Path?
There are several ways to change the default context path.
Using application.properties File
- /src/main/resources/application.properties > server.port=8080 > server.servlet.context-path=/springboot2webapp
By default, the context path is “/”. To change the context path, override and update server.servlet.context-path properties. The following examples update the context path from / to /springboot2webapp or
http://localhost:8080/springboot2webapp Just like many other configuration options, the context path in Spring Boot can be changed by setting a property, i.e., server.servlet.context-path.

Posted on March 19, 2020
Join Our Newsletter. No Spam, Only the good stuff.
Sign up to receive the latest update from our blog.


