ayy lmao
Posted on January 27, 2021
Task 12: Skilling Up
This task is pretty much just how-to-nmap-101.
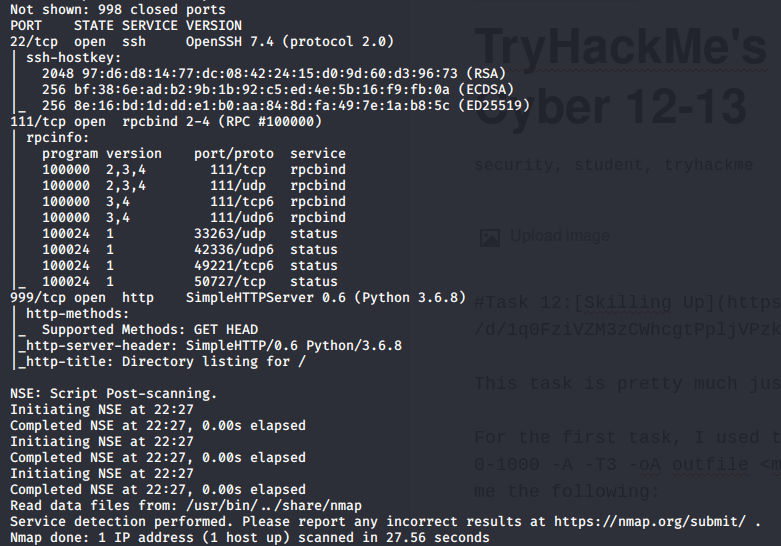
For the first task, I used the command nmap -v -sT -p 0-1000 -A -T3 -oA outfile <myIP> which after a while gives me the following:
There's some other text above this, but basically it shows there are only three TCP ports open under 1000: port 22, 111 and 999. The answer to the first question is 3.
Using the -O flag to find the host operating system gave me a No exact OS matches for host from nmap, so instead I took at look at the services that were up. Googling RPCbind leads me to a linux man page for the service so I put in linux as the answer to the second question - which works. Honestly I didn't feel too good about this answer since I felt like I cheaped out somehow and didn't use nmap correctly. But an answer's an answer so I'll move on for now.
From the screencap above we can see that the ssh version running is OpenSSH 7.4, which is the answer for the third question.
Finally, I saw that a http service was running on port 999. I accessed this by visiting <myIP>:999 on my browser, bringing me to a dictionary listing with one file on it: interesting.file, the answer the the last question.
Not too much fanfare around this task.
Learned: nmap, TCP/UDP protocals
Task 13: Training
In this one, we do privilege escalation!
I actually have no idea on anything about privilege escalation, luckily the first question is sort of straightforward - use nmap to find out which port ssh is deployed on. Originally I just tried to hack together what little I knew about nmap to scan the whole range of ports with nmap <machine_ip> -p- -T0, but that turned out to be way too long. I cheated a little and seeing how the answer format is 5 character long (*****), just did 6 different scans of 10000 ports each from 10000 to 65535. After an annoying wait I found the open port on 65534. We have to tell ssh to connect to the nonstandard port with -p <port_number>
The next question asks us to read the contents of /home/igor/flag1.txt, which has its permission set as
-r-------- 1 igor igor, meaning only igor is able to read the file. No problem - I just modified the find / -user root -perm -4000 -exec ls -ldb {} \; command in the supporting doc with root replaced with igor and with all errors filtered to /dev/null, which gives us two binaries: /usr/bin/find and /usr/bin/nmap.
To make sure the first is actually ran by igor, I just created a dummy file and executed find <dummyfile> -exec whoami \;, which gives us igor, as expected. We can use a slightly modified command to read the contents of flag1.txt with find <dummyfile> -exec cat /home/igor/flag1.txt, giving us: THM{d3f0708bdd9accda7f937d013eaf2cd8}
For the third question I took the same approach as the second. Searching for all binaries with the SUID bit set gives us a huge list to go through:
To check if any of these were actually system binaries, I just used man <name of binary>. Any custom ones wouldn't bring up a man page. I skipped the ones that were in /snap/core (apparently used for Snap, a package manager) and any ones that I knew were system binaries such as mount, ping, su, etc. After a while I found system-control, which when executed lets me execute any command as root. From there it's a simple matter of doing printing out the contents of /root/flag2.txt to get THM{8c8211826239d849fa8d6df03749c3a2}
Pretty fun one! Didn't didn't know anything about SUID files or privilege escalation so everything was completely new. This one is obviously not super realistic (who's going to leave a binary like system-control out in the open?) but it's still pretty cool to poke around and see how everything works.
Learned: SUID, privilege escalation, -exec option for find

Posted on January 27, 2021
Join Our Newsletter. No Spam, Only the good stuff.
Sign up to receive the latest update from our blog.


