Writing to Airtable from a Twilio serverless function

Tilde A. Thurium
Posted on May 12, 2020
Airtable is an awesome product. It’s like a cross between a spreadsheet and a database, but with a lot more flexibility for creating dynamic views of your data. In this post you’ll learn how to write to Airtable from a Twilio application. The advantages of doing so are as follows:
- Rapid prototyping. If you need to persistently store data, it’s easier to create an Airtable base than to set up a proper database.
- Maintenance flexibility. Folks who don’t know how to code can easily maintain and extend the data.
- Seamless authentication. Sure, you could use Google Sheets as a lightweight database, but authenticating with Google Sheets API can be tricky.
Today we’ll be building a Net Promoter Score (NPS) app that writes data from SMS messages to Airtable. NPS is a calculated value summarizing how a group of people feel about something -- a brand, an event, whatever. That said, this code is just a starting point. Feel free to customize it for whatever your use case might be.
Prerequisites
- A Twilio account -- sign up for a free one here and receive an extra $10 when you upgrade your account
- A free Airtable account
- A Twilio phone number with SMS capabilities
Airtable 101
In order to use Airtable, you need to be familiar with a few key concepts. If you’re already an Airtable whiz, feel free to skip to the “Writing to Airtable with a serverless function” section.
- Bases. According to Airtable documentation, “A base is a database that contains all of the information you need for a specific project.”
- Bases are made up of one or more tables. If we’re going with the spreadsheet metaphor, tables are like different tabs.
- Records are units of data, analogous to a row on a spreadsheet.
- Information in records is stored in fields, which are kind of like a column on a spreadsheet.
- Workspaces are folders where you can organize your bases so that other folks can collaborate with you.
To create a new base you can:
- Choose one of Airtable’s many official templates
- Choose a template created by the Airtable community
- Start from scratch
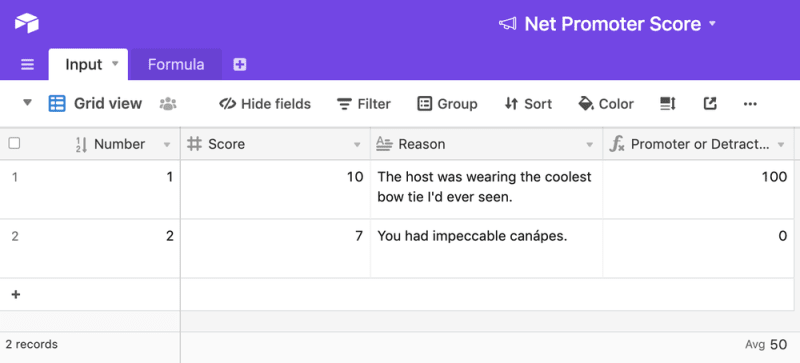
I’ve created a base called “Net Promoter Score” that we’ll be working with today. You can view it here and create your own copy with the “Copy base” button on the right-hand side.
This base contains an “Input” table that has 4 fields:
- Number: a unique, automatically incremented field type. The first field in a base is the primary field and must be unique. It’s kind of like a relational database’s primary key.
- Score: a number field, representing how good (or bad!) the survey responders feel.
- Reason: a long text field allowing the survey responders to provide more context on why they feel that way.
- Promoter or Detractor: a formula field performing an intermediate calculation that helps us get to our final NPS score.
A rollup calculation at the bottom of this field gives us our final NPS score.
Writing to Airtable with a serverless function
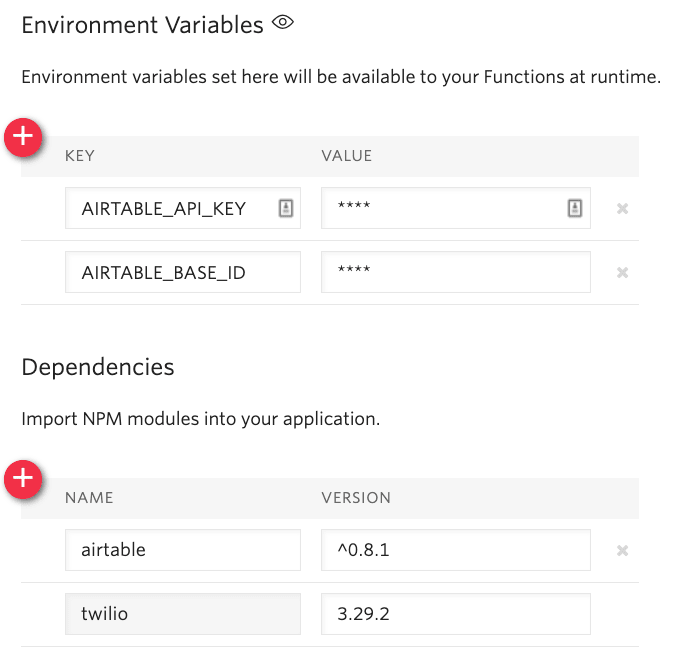
For this project we'll use a Twilio Function for writing data to the Airtable base. Open the Functions configuration dashboard. Generate an Airtable API key and add it as an environment variable named AIRTABLE_API_KEY.
Be careful not to commit your Airtable API key to code that’s going up on GitHub, or share it with anybody. If you do they can gain full access to your Airtable account.
Go to the Airtable API landing page. You’ll see links to all your bases. Click through on the link to the “Net Promoter Score” base.
On this page, you’ll see some (nifty!) auto-generated API documentation. We’ll need the unique ID of the Net Promoter Score base, so copy that to your clipboard.
Go back to the Twilio functions dashboard. Add the Airtable base ID as an environment variable called AIRTABLE_BASE_ID.
While you’re at it, add the Airtable Node.js SDK to the Dependencies section of the Functions configuration dashboard. Here we’re using version ^0.8.1.
Let’s write a Function that, given a string and a number, writes a new row to our NPS base. Using the “Blank” template, create a new Function called writeNPS. Give it a path, /write-nps. Copy the following code into it:
const airtable = require("airtable");
const twilio = require("twilio");

exports.handler = function (context, event, callback) {
 const base = new airtable({
   apiKey: context.AIRTABLE_API_KEY,
 }).base(context.AIRTABLE_BASE_ID);
 base("Input").create(
   [
     {
       fields: {
         Reason: event.reason,
         Score: parseInt(event.numericalScore),
       },
     },
   ],
   function (error, records) {
     if (error) {
       console.error(error);
       callback(error);
       return;
     } else {
       callback(null, "Success!");
     }
   }
 );
};
Uncheck the box that says “Check for valid Twilio signature” so we can test this function by running local commands. Copy your function URL into the code below and run it from from the command line:
curl --request POST 'https://YOUR-FUNCTION-URL.twil.io/write-nps?numericalScore=7&reason=You%20had%20impeccable%20can%C3%A1pes.' \
--header 'Content-Type: application/x-www-form-urlencoded'
Success!
What is even happening in this function? Let’s break it down.
First, we instantiate the Airtable base.
Then we call the create method, to create a new row. Although we’re only creating one row here, this method accepts a list of objects if you want to bulk create.
The second argument to create is a function allowing us to do some error handling and call the callback to let Twilio know our function is done executing.
Warning: as I found out the hard way, Airtable creates empty rows for failed requests. 😭
me: makes an error during Airtable API request
Airtable: HEY EVERYONE LOOK AT THIS FAILED REQUEST
Type issues are another gotcha. In the previous code sample we needed to convert strings to numbers for the Score field. If not, the request will fail because the Score field uses the “Number” data type. Airtable offers automatic type coercion that you can enable if you want to live dangerously. Then again, we’re using JavaScript here which already has a bunch of weird type coercion edge cases so YOLO.
To enable type conversion, pass the typecast parameter in to the create method like so:
 base("Input").create(
   [
     {
       fields: {
         Reason: event.reason,
         Score: event.numericalScore,
       },
     },
   ],
   { typecast: true },
   function (error, records) {
   ...
To test this you can run the same cURL command you ran previously since the inputs to the function haven’t changed.
Airtable also has methods for updating and deleting records, though they aren’t super applicable for our use case. Check out the Airtable API documentation for details.
Adding a Twilio Studio flow for Net Promoter Score
Twilio Studio is the fastest way to get multi-step messaging flows up and running. To save time, you can copy my flow by importing the following JSON into Studio. Before importing you’ll need to replace the example.com URL with the URL of the function you just wrote.
{
  "description": "NPS Survey",
  "states": [
    {
      "name": "Trigger",
      "type": "trigger",
      "transitions": [
        {
          "next": "NPS-Numerical-Score",
          "event": "incomingMessage"
        },
        {
          "event": "incomingCall"
        },
        {
          "event": "incomingRequest"
        }
      ],
      "properties": {
        "offset": {
          "x": 0,
          "y": 0
        }
      }
    },
    {
      "name": "NPS-Numerical-Score",
      "type": "send-and-wait-for-reply",
      "transitions": [
        {
          "next": "NPS-Text-Reason",
          "event": "incomingMessage"
        },
        {
          "event": "timeout"
        },
        {
          "event": "deliveryFailure"
        }
      ],
      "properties": {
        "offset": {
          "x": -140,
          "y": 250
        },
        "service": "{{trigger.message.InstanceSid}}",
        "channel": "{{trigger.message.ChannelSid}}",
        "from": "{{flow.channel.address}}",
        "body": "On a scale of 1-10, how likely are you to recommend this event to a friend?",
        "timeout": 3600
      }
    },
    {
      "name": "send-thanks",
      "type": "send-message",
      "transitions": [
        {
          "event": "sent"
        },
        {
          "event": "failed"
        }
      ],
      "properties": {
        "offset": {
          "x": -110,
          "y": 930
        },
        "service": "{{trigger.message.InstanceSid}}",
        "channel": "{{trigger.message.ChannelSid}}",
        "from": "{{flow.channel.address}}",
        "to": "{{contact.channel.address}}",
        "body": "Thank you so much for the feedback, and most importantly for participating in the event!"
      }
    },
    {
      "name": "NPS-Text-Reason",
      "type": "send-and-wait-for-reply",
      "transitions": [
        {
          "next": "write-data",
          "event": "incomingMessage"
        },
        {
          "event": "timeout"
        },
        {
          "event": "deliveryFailure"
        }
      ],
      "properties": {
        "offset": {
          "x": -130,
          "y": 510
        },
        "service": "{{trigger.message.InstanceSid}}",
        "channel": "{{trigger.message.ChannelSid}}",
        "from": "{{flow.channel.address}}",
        "body": "What's your primary reason for giving that score?",
        "timeout": 3600
      }
    },
    {
      "name": "write-data",
      "type": "make-http-request",
      "transitions": [
        {
          "next": "send-thanks",
          "event": "success"
        },
        {
          "event": "failed"
        }
      ],
      "properties": {
        "offset": {
          "x": -120,
          "y": 710
        },
        "method": "POST",
        "content_type": "application/x-www-form-urlencoded;charset=utf-8",
        "parameters": [
          {
            "value": "{{widgets.NPS-Numerical-Score.inbound.Body}}",
            "key": "numericalScore"
          },
          {
            "value": "{{widgets.NPS-Text-Reason.inbound.Body}}",
            "key": "reason"
          }
        ],
        "url": "http://example.com"
      }
    }
  ],
  "initial_state": "Trigger",
  "flags": {
    "allow_concurrent_calls": true
  }
}
After you’ve imported the Studio flow, hook it up to your Twilio phone number.
Conclusion: writing to an Airtable base from your Twilio app
In this post, you’ve learned to:
- Write data to an Airtable base with a serverless function
- Import a Twilio Studio flow that performs a NPS survey
If you want to learn more about Airtable, check out this post about how to read Airtable data from a Twilio Function. In the meantime, hit me up on Twitter or over email (tthurium [at] twilio [dot] com) if you have any questions.

Posted on May 12, 2020
Join Our Newsletter. No Spam, Only the good stuff.
Sign up to receive the latest update from our blog.


