Introduction to hardware programming with DeviceScript

Timon van Spronsen
Posted on January 25, 2024

Hardware programming used to require you to learn C/C++. If you’re already familiar with JavaScript or TypeScript, you will be delighted to learn about DeviceScript, a TypeScript programming environment for microcontrollers. In this blogpost you’ll learn the basics of electronics and DeviceScript. We will create the “hello world” of programming: making an LED blink!
Hackerspace Pixelbar
This blogpost originates from a workshop organized at Hackerspace Pixelbar in Rotterdam, which was generously sponsored by No Fluff Jobs. A hackerspace is a physical space where people interested in science, technology or digital art (and many other areas) can meet and exchange ideas. Want to visit? We’re open on Wednesday evenings and Saturday afternoons. Feel free to connect with us on Discord or refer to our website for current opening hours. Additionally, we regularly organize workshops about JavaScript and web-related topics. Join our Meetup group to get notified of the next event!
Safety instructions
Keep these safety instructions in mind while working with electronics:
- Don’t adjust wiring while a circuit is powered. In other words, plug out the USB cable connected to your computer.
- Wash your hands after handling hardware. Some components may be lightly contaminated with toxic metals, so it’s good practice to wash your hands afterwards.
The setup
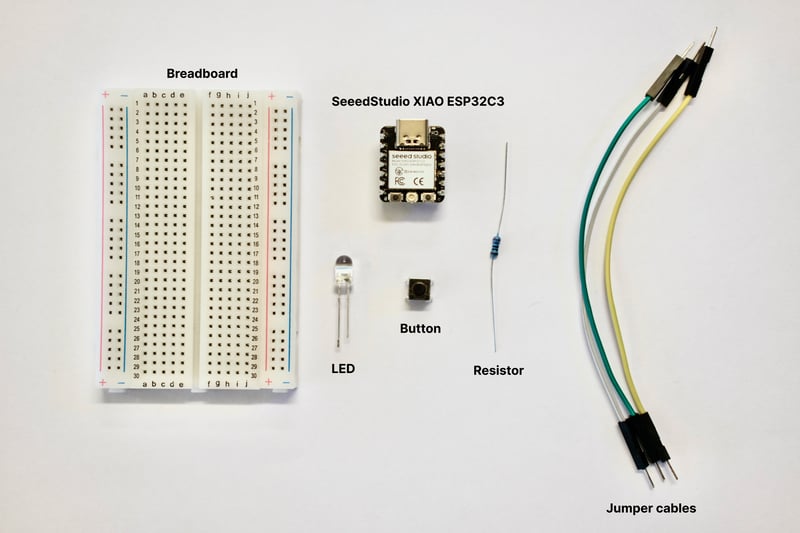
We’re going to need a few components to get going:
- A Seeed Studio XIAO ESP32C3 with headers soldered on
- A cable to connect the microcontroller to your computer (USB-C in our case)
- A breadboard
- A 5mm 2V LED – any LED will do, I recommend using a diffused LED
- A 100Ω resistor – a higher value, e.g., 270Ω is fine too, the LED will just shine a little more dimly
- A few jumper cables
- Optionally: a button
Aside from hardware, here are the software requirements:
- Node.js 18 or higher (LTS recommended)
- Visual Studio Code
- DeviceScript extension for Visual Studio Code
Before we start, it’s essential to learn a bit about the components we’re going to be using.
The breadboard
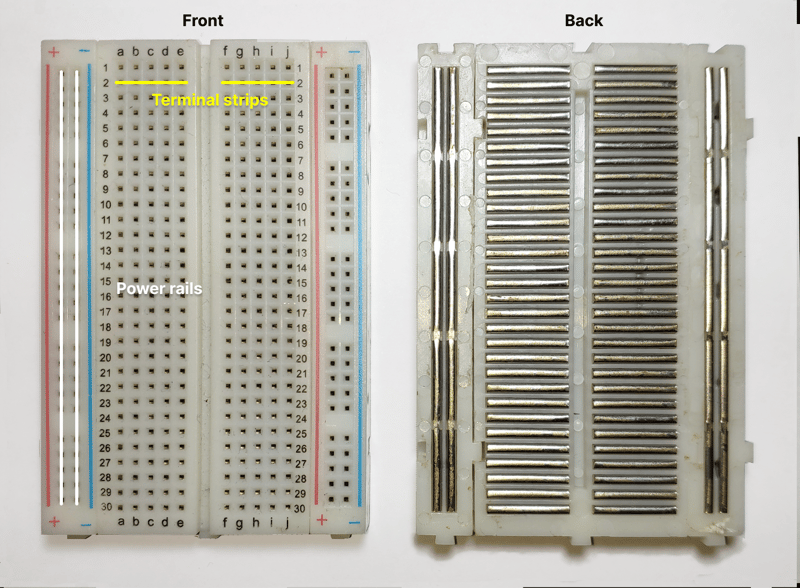
A breadboard is a way to build electronic circuits. The image below shows the front and the back of a breadboard with the adhesive backing removed. The top side is where we plug in our components and jumper wires. The backside demonstrates how everything is connected. The rows are connected horizontally, we call them terminal strips, they are not connected across the divider gap in the middle. The columns on the side (with the + and - above them) are called power rails, and are connected vertically.
The microcontroller
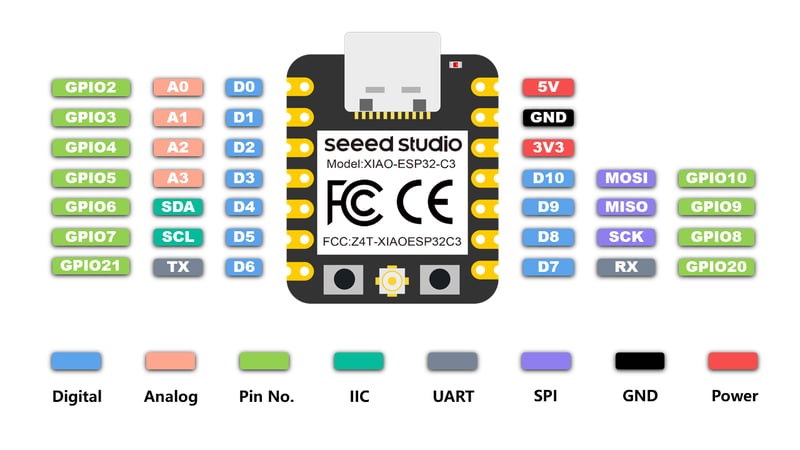
A microcontroller is a tiny computer on a single integrated circuit, common examples include Arduino and the ESP32 series. Microcontrollers usually contain several general purpose input/output pins (GPIO). These input/output pins allow us to connect components like LEDs. The pinout diagram below shows the pins present on the Seeed Studio XIAO ESP32C3, you can reference this diagram when you wire up the components.
The LED and resistor
An LED has two legs, we call them the anode (+) and the cathode (-). The anode leg is slightly longer. We use a resistor to limit the current that flows through the LED, if we were to omit a resistor, the LED could burn out. In my setup I’m using 2V 20mA LEDs, the specifications of your LED may differ slightly, not to worry, the specified resistor will likely be enough to keep your LED from burning out. The anode should be connected to the positive side of the circuit, while the cathode should be connected to the ground, the other way around won’t hurt the LED, but it won’t do anything either.
Wiring up the hardware
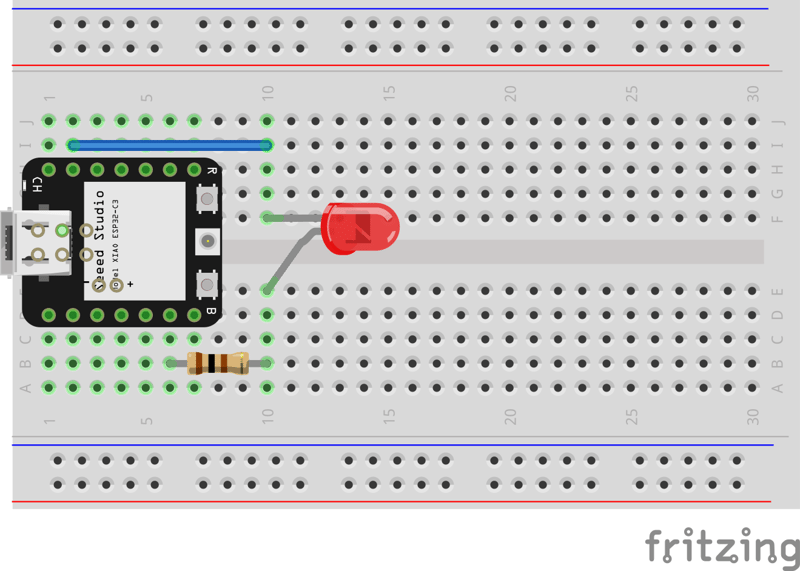
Let’s connect the components to the breadboard, you can follow the schema below. The bended leg of the LED in the breadboard schema below is the anode (the longer leg).
Let’s examine what we did. We connected the GND pin (ground) with a jumper wire to row 10, this connects the ground to the terminal strip on row 10 on the top side of the gap, meaning that the cathode of the LED is connected to the ground. The anode of the LED is connected with the resistor, which in turn is connected with pin D6.
Programming the hardware
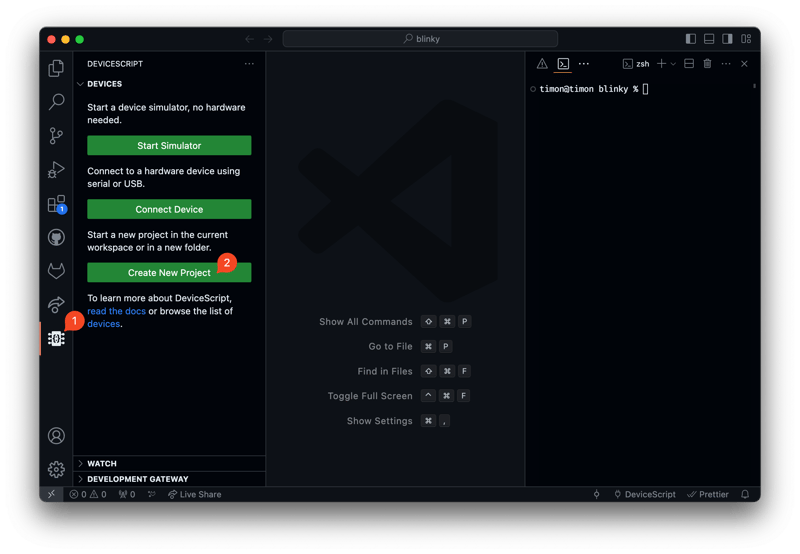
Now onto the most fun part! First create a new folder to contain your project (e.g., blinky), open this folder in VS Code (File → Open Folder…). If you have the DeviceScript extension installed you should see a DeviceScript icon in the activity bar, click on it, then press “Create New Project” and follow the wizard.
Go back to the file explorer, open src/main.ts and replace the contents with the code below.
import { startLightBulb } from "@devicescript/servers";
import { pins } from "@dsboard/seeed_xiao_esp32c3";

const led = startLightBulb({ pin: pins.SCL_D5 });

setInterval(async () => {
  await led.toggle();
}, 1000);
A couple of things to note here. It’s important to import the correct pin definitions, as every board has different pins, or a different layout. I once made the mistake of importing the pin definitions for esp32c3_bare instead, wondering for an hour why my code didn’t work 😅. startLightBulb starts a client to interact with the LED that we connected, we have to give it the pin that’s driving the LED (D5). await led.toggle() will toggle the LED on and off, this is encapsulated in a setInterval which is triggered every 1000 ms (= 1 second).
Flashing the microcontroller
Before we can load our code on the microcontroller, we have to flash the DeviceScript firmware onto the microcontroller.
- Connect the microcontroller to your computer with a USB cable.
- Open the command palette in VS Code (Command+Shift+P on Mac, Ctrl+Shift+P on Windows and Linux), search for “flash”.
- Select
DeviceScript: Flash Firmware…and choose the appropriate device.
A terminal will open where you can track the progress, it might take a few seconds, once finished it should say “flash OK”. You can now connect the device.
Loading code onto the microcontroller
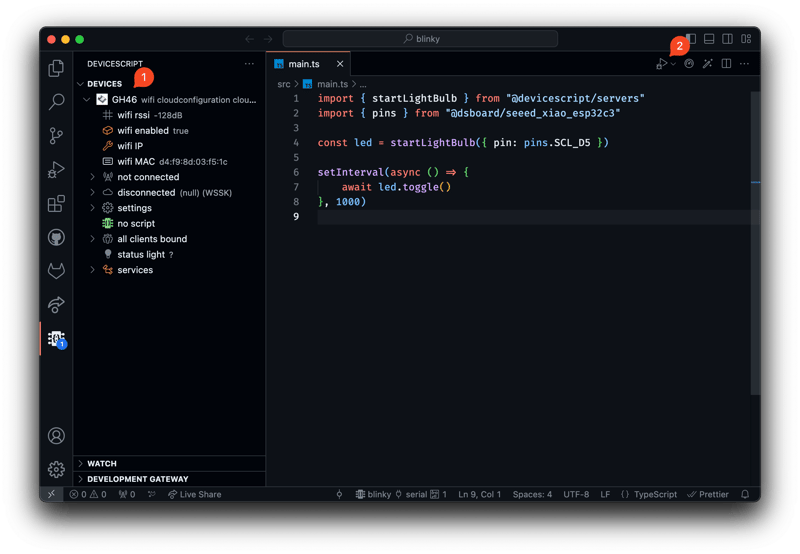
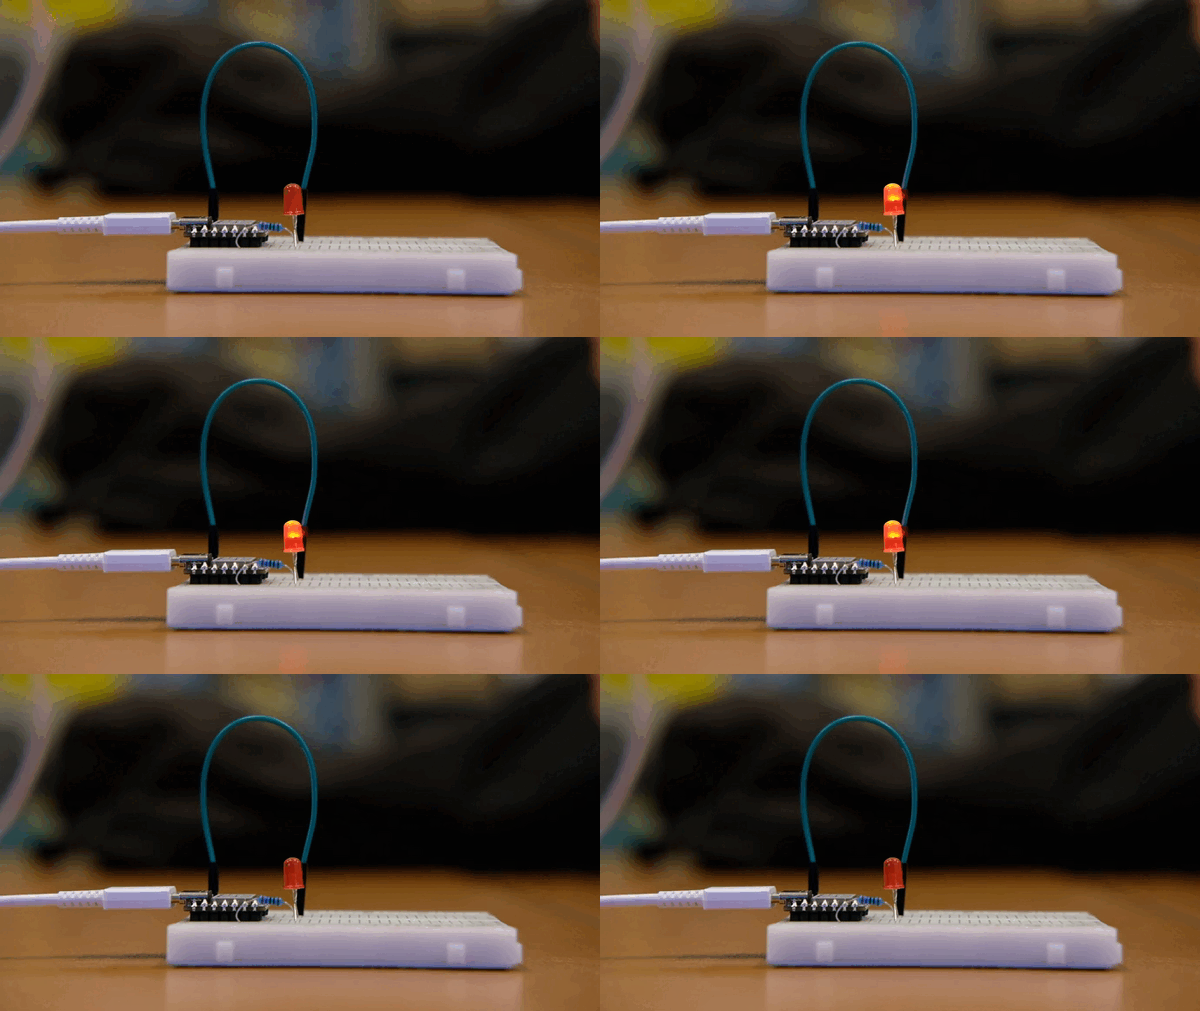
Once again, open the DeviceScript panel, but now click on “Connect Device”, then select serial, your device should now appear in the sidebar (1). Then click on the little chevron besides the debug button in the top-right corner (2) and select “DeviceScript: Run” from the context menu. The LED on your breadboard should now start blinking!
The result
Dimming an LED
Let’s make things slightly more exciting, we’ll make the LED fade. To achieve this we must add dimmable: true to startLightBulb, this will allow us to change the intensity of the LED with led.intensity.write(intensity), where intensity is some number between 0 and 1.
import { sleep } from "@devicescript/core";
import { startLightBulb } from "@devicescript/servers";
import { pins } from "@dsboard/seeed_xiao_esp32c3";

const led = startLightBulb({
  pin: pins.SCL_D5,
  dimmable: true,
});

const fadeInLevels = [0, 0.1, 0.2, 0.3, 0.4, 0.5, 0.6, 0.7, 0.8, 0.9, 1];
const fadeOutLevels = [1, 0.9, 0.8, 0.7, 0.6, 0.5, 0.4, 0.3, 0.2, 0.1, 0];

async function fade() {
  // Fade in
  for (const level of fadeInLevels) {
    await led.intensity.write(level);
    await sleep(50);
  } // Stay at peak brightness for a bit
  await sleep(500); // Fade out
  for (const level of fadeOutLevels) {
    await led.intensity.write(level);
    await sleep(50);
  }
}

while (true) {
  await fade();
  await sleep(200);
}
Next steps
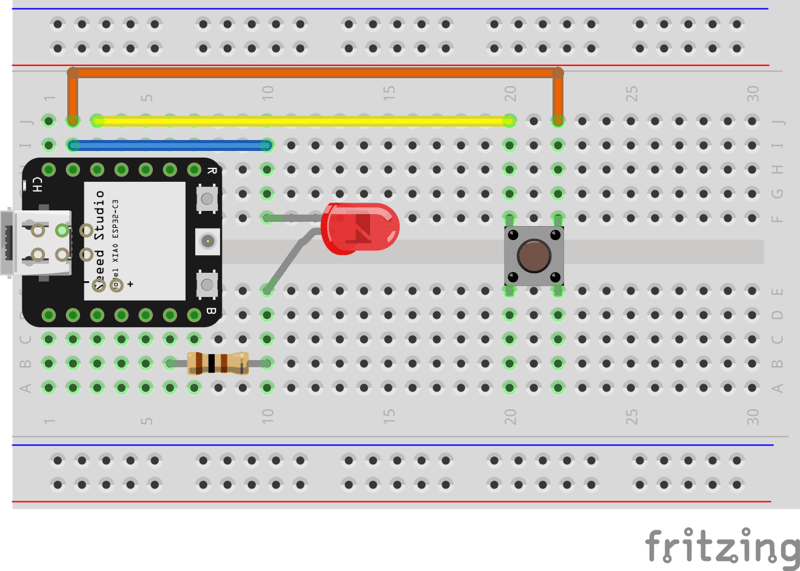
This concludes the tutorial. Next up you could try wiring up a button to a digital pin and use it to toggle the LED, I’ll leave you with the schema below. If you have any questions, don’t hesitate to drop by Pixelbar hackerspace in Rotterdam. We also have a Discord community that you can join to ask questions.

Posted on January 25, 2024
Join Our Newsletter. No Spam, Only the good stuff.
Sign up to receive the latest update from our blog.
