Implementing GitHub API with React

Emmanuel Boluwatife Janet
Posted on January 6, 2023
The GitHub public API provides a simple way to consume content on GitHub, In this article we are going to be using the /endpoint in the GitHub specification to display list of Repos in a GitHub Account.
What you should have
To get started ensure you have the following tools installed.
- Node JS https://nodejs.org/en/
- VS Code Editor https://code.visualstudio.com/download
- Prettier Code Formatter Extension
Now that we have our tools installed or development environment
setup. It's the time to build our react application but before we proceed let's understand how to actually set up a react application.
Setting up the project
Open your terminal and run the following commands
npx create-react-app my-app
cd my-app
npm start
npx is the command used to create react app, it is a tool which allows us to set up our fast react project while my-app is the name of the application but in your own case you could change that to anything you want.
After installing or creating the react project the next command is to go into the folder and the last command which is npm start allows us to kind of launch the application in your browser and view how it looks like.

Next, this is what you should have in your vs code. There are three main important folders which are;
node_modules folder containing the packages installed,
the public folder and the last one which is the SRC folder. The SRC folder is where all the magic happens and where we have our entire application. Inside the SRC folder is where we can create our components and as we can see the image above we have the App.css file where you can write your CSS code. The App.js file is the root component and inside this component is where we embedded all other component that make up the entire application.
Let's design the UI
The following technology were implemented in my project which are;
- React
- React Router
- Fetch
- Custom hook (useFetch)
- Error Boundary
- React Helmet (SEO)
I created different components in my SRC folder that will be responsible for displaying a list of my repositories on GitHub. So in order to create a component I imported my react and my components as shown below and all these should be in your App.js file:
import React from "react";
import Home from "./components/Home";
import AllRepo from "./components/AllRepo";
import EachRepo from "./components/EachRepo";
import Navbar from "./components/Navbar";
import Footer from "./components/Footer";
import NotFound from "./components/NotFound";
import About from "./components/About";
import { BrowserRouter, Routes, Route } from "react-router-dom";
import "./App.css";
import { ErrorBoundary } from 'react-error-boundary';
import { HelmetProvider } from 'react-helmet-async';
I also implemented routes in my React app by using the react-router-dom library. This library provides a simple way to create routes in a React app and switch between different routes based on the URL.
 <Routes>
   <Route path="/" element={<Home />} exact />
   <Route path="/all-repo" element={<AllRepo />} />
   <Route path="/all-repo/:id" element={<EachRepo />} />
   <Route path="/about" element={<About />} />
   <Route path="*" element={<NotFound />} />
 </Routes>
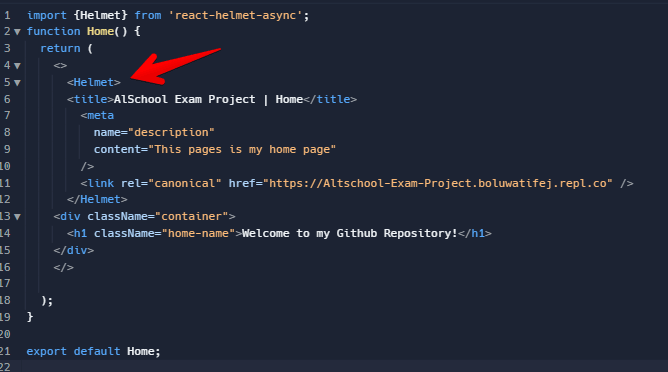
I implemented proper SEO in my React app using the react-helmet library. This library allows me to set the title, description, and other meta tags for each page in my app, which helps improve the SEO of the app.
Error Boundary was also implemented in my React app, I created a new component calledErrorFallBack that wraps around the components that may throw an error. This component will catch any errors that are thrown by the wrapped components and display a fallback UI instead of the error. This is an example as shown below
To make the app look good and have a good design, I used a CSS framework called bootstrap to style the app. I also make sure to follow best practices for designing user interfaces and make sure the app is easy to use and navigate and also to be responsive on any mobile device.
The following links were added to my index.js file
(https://cdn.jsdelivr.net/npm/bootstrap-icons@1.9.1/font/bootstrap-icons.css)(https://cdn.jsdelivr.net/npm/bootstrap@5.0.2/dist/css/bootstrap.min.css)
(https://cdn.jsdelivr.net/npm/bootstrap@5.0.2/dist/js/bootstrap.bundle.min.js)
There are different free online hosting where you can host your application and some of them are;
- Netlify https://www.netlify.com/
- Vercel https://vercel.com/
- Heroku https://www.heroku.com/ etc
Conclusion
Let me know what you think about this article!
PS: This is my first blog post on Dev.to
Altschool Africa assigned this technical writing as part of their grade. Please visit https://github.com/Tifem/Altschool-exam-project if you think the software needs further features.
Live Link: (https://altschool-exam-project.vercel.app/)
GitHub Repo: (https://github.com/Tifem/Altschool-exam-project)

Posted on January 6, 2023
Join Our Newsletter. No Spam, Only the good stuff.
Sign up to receive the latest update from our blog.
Related
November 30, 2024


