The Secrets of API Gateway Caching

Tatiana Barrios
Posted on May 25, 2020
*AWS pricing applies.
Latency on Rest APIs has always been an issue. Maybe your response body is growing longer and longer, therefore taking more time. Or maybe you want to serve your users around the world quicker. To solve these situations there is an obvious answer: Implement caching. Cache, pronounced /kaʃ/, can be done in the backend, but a code solution is not always straightforward. However if you use API Gateway from AWS, it can make a big difference.
Here we are going to discuss a couple of approaches to caching on AGW: one manual because you need to understand the intrinsics of it and, one via the Serverless framework.
Manual Approach
For the first approach, let's suppose you have a Rest API on AGW for a bookstore. A pretty basic one, which on the console looks like this:
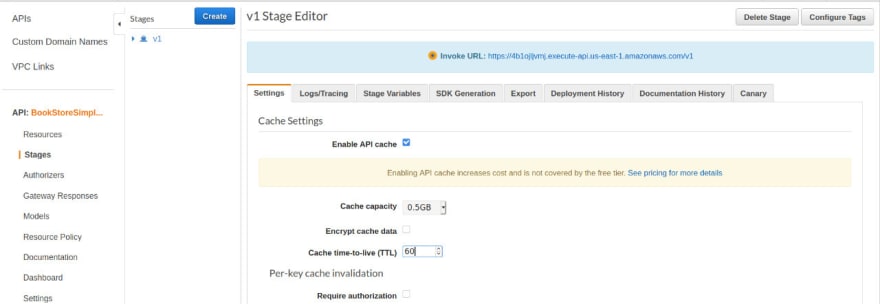
To activate the cache, you would have to go to the stage settings and just enable the cache. Be careful about specifying the Cache capacity, its TTL (Time To Live), if it is encrypted and if it requires authorization because all of that will influence the price 😉. For this post purposes, we won't need the encrypting or authorization, and we will settle for the lowest Cache capacity available (0.5Gb). Also, we'll set the TTL on 60 seconds (TTL is always in seconds, I have a little anecdote about that 😅). Please keep in mind, caching is not covered by the AWS free trial. When enabled, it has to look like this:
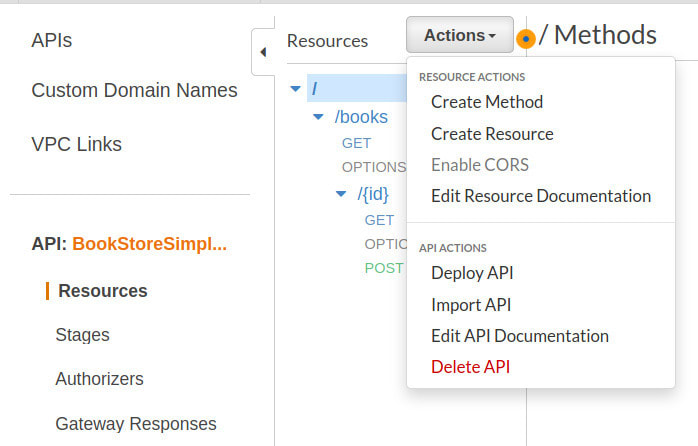
Before moving on to test, you have to Save Changes but more important: Deploy the API stage. If you don't deploy the API, it will appear as if you never enabled the cache, so please remember that. To deploy the API, you just have to go back to Resources, Actions, and then Deploy API. On the console, it should look like this:
And now caching is enabled. Wait, is that it? 🤔 NO. First of all, let's keep in mind that Caching is directed to GET requests, and not POST or other requests. So, let's suppose you have a GET request, that depends on Query parameters, Path parameters, and even Headers. You enable the caching, call it a day and suddenly: BAM! all the responses are coming the same, no matter how much you change the parameters. That has a reason: enabling cache on the stage doesn't work alone, we need to override the caching settings on all necessary requests. For that, let's go again to the stage configurations, but this time, we will expand the stage resources. You should get something like this on the console:
We will select the resource and the method we are interested to override. Let's pick the one that says: GET /books/{id}. It will give us 2 options, from which we will choose Override for this method. The console should look like this:
We can disable Cloudwatch Logging from there, and even disable the throttling, but we are not focusing on that. In the caching settings, we can change the TTL, encrypt the data, and change the authorization parameters for that resource, but we are not interested in that. I know it doesn't make sense now, but it is necessary to enable the overriding for the next step. So, we will live it like it is, and save changes.
Before deploying the stage, we will need to go back to the Resources menu, go to the resource we picked in the last step, and then, to the method. The console should look like this, in part:
From here, we select Method Request. This view will let us configure every parameter we need to make the caching right, from Request Path to Request Body. For now, we will register the path id, and add query strings called name and author, and also header Accept-Language. Here, what is important is to check the parameter Caching:
We will live it like that and finally, deploy the API 😎. After all of this, on every requested change, you should get something different.
NOTE: There is a known AGW bug related to configuring the cache on header parameters. There is no straightforward solution for that unless you are using an Infrastructure as Code approach. In this case, reload the page and try again until AGW approves the request.
Serverless Approach
If we use serverless there is an easier approach to enable caching than what I previously wrote. First of all, you will need to have Serverless installed with everything it implies. Second, you will need to install the Serverless API Gateway Caching plugin.
serverless plugin install --name serverless-api-gateway-caching
On the serverless YAML file, there is an optional custom key used to apply all configurations from plugins. There we enable the caching for the whole API, just like we did some paragraphs ago, but on the code. Later, in the functions key, for the function linked to our desired resource and method, we need to set its specific caching parameters. And that would be it. Much simpler than the previous approach 😅. By now, the file should look like this:
service: bookstore

provider:
  name: aws
  runtime: nodejs12.x
  stage: ${opt:stage, 'dev'}
  region: us-east-1
  stackName: Bookstore-API-${self:provider.stage}
  apiName: Bookstore-API-${self:provider.stage}
  timeout: 30

custom:
  apiGatewayCaching:
    enabled: true
    clusterSize: '0.5'
    ttlInSeconds: 60
    dataEncrypted: false
    perKeyInvalidation:
      requireAuthorization: false

functions:
  getBooks:
    name: getBooks-${self:provider.stage}
    handler: get/index.handler
    events:
      - http:
          path: books/{id}
          method: get
          cors: true
          caching:
            enabled: true
            cacheKeyParameters:
              - name: request.path.id
              - name: request.querystring.name
              - name: request.querystring.author
              - name: request.header.Accept-Language
  postBooks:
    name: postBooks-${self:provider.stage}
    handler: post/index.handler
    events:
      - http:
          path: books
          method: post
          cors: true
          caching:
            enabled: false

plugins:
  - serverless-api-gateway-caching
Please don't forget to do serverless deploy to apply all your changes on the cloud, otherwise, we did nothing 🙃.
Thank you so much for reading me ☺️. If you like, you can follow me on Twitter and LinkedIn
Laters! ✌🏽

Posted on May 25, 2020
Join Our Newsletter. No Spam, Only the good stuff.
Sign up to receive the latest update from our blog.


