Thomas Ardal
Posted on October 21, 2020

Back when Visual Studio 2010 were the coolest kid on the block, everyone talked about the new Web.config transformation feature. The intentions with transformations were a bit different back then, but still very relevant for ASP.NET, MVC and Web API projects. In this post, I'll explain everything you need to know about Web.config transformations and go through best (and worst) practices when implementing transformations in your web project.
So, what are Web.config transformations? Most applications need to run on multiple environments and in multiple configurations. Everyone must have at least a local web server, as well as a production environment. If you are connecting to a database, the connection string needs to be different for the two environments. You could use Web.config transformations to achieve that.
Using different environments to explain Web.config transformations isn't really the best example; most articles use this example, however, primarily because it's easy to understand and the articles are old. So much has happened in the .NET tool space since tranformations were introduced. Tools like Azure DevOps and Octopus Deploy heavily improved how we configure and deploy applications on multiple environments.
To explain transformations, I'll use another example: solution configurations. You probably already know the Debug and Release configurations available on all .NET projects. .NET uses these two configurations for a number of purposes, like optimizing your code and excluding source code information when running in Release mode. Solution configurations can be used for transformations, as well. Switching configuration based on configuration is a perfect use of transformations.
Web.config transformations are implemented using a markup language called XML Document Transform - XDT for short. XDT is an XML-based document format invented by Microsoft and used to describe changes to a Web.config file. Want to replace an element with a specified name? XDT can do that. Want to insert an element beneath another element? XDT is your friend. Want to replace an attribute value with...well, you get the point.
Let's look at some code. To transform a Web.config file, you specify a file named Web.*Configuration*.config alongside your existing Web.config file. You probably already have a file named Web.release.config in your project, so let's build from that:
<?xml version="1.0"?>
<configuration xmlns:xdt="http://schemas.microsoft.com/XML-Document-Transform">
  <system.web>
    <compilation xdt:Transform="RemoveAttributes(debug)" />
  </system.web>
</configuration>
All XDT documents need a namespace declaration in the root element. The example above, removes the debug attribute from the compilation element located beneath the system.web element. This is done using the xdt:Transform attribute. The value can be one of many, but in this case, it is RemoveAttribute(debug). SetAttributes, Replace, and InsertBefore are also popular options.
In the example above, locating the attribute was easy by declaring the full XML structure (configuration -> system.web -> compilation). If we want to modify existing markup with more complex structures, you can use additional XDT attributes. The most common example is to replace an appSettings value with another:
<?xml version="1.0"?>
<configuration xmlns:xdt="http://schemas.microsoft.com/XML-Document-Transform">
  <appSettings>
    <add key="isProd" value="true" xdt:Transform="SetAttributes" xdt:Locator="Match(key)" />
  </appSettings>
</configuration>
The example XDT replaces the value of the isProd application setting with true. Understanding XDT can be a bit difficult at first. To explain how the transformation works, let's go through the XML, step-by-step.
- XDT looks for a
configurationelement in the XML to modify. - It then looks for an
appSettingselement. - It then looks for an
addelement (you probably have multiple of these). - It then find
addelement's whichkeyattribute equalsisProd. - Finally, it updates the value of
isProdwithtrue.
I hope you have a better understanding of how the transformation works. For more examples of writing XDT transformations, the last chapter in the post is a compilation of common scenarios that I have used or am using on elmah.io.
The best way to learn about transformations is to look through the common tasks in the last chapter in the post. Before we move on to the examples, there are a number of things that are good to know.
App.config files
Thus far we have only talked about Web.config files. So, App.config files are supported as well, right? Not everyone knows that Web.config and App.config files are actually two different file types, maintained by different people (at least that's what I've heard) but that share common elements. This means that App.config files are not supported out of the box.
Luckily, Sayed Ibrahim Hashimi wrote an extension to XDT transformations, called Slow Cheetah, that would transform App.config files as well. Actually, Slow Cheetah works on any XML file, which is nice for transforming other types of configuration files, like those from EntityFramework and NHibernate.
Since launching Slow Cheetah, Microsoft adopted the tool and made it available as an extension for Visual Studio. The tool also comes as a NuGet package you can use as part of your build pipeline. One thing to notice here is that Slow Cheetah runs on compile time, where Web.config transformations run on deploy time.
To start transforming XML files (not Web.config files since they are already built-in), install the SlowCheetah package. After restarting Visual Studio, right-clicking an App.config file will now show the Add Transform option:
SlowCheetah needs to install a NuGet package in order to transform the file on build. A nice feature of installing the Visual Studio package first, is this:
Nice! By clicking Yes, SlowCheetah automatically installs the required NuGet package and modifies the project file:
<ItemGroup>
  <None Include="App.config">
    <TransformOnBuild>true</TransformOnBuild>
  </None>
  <None Include="App.Debug.config">
    <DependentUpon>App.config</DependentUpon>
    <IsTransformFile>true</IsTransformFile>
  </None>
  <None Include="App.Release.config">
    <DependentUpon>App.config</DependentUpon>
    <IsTransformFile>true</IsTransformFile>
  </None>
</ItemGroup>
Notice the IsTransformFile element, which is where the magic happens. Using the installed NuGet package, SlowCheetah automatically transforms the App.config file depending on the chosen configuration.
The two new XDT files are nested beneath the App.config file:
IntelliSense
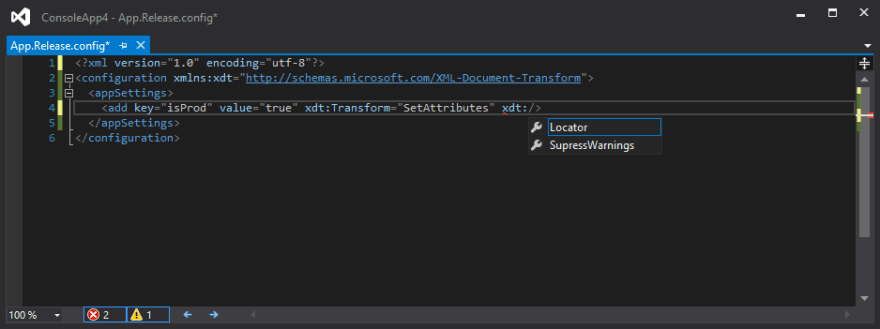
Visual Studio is known for providing great IntelliSense for commonly used source file types. XDT transformations are Web/App.config files with a xdt namespace within, meaning that Visual Studio will provide the same experience in transform files. This even includes IntelliSense for xdt: attributes:
Sadly, IntelliSense won't help with filling out the values of the xdt attributes. For this, you will need experience, the documentation and tutorials like this one. A good tip to help debug XDT problems (believe me - you will experience those) is to install SlowCheetah as explained above. SlowCheetah ads a preview command to Visual Studio when right-clicking the transform file. Previewing a XDT file shows exactly how this file will modify the existing XML file:
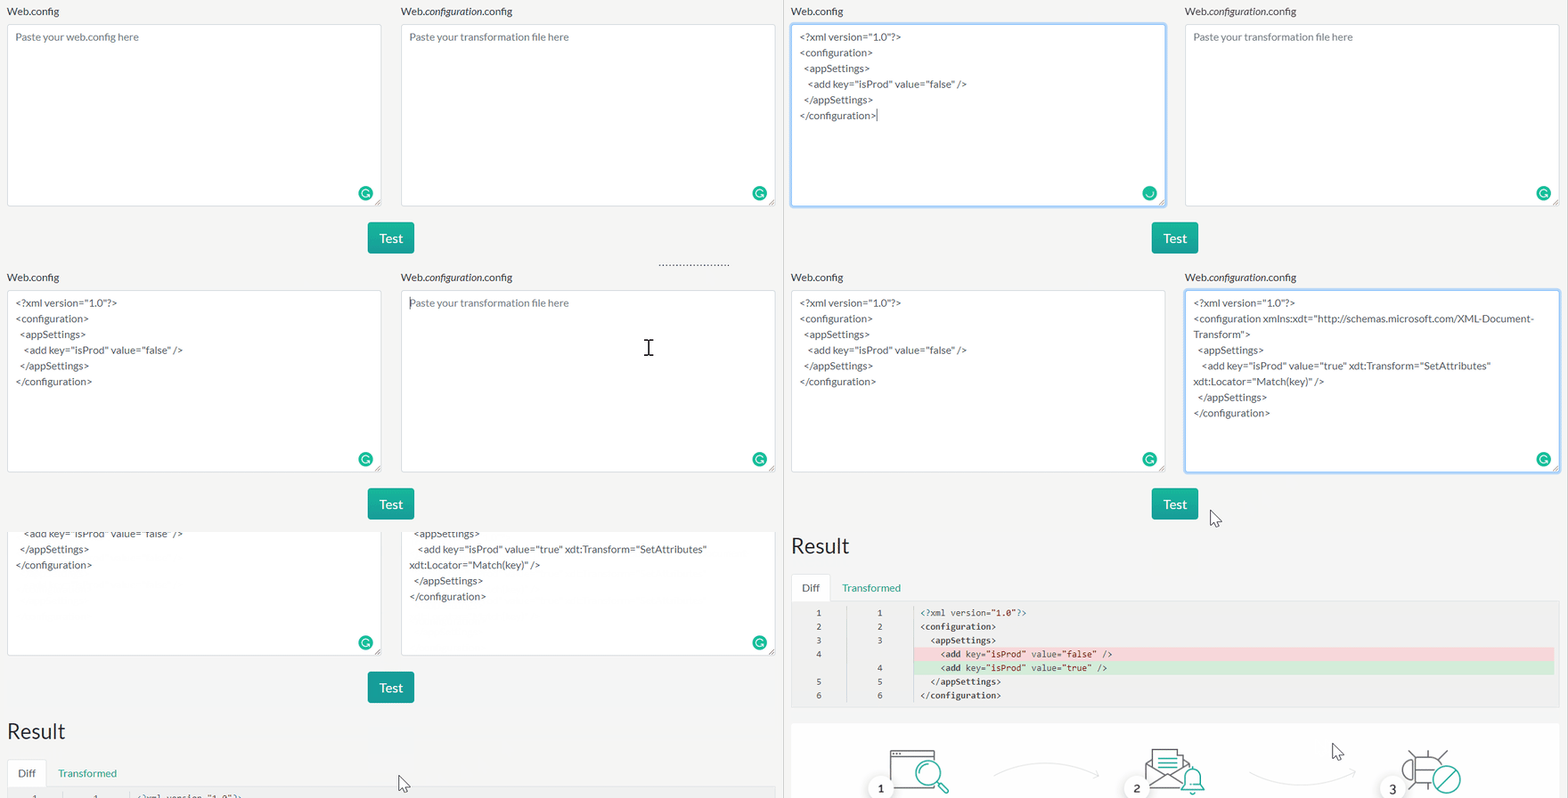
An alternative to previewing changes in Visual Studio, is using an online tool I've built: Web.config Transformation Tester. The tool generates a diff similar to the one in SlowCheetah:
Visual Studio plugins
We already touched upon a great plugin for helping with XDT transformations. There are a couple of other helpful plugins available.
Configuration Transform - https://marketplace.visualstudio.com/items?itemName=GolanAvraham.ConfigurationTransform
Golan Avraham offers an alternative to SlowCheetah that may work better in situations where you have a configuration per environment.
File Nesting - https://marketplace.visualstudio.com/items?itemName=MadsKristensen.FileNesting
Mads Kristensen wrote this excellent plugin that lets you nest files under each other in Visual Studio. I've experienced some problems getting XDT transform files correctly nested and fixing it was a piece of cake with File Nesting.
Common tasks
This is a collection of common tasks achievable with Web.config transformations.
Add appSetting/connectionString element
<configuration xmlns:xdt="...">
  <appSettings>
    <add key="Hello" value="world" xdt:Transform="Insert" />
  </appSettings>
</configuration>
Update appSetting/connectionString value
<configuration xmlns:xdt="...">
  <appSettings>
    <add key"Hello" value="World" xdt:Transform="SetAttributes" xdt:Locator="Match(key)" />
  </appSettings>
</configuration>
Insert complex element
<configuration xmlns:xdt="...">
  <system.webServer>
    <rewrite>
      <rules xdt:Transform="Insert">
        <rule name="RedirectToHTTPS" stopProcessing="true">
          <match url="(.*)" />
          <conditions>
            <add input="{HTTPS}" pattern="off" ignoreCase="true" />
          </conditions>
          <action type="Redirect" url="https://{SERVER_NAME}/{R:1}" redirectType="Permanent" />
        </rule>
      </rules>
    </rewrite>
  </system.webServer>
</configuration>
Remove attribute
<configuration xmls:xdt="...">
  <system.web>
    <compilation xdt:Transform="RemoveAttributes(debug)" />
  </system.web>
</configuration>
Replace element
<configuration xmlns:xdt="...">
  <system.web xdt:Transform="Replace">
    ...
  </system.web>
</configuration>
Would your users appreciate fewer errors?
elmah.io is the easy error logging and uptime monitoring service for .NET. Take back control of your errors with support for all .NET web and logging frameworks.
➡️ Error Monitoring for .NET Web Applications ⬅️
This article first appeared on the elmah.io blog at https://blog.elmah.io/web-config-transformations-the-definitive-syntax-guide/

Posted on October 21, 2020
Join Our Newsletter. No Spam, Only the good stuff.
Sign up to receive the latest update from our blog.


