Combine Utility CSS with Scoped Styles in an Enhance Project

Taylor Beseda
Posted on December 20, 2022
[A post from my drafts folder]
Enhance projects include a (totally optional) built-in CSS utility class system out of the box. By default, the generated stylesheet is very small, and developers can even configure their app’s design scale and color palette.
Let’s create a form layout with the available layout helpers and stylize the submit button with custom colors. For this approach, we’ll blend utility classes and a custom element’s local stylesheet.
Starting with a barebones pizza order form:
<main>
  <h1>Order a Pizza!</h1>

  <form action="/orders" method="POST">
    <fieldset>
      <legend>Pie Size</legend>

      <input type="radio" name="size" id="size_1" value="small" required />
      <label for="size_1">Small</label>

      <input type="radio" name="size" id="size_2" value="medium" />
      <label for="size_2">Medium</label>

      <input type="radio" name="size" id="size_3" value="large" />
      <label for="size_3">Large</label>
    </fieldset>

    <fieldset>
      <legend>Toppings!</legend>

      <label>Choose one or more <small>(cmd + click)</small>:</label>

      <select name="toppings" multiple size="12">
        <optgroup label="Premium toppings">
          <option value="pep">Pepperoni</option>
          <option value="jal">Jalapenos</option>
          <option value="oliv" disabled>Green olives</option>
        </optgroup>
        <optgroup label="Regular toppings">
          <option value="pine">Pineapple</option>
          <option value="feta">Feta cheese</option>
          <option value="bell">Bell pepper</option>
        </optgroup>
        <optgroup label="Free toppings">
          <option value="saus">Italian Sausage</option>
          <option value="ham" disabled>Ham</option>
          <option value="spin">Spinach</option>
        </optgroup>
      </select>
    </fieldset>

    <button type="submit">Place My Order</button>
  </form>
</main>
Well, that doesn’t look like much:
In order to give us a clean slate, Enhance Styles’ CSS reset is fairly aggressive. No problem, let’s start by building up a better layout.
<style>
  main { max-width: 50ch; }
</style>

<main class="mt4 m-auto font-sans">
  <h1 class="text2 text-center mb1">Order a Pizza!</h1>
Right away, I’ve added a <style> tag that scoped just to this page. I’ve set a max-width and then added our first utility classes to the <main> tag to get a bit of margin and use a sans-serif font stack. Similarly, I’ve set a text size and centering on the main <h1> header.
Let’s continue by adjusting each <fieldset>’s padding and a border:
<fieldset class="p1 border2">
All elements have a border-color of transparent by default, so the next step is to set the fieldset’s border-color in our <style> tag to a provided color swatch from Enhance Styles:
fieldset { border-color: var(--secondary-200) }
Taking a look now, and we’re in much better shape.
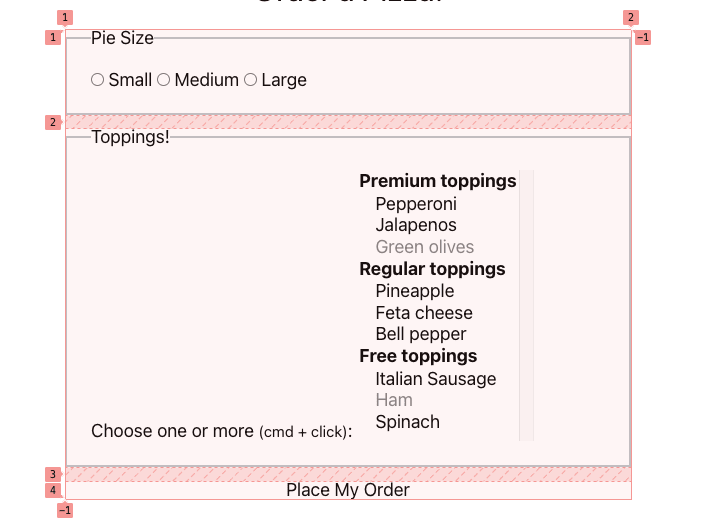
Alright, time for some grid layout! First up, the form:
<form action="/orders" method="POST" class="grid flow-row gap-2">
And with our web inspector’s help, we can see the grid is coming together:
We’ll use the flex class to do something similar with the “Pie Size” <fieldset>, notice the new <div> input/label wrappers:
<fieldset class="flex justify-around p1 border2">
  <legend>Pie Size</legend>

  <div>
    <input type="radio" name="size" id="size_1" value="small" required />
    <label for="size_1">Small</label>
  </div>

  <div>
    <input type="radio" name="size" id="size_2" value="medium" />
    <label for="size_2">Medium</label>
  </div>

  <div>
    <input type="radio" name="size" id="size_3" value="large" />
    <label for="size_3">Large</label>
  </div>
</fieldset>
And a similar treatment for the “Toppings!” section:
<fieldset class="grid flow-row gap-2 p1 border2">
We’re almost there
Now for that submit button, some added CSS in our style tag to set colors
button {
  color: var(--light);
  background-color: var(--primary-400);
}
And a wrapper div + some utility classes
<div class="mt-2 flex justify-around">
  <button type="submit" class="pt-4 pb-4 pl-1 pr-1 font-bold text1 radius1">
    Place My Order
  </button>
</div>
Finally, we’ve got a nice-to-use Pizza Order Form
The final markup, all in one Enhance page file:
<style>
  main {
    max-width: 50ch;
  }
  fieldset {
    border-color: var(--secondary-200)
  }
  button {
    color: var(--light);
    background-color: var(--primary-400);
  }
</style>

<main class="mt4 m-auto font-sans">
  <h1 class="text2 text-center mb1">Order a Pizza!</h1>

  <form action="/orders" method="POST" class="grid flow-row gap-2">
    <fieldset class="flex justify-around p1 border2">
      <legend>Pie Size</legend>

      <div>
        <input type="radio" name="size" id="size_1" value="small" required />
        <label for="size_1">Small</label>
      </div>

      <div>
        <input type="radio" name="size" id="size_2" value="medium" />
        <label for="size_2">Medium</label>
      </div>

      <div>
        <input type="radio" name="size" id="size_3" value="large" />
        <label for="size_3">Large</label>
      </div>
    </fieldset>

    <fieldset class="grid flow-row gap-2 p1 border2">
      <legend>Toppings!</legend>

      <label>Choose one or more <small>(cmd + click)</small>:</label>

      <select name="toppings" multiple size="12">
        <optgroup label="Premium toppings">
          <option value="pep">Pepperoni</option>
          <option value="jal">Jalapenos</option>
          <option value="oliv" disabled>Green olives</option>
        </optgroup>
        <optgroup label="Regular toppings">
          <option value="pine">Pineapple</option>
          <option value="feta">Feta cheese</option>
          <option value="bell">Bell pepper</option>
        </optgroup>
        <optgroup label="Free toppings">
          <option value="saus">Italian Sausage</option>
          <option value="ham" disabled>Ham</option>
          <option value="spin">Spinach</option>
        </optgroup>
      </select>
    </fieldset>

    <div class="mt-2 flex justify-around">
      <button type="submit" class="pt-4 pb-4 pl-1 pr-1 font-bold text1 radius1">
        Place My Order
      </button>
    </div>
  </form>
</main>

Posted on December 20, 2022
Join Our Newsletter. No Spam, Only the good stuff.
Sign up to receive the latest update from our blog.


