The Complete Guide to Build a Full Blown Multilanguage Website with Nuxt.js

Storyblok
Posted on January 10, 2020
This guide is for beginners and professionals who want to build a full-blown multi-language website using Nuxt.js. With this step by step guide, you will get a dynamic Nuxt.js website running on a now server, using an api for the multi-language content.
If you are in hurry you can download the whole project (nuxtblok.now.sh) at Github github.com/storyblok/nuxtjs-multilanguage-website
- Introduction
- Environment setup
- Build a homepage
- Build a navigation menu
- Build a blog section
- Build a sitemap
- Adding another language
- Deploy to live
Environment setup
Requirements
Basic understanding of NuxtJs
The CLI of now.sh for hosting
An account on Storyblok.com to manage content
If not done yet install NodeJs, NPM and NPX.\
We will start with initializing project with the nuxt.js starter template.
npx create-nuxt-app mywebsite
cd mywebsite && npm build
npm run dev
Nuxt.js starts it's server on port 3000 by default so after running npm run dev open your browser at http://localhost:3000.
As we will use SCSS to organize our CSS we also need to install the sass-loader.
npm install --save-dev sass-loader node-sass css-loader
To track the changes we make over the time we will also initialize the git repository.
// Initialize git
git init && git add . && git commit -m 'init'
Build a skeleton
We will start to build the skeleton for your website. At the end, you will have a header, a main and a footer section and some useful global utility CSS classes.
Global SCSS in Nuxt.js
In step 1. we installed the SCSS loader so let's create some global stylings and define scss variables. We will create a folder for styling general html tags assets/scss/elements/ and one for our utility component assets/scss/components/
assets/
--| scss/
-----| elements/
--------| body.scss
--------| ...
-----| components/
--------| util.scss
--------| ...
--| styles.scss
Create the file assets/scss/styles.scss and add the following content.
assets/scss/styles.scss
$brand-color: #357F8A;
$breakpoint-small: 480px;
$breakpoint-medium: 768px;
$breakpoint-large: 960px;
$breakpoint-xlarge: 1220px;
$breakpoint-mini-max: ($breakpoint-small - 1);
$breakpoint-small-max: ($breakpoint-medium - 1);
$breakpoint-medium-max: ($breakpoint-large - 1);
$breakpoint-large-max: ($breakpoint-xlarge - 1);

@import 'elements/body.scss';
@import 'components/util.scss';
Instead of putting the stylings of all HTML elements in one file I prefer to make separate files to keep the project structured and scalable.\
Create the file assets/scss/elements/body.scss to define the base font stylings.
assets/scss/elements/body.scss
body {
  font-family: 'Zilla Slab', Helvetica, sans-serif;
  line-height: 1;
  font-size: 18px;
  color: #000;
  margin: 0;
  padding: 0;
}
In the components folder we manage the global css components and helper classes.\
Create the file assets/scss/components/util.scss to define the global utility classes.
assets/scss/components/util.scss
.util__flex {
  display: flex;
}

.util__flex-col {
  flex: 0 0 auto;
}

.util__flex-eq {
  flex: 1;
}

.util__container {
  max-width: 75rem;
  margin-left: auto;
  margin-right: auto;
  padding-left: 20px;
  padding-right: 20px;
  box-sizing: border-box;
}
Add a google font to Nuxt.js
In the body.scss file we defined Zilla Slab as font. As this is not a system font we need to add it to the head section of our document. There the Nuxt.js configuration file comes into play.\
Open nuxt.config.js and add the font stylesheet to the head section.
nuxt.config.js
head: {
    ...
    link: [
      ...
      {
        rel: 'stylesheet',
        href: 'https://fonts.googleapis.com/css?family=Zilla+Slab:400,700'
      }
    ]
},
...
Define the default layout
Now that we have our SCSS in place we need to add it to the project. Make sure you have installed the sass loader in step one and replace the code of layouts/default.vue with following.
layouts/default.vue
<template>
  <div>
    <top-header/>
    <main id="main" role="main">
      <nuxt/>
    </main>
    <bottom-footer/>
  </div>
</template>

<script>
import TopHeader from '~/components/TopHeader.vue'
import BottomFooter from '~/components/BottomFooter.vue'

export default {
  components: {
    TopHeader,
    BottomFooter
  }
}
</script>

<style lang="scss">
@import '../assets/scss/styles.scss';
</style>
You will see an error that the components TopHeader.vue and BottomFooter.vue don't exist yet. So let's create them too.
Create the header component
Notice the attribute lang="scss" at the style tag. This allows you to use SCSS in your Vue.js components.
components/TopHeader.vue
<template>
  <header class="top-header util__flex util__container">
    <nav class="top-header__col">
      <ul class="nav">
        <li>
          <nuxt-link class="nav__item" to="/">Home</nuxt-link>
        </li>
        <li>
          <nuxt-link class="nav__item" to="/en/blog">Blog</nuxt-link>
        </li>
      </ul>
    </nav>
    <a href="/" class="top-header__col top-header__logo">
      <img src="http://a.storyblok.com/f/42016/1096x313/0353bf6654/logo2.png">
    </a>
    <nav class="top-header__col top-header__second-navi">
      <ul class="nav">
        <li>
          <nuxt-link class="nav__item" to="/en/blog">English</nuxt-link>
        </li>
        <li>
          <nuxt-link class="nav__item" to="/de/blog">German</nuxt-link>
        </li>
      </ul>
    </nav>
  </header>
</template>

<style lang="scss">
  .top-header {
    justify-content: space-between;
    padding-top: 30px;
    padding-bottom: 30px;
  }

  .top-header__logo {
    text-align: center;
    position: absolute;
    left: 50%;

    img {
      position: relative;
      max-height: 60px;
      left: -50%;
      top: -15px;
    }
  }

  .top-header__second-navi {
    text-align: right;
  }
</style>
Create the footer component
Add BottomFooter.vue to your ./components folder.
components/BottomFooter.vue
<template>
  <footer class="bottom-footer">
    <div class="util__container">
      <nuxt-link class="bottom-footer__link" to="/en/sitemap">Sitemap</nuxt-link>
    </div>
  </footer>
</template>

<style lang="scss">
.bottom-footer {
  background: #e3f2ed;
  padding: 40px 0 120px 0;
  text-align: center;
}

.bottom-footer__link {
  color: #8ba19a;
  text-decoration: none;
}
</style>
Currently, the website should look similar to the following screenshot. In the next step, I'll show you how to create the homepage with a teaser and a feature section.
Now let's commit that to git. See my GitHub commit for reference.
$ git add . && git commit -m 'creates the skeleton'
Build a homepage
Install the Storyblok Nuxt.js module
The Storyblok module will install $storyapi and $storyblok on the Vue instance.
$ npm install storyblok-nuxt --save
After installing the module you need to initialize it with the preview token of your Storyblok space. Signup or Login at app.storyblok.com and create a new space. Add the following to your nuxt.config.js and replace PREVIEW_TOKEN with your preview token.
nuxt.config.js
module.exports = {
  modules: [
    ['storyblok-nuxt', {accessToken: 'YOUR_PREVIEW_TOKEN', cacheProvider: 'memory'}]
  ],
  ...
Update the homepage component
Now replace the default content of pages/index.vue with following:
pages/index.vue
<template>
  <section class="util__container">
    <component v-if="story.content.component" :key="story.content._uid" :blok="story.content" :is="story.content.component"></component>
  </section>
</template>

<script>

export default {
  data () {
    return {
      story: { content: {} }
    }
  },
  mounted () {
    // Load the JSON from the API
    this.$storybridge.on(['input', 'published', 'change'], (event) => {
      if (event.action == 'input') {
        if (event.story.id === this.story.id) {
          this.story.content = event.story.content
        }
      } else {
        window.location.reload()
      }
    })
  },
  asyncData (context) {
    return context.app.$storyapi.get('cdn/stories/home', {
      version: 'draft'
    }).then((res) => {
      return res.data
    }).catch((res) => {
      if (!res.response) {
        console.error(res)
        context.error({ statusCode: 404, message: 'Failed to receive content form api' })
      } else {
        console.error(res.response.data)
        context.error({ statusCode: res.response.status, message: res.response.data })
      }
    })
  }
}
</script>
The asyncData method will load a JSON that defines which components we will render on the homepage.
Creating the homepage components
To render the full homepage we will need to create some components. Add the file components.js to the plugins folder.
plugins/components.js
import Vue from 'vue'
import Page from '~/components/Page.vue'
import Teaser from '~/components/Teaser.vue'
import Grid from '~/components/Grid.vue'
import Feature from '~/components/Feature.vue'

Vue.component('page', Page)
Vue.component('teaser', Teaser)
Vue.component('grid', Grid)
Vue.component('feature', Feature)
Nuxt.js doesn't pick up the files in plugins automatically so we need to add the components.js to the nuxt.config.js.
nuxt.config.js
module.exports = {
  plugins: [
    '~/plugins/components'
  ],
  ...
Then create the Vue components inside the components folder.
Page.vue
components/Page.vue
<template>
  <div v-editable="blok" class="page">
    <component :key="blok._uid" v-for="blok in blok.body" :blok="blok" :is="blok.component"></component>
  </div>
</template>

<script>
export default {
  props: ['blok']
}
</script>
Teaser.vue
components/Teaser.vue
<template>
  <div v-editable="blok">
    {{ blok.headline }}
  </div>
</template>

<script>
export default {
  props: ['blok']
}
</script>
Grid.vue
components/Grid.vue
<template>
  <div v-editable="blok" class="util__flex">
    <component :key="blok._uid" v-for="blok in blok.columns" :blok="blok" :is="blok.component"></component>
  </div>
</template>

<script>
export default {
  props: ['blok']
}
</script>
Feature.vue
components/Feature.vue
<template>
  <div v-editable="blok" class="util__flex-eq">
    <h1>{{ blok.name }}</h1>
  </div>
</template>

<script>
export default {
  props: ['blok']
}
</script>
When reloading http://localhost:3000/ you should see following.
Create your first block in Storyblok
We just loaded the demo content of Storyblok and now we will extend the teaser component with interactive slides. To do this start with connecting your environment to the Storyblok composer inserting your development host localhost:3000.
IMPORTANT: After inserting the host you need to change the real path field (see next step) otherwise you get a 404 page.
Changing the real path field
You now should see your website in the preview. But it will show a not found page because Storyblok by default uses the path /home for the homepage. To change that you will need to go to the Config tab and put a / in the real path field.
So let's define the schema of a new slide block/component
Follow this video which explains how to create a new block.
After adding the schema and the content to Storyblok we will need to add the slide Vue.js component to the project. Create components/Slide.vue with the following content.
components/Slide.vue
<template>
  <div class="slide" v-editable="blok">
    <img :src="blok.image">
  </div>
</template>

<script>
export default {
  props: ['blok']
}
</script>

<style lang="scss">
.slide img {
  width: 100%;
}
</style>
Add the new component to your component.js file.
plugins/components.js
import Vue from 'vue'
...
import Slide from '~/components/Slide.vue'

...
Vue.component('slide', Slide)
Of course, we don't want to show all slides at once. So let's extend the Teaser.vue with some logic to show a dot navigation. You can use any Vue.js slider plugin for a more advanced slider but let's keep it simple here.
components/Teaser.vue
<template>
  <div v-editable="blok" class="teaser">
    <component v-if="slide" :blok="slide" :is="slide.component"></component>
    <div class="teaser__pag">
      <button @click="handleDotClick(index)"
              :key="index"
              v-for="(blok, index) in blok.body"
              :class="{'teaser__pag-dot--current': index == currentSlide}"
              class="teaser__pag-dot">Next</button>
    </div>
  </div>
</template>

<script>
export default {
  props: ['blok'],

  data () {
    return {
      currentSlide: 0
    }
  },

  computed: {
    slide () {
      let slides = this.blok.body.filter((slide, index) => {
        return this.currentSlide === index
      })
      if (slides.length) {
        return slides[0]
      }
      return null
    }
  },

  methods: {
    handleDotClick (index) {
      this.currentSlide = index
    }
  }
}
</script>

<style lang="scss">
.teaser__pag {
  width: 100%;
  text-align: center;
  margin: 30px 0;
}

.teaser__pag-dot {
  text-indent: -9999px;
  border: 0;
  border-radius: 50%;
  width: 17px;
  height: 17px;
  padding: 0;
  margin: 5px 6px;
  background-color: #ccc;
  -webkit-appearance: none;
  cursor: pointer;

  &--current {
    background-color: #000;
  }
}
</style>
After saving you should have the following result.
Extending the feature section
The features section currently has only a title. We now will extend the feature block with a description text and icons.
Click on the feature block and add the fields description (with type textarea) and icon (with type image) by clicking on "Define Schema".
Open the feature component (components/Feature.vue) and extend it with the new fields as well as some basic CSS stylings.
components/Feature.vue
<template>
  <div v-editable="blok" class="feature util__flex-eq">
    <img :src="resizedIcon" class="feature__icon">
    <h1>{{ blok.name }}</h1>
    <div class="feature__description">
      {{ blok.description }}
    </div>
  </div>
</template>

<script>
export default {
  computed: {
    resizedIcon () {
      if (typeof this.blok.icon !== 'undefined') {
        return '//img2.storyblok.com/80x80' + this.blok.icon.replace('//a.storyblok.com', '')
      }
      return null
    }
  },
  props: ['blok']
}
</script>

<style lang="scss">
.feature {
  text-align: center;
  padding: 30px 10px 100px;
}

.feature__icon {
  max-width: 80px;
}
</style>
After you have filled in some content you should have a fully editable homepage.
Build a navigation menu
To build a dynamic navigation menu you have several possibilities. One is to create a global content item that contains the global configurations. Another method is to use the Links API to generate the navigation automatically from your content tree. We will implement the first method in this tutorial.
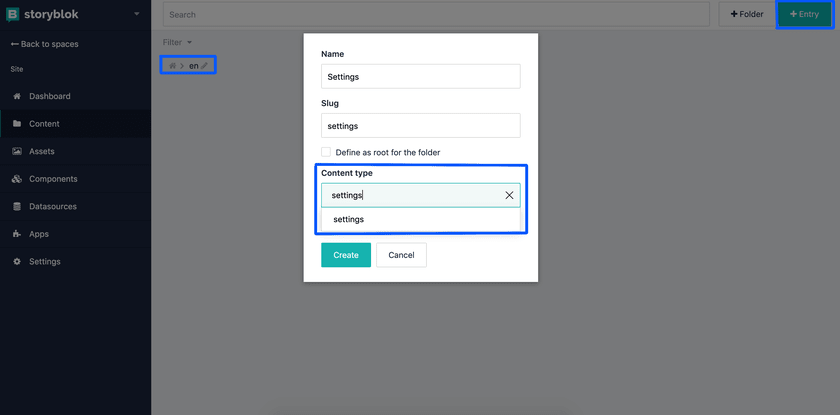
As we are creating a multi-language website we create a global configuration for each language. Let's start with creating a folder for English en.
Create a global settings content item
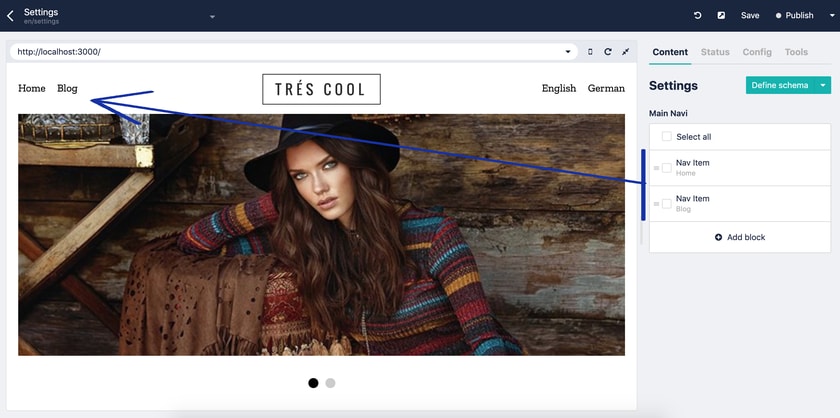
Inside the folder en we create a content item called Settings with the new content type settings. This will be the content item where we put navigation items and other global configurations of our website.
Change the real path to / and create the schema for the main navigation defining the key main_navi with the type Blocks.
Add a block for the nav item with the name of the type Text and link of the type Link. At the end your Settings content item should look like following:
Getting global settings with the Vuex store
As Nuxt.js comes with built-in support for Vuex we will use it to retrieve and store the navigation configuration as well as the current language.
After dispatching the action loadSettings in a middleware we will have the navigation items available at $store.state.settings.main_navi.
store/index.js
export const state = () => ({
  cacheVersion: '',
  language: 'en',
  settings: {
    main_navi: []
  }
})

export const mutations = {
  setSettings(state, settings) {
    state.settings = settings
  },
  setLanguage(state, language) {
    state.language = language
  },
  setCacheVersion(state, version) {
    state.cacheVersion = version
  }
}

export const actions = {
  loadSettings({ commit }, context) {
    return this.$storyapi.get(`cdn/stories/${context.language}/settings`, {
      version: context.version
    }).then((res) => {
      commit('setSettings', res.data.story.content)
    })
  }
}
Add a middleware
A middleware in Nuxt.js lets you define a function that runs before rendering the page. The function can be asynchronous and return a Promise so it's ideal for loading our settings from the API.
middleware/languageDetection.js
export default function ({ app, isServer, route, store, isDev }) {
  let version = route.query._storyblok || isDev ? 'draft' : 'published'
  let language = route.params.language || 'en'

  if (isServer) {
    store.commit('setCacheVersion', app.$storyapi.cacheVersion)
  }

  if (!store.state.settings._uid || language !== store.state.language) {
    store.commit('setLanguage', language)

    return store.dispatch('loadSettings', {version: version, language: language})
  }
}
Additionally the middleware needs to be registered in the nuxt.config.js.
nuxt.config.js
module.exports = {
  ...
  router: {
    middleware: 'languageDetection'
  },
Access the data in the TopHeader component
With $store.state.settings.main_navi we can now easily access the navigation items and loop over them to render them in components/TopHeader.vue.
components/TopHeader.vue
<template>
  <header class="top-header util__flex util__container">
    <nav class="top-header__col">
      <ul class="top-header__nav">
        <li :key="index" v-for="(navitem, index) in $store.state.settings.main_navi">
          <nuxt-link class="top-header__link" :to="navitem.link.cached_url">
            {{ navitem.name }}
          </nuxt-link>
        </li>
      </ul>
    </nav>
    <a href="/" class="top-header__col top-header__logo">
      <img src="http://a.storyblok.com/f/42016/1096x313/0353bf6654/logo2.png">
    </a>
    <nav class="top-header__col top-header__second-navi">
      <ul class="top-header__nav top-header__nav--right">
        <li>
          <nuxt-link class="top-header__link" to="/en/blog">English</nuxt-link>
        </li>
        <li>
          <nuxt-link class="top-header__link" to="/de/blog">German</nuxt-link>
        </li>
      </ul>
    </nav>
  </header>
</template>

...
Reloading the page we should see now the header navigation with the configurable navigation items from Storyblok.
Build a blog section
A common task when creating a website is to develop an overview page of collections like news, blog posts or products. In our example, we will create a simple blog. In Nuxt.js you can define dynamic routes creating folders with the underscore prepended _ and Nuxt will automatically resolve them to Vue.js routes.
Our final URL should look like /:language/blog/:slug so we will need to create following folder structure.
pages/
--| _language/
-----| blog/
--------| _slug.vue
--------| index.vue
--| index.vue
Add a blog detail page
We start with the blog detail page at pages/_language/blog/_slug.vue which will fetch the content from the API and then render the blog post with markdown using marked as a parser.
So first we will need to install the markdown parser.
$ npm install marked --save
Then we will create the file pages/_language/blog/_slug.vue for the dynamic route of the blog posts.
pages/_language/blog/_slug.vue
<template>
  <section class="util__container">
    <div v-editable="story.content" class="blog">
      <h1>{{ story.content.name }}</h1>
      <div class="blog__body" v-html="body">
      </div>
    </div>
  </section>
</template>

<script>
import marked from 'marked'

export default {
  data () {
    return {
      story: { content: { body: '' } }
    }
  },
  computed: {
    body () {
      return marked(this.story.content.body)
    }
  },
  mounted () {
    // Load the JSON from the API
    this.$storybridge.on(['input', 'published', 'change'], (event) => {
      if (event.action == 'input') {
        if (event.story.id === this.story.id) {
          this.story.content = event.story.content
        }
      } else {
        window.location.reload()
      }
    })
  },
  async asyncData (context) {
    return await context.app.$storyapi.get('cdn/stories/home', {
      version: 'draft'
    }).then((res) => {
      return res.response
    }).catch((res) => {
      if (!res.response) {
        console.error(res)
        context.error({ statusCode: 404, message: 'Failed to receive content form api' })
      } else {
        console.error(res.response.data)
        context.error({ statusCode: res.response.status, message: res.response.data })
      }
    })
  }
}
</script>

<style lang="scss">
.blog {
  padding: 0 20px;
  max-width: 600px;
  margin: 40px auto 100px;

  img {
    width: 100%;
    height: auto;
  }
}

.blog__body {
  line-height: 1.6;
}
</style>
Create the overview page
To list the blog posts we will create a route on /:language/blog simply by saving the file index.vue into the blog folder.
Storyblok's API can list all content items of a specific folder with the parameter starts_with. The number of content items you get back is by default 25 but you can change that with the per_page parameter and jump to the other pages with the page parameter.
pages/_language/blog/index.vue
<template>
  <section class="util__container">
    <div :key="blogPost.content._uid" v-for="blogPost in data.stories" class="blog__overview">
      <h2>
        <nuxt-link class="blog__detail-link" :to="'/' + blogPost.full_slug">
          {{ blogPost.content.name }}
        </nuxt-link>
      </h2>
      <small>
        {{ blogPost.published_at }}
      </small>
      <p>
        {{ blogPost.content.intro }}
      </p>
    </div>
  </section>
</template>

<script>
export default {
  data () {
    return { total: 0, data: { stories: [] } }
  },
  asyncData (context) {
    let version = context.query._storyblok || context.isDev ? 'draft' : 'published'

    return context.app.$storyapi.get('cdn/stories', {
      version: version,
      starts_with: `${context.store.state.language}/blog`,
      cv: context.store.state.cacheVersion
    }).then((res) => {
      return res
    }).catch((res) => {
      context.error({ statusCode: res.response.status, message: res.response.data })
    })
  }
}
</script>

<style lang="scss">
.blog__overview {
  padding: 0 20px;
  max-width: 600px;
  margin: 40px auto 60px;

  p {
    line-height: 1.6;
  }
}

.blog__detail-link {
  color: #000;
}
</style>
Create the blog content folder
After creating the Vue.js components for showing the blog we need to create a new folder in Storyblok to create the blog pages.
Create the folder en/blog and choose blog as default content type of this folder.
Create the blog article
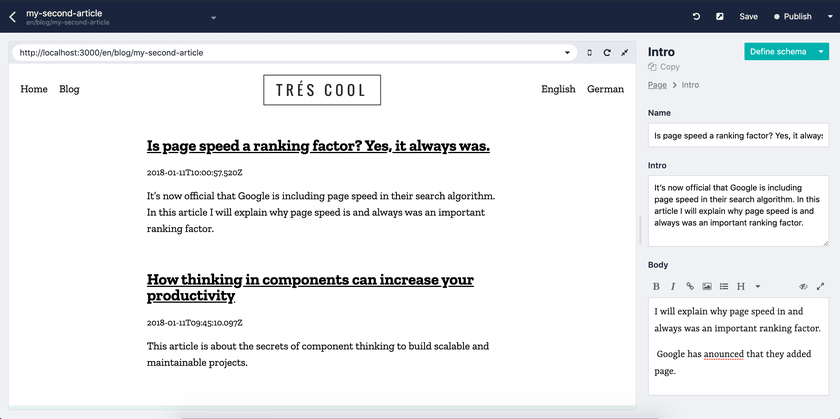
When you go inside the blog folder and create a new content item it will now automatically choose blog as content type. Add the schema fields intro (Textarea), name (Text) and body (Markdown) and create some demo content.
In the overview you should see the list of blog articles.
Build a sitemap
To generate a sitemap or navigation tree with Nuxt.js of all our pages we will call Storyblok's links API. The API includes the parent-child relationships through the parent_id and therefore we just need to generate a tree using a computed property.
pages/_language/sitemap.vue
<template>
  <section class="util__container">
    <div class="sitemap">
      <h1>Sitemap</h1>

      <div v-for="language in tree" :key="language.id">
        <ul>
          <sitemap-item
            v-show="item.item.name !== 'Settings'"
            :model="item"
            v-for="item in language.children"
            :key="item.id">
          </sitemap-item>
        </ul>
      </div>
    </div>
  </section>
</template>

<script>
export default {
  data () {
    return {
      links: {}
    }
  },
  computed: {
    tree () {
      let parentChilds = this.parentChildMap(this.links)

      return this.generateTree(0, parentChilds)
    }
  },
  asyncData (context) {
    let version = context.query._storyblok || context.isDev ? 'draft' : 'published'

    return context.app.$storyapi.get('cdn/links', {
      version: version,
      starts_with: context.store.state.language,
      cv: context.store.state.cacheVersion
    }).then((res) => {
      return res.data
    }).catch((res) => {
      context.error(res)
    })
  },
  methods: {
    parentChildMap (links) {
      let tree = {}
      let linksArray = Object.keys(links).map(e => links[e])

      linksArray.forEach((link) => {
        if (!tree[link.parent_id]) {
          tree[link.parent_id] = []
        }

        tree[link.parent_id].push(link)
      })

      return tree
    },
    generateTree (parent, items) {
      let tree = {}

      if (items[parent]) {
        let result = items[parent]

        result.forEach((cat) => {
          if (!tree[cat.id]) {
            tree[cat.id] = {item: {}, children: []}
          }
          tree[cat.id].item = cat
          tree[cat.id].children = this.generateTree(cat.id, items)
        })
      }

      return Object.keys(tree).map(e => tree[e])
    }
  }
}
</script>

<style lang="scss">
.sitemap {
  max-width: 600px;
  margin: 20px auto 60px;
}
</style>
To the sitemap as a tree with infinite nodes we create a SitemapItem.vue component and include itself when looping over the children of the tree.
components/SitemapItem.vue
<template>
  <li class="sitemap-item">
    <nuxt-link :to="'/' + model.item.slug">
      {{model.item.name}}
    </nuxt-link>
    <ul v-if="model.children.length > 0">
      <sitemap-item
        :key="item.item.id"
        :model="item"
        v-for="item in model.children">
      </sitemap-item>
    </ul>
  </li>
</template>

<script>
export default {
  props: ['model']
}
</script>

<style lang="scss">
.sitemap-item {
  padding: 5px 0;

  a {
    color: #8ba19a;
  }

  ul {
    margin-top: 10px;
    margin-bottom: 10px;
  }
}
</style>
Don't forget to add the new SitemapItem component to your components.js file.
plugins/components.js
...
import SitemapItem from '~/components/SitemapItem.vue'

...
Vue.component('sitemap-item', SitemapItem)
At the end, we should have the following page.
Adding another language
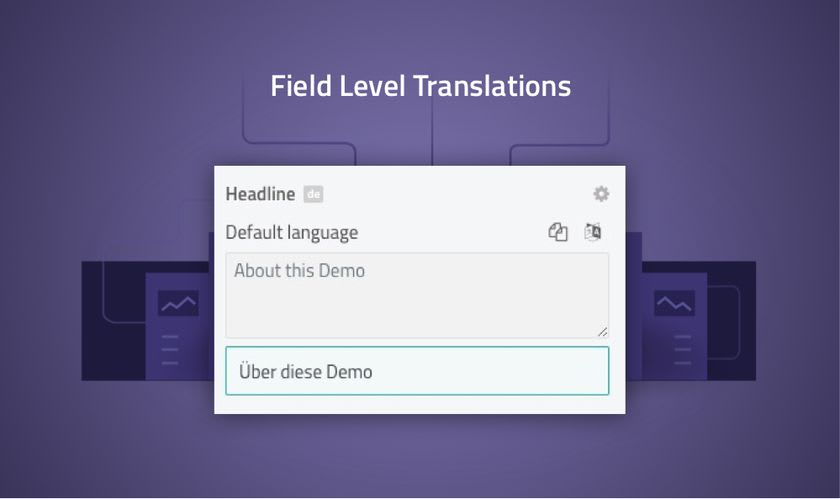
With Storyblok you have two options to make multi-language projects - field level translation and multi-tree translation. Field level translation is a good decision if you have most of your content translated. Consider using the multi-tree translation if the content tree is different in every language. If you are not sure what to choose read our guide about i18n.
Deploy to live
Now it's time to show your project to the world.
For easy, zero configuration, deployment you can use now. After you have downloaded and installed their desktop application you can deploy Nuxt.js with a single command.
now
You will get a unique URL which you can then link via now alias to your custom domain.
Conclusion
It's incredibly easy to build a full-blown website with Nuxt.js and it comes with a great ecosystem. I really like the way Nuxt.js abstracts common tasks you normally do in the Webpack configuration. It feels a little bit like Ruby on Rails where conventions go over configuration. For big projects, these conventions make it easy to onboard new team members and make the projects a lot more maintainable.

Posted on January 10, 2020
Join Our Newsletter. No Spam, Only the good stuff.
Sign up to receive the latest update from our blog.


