Setting up GitHub Actions for AWS S3 Integration

StaubRacing
Posted on March 6, 2024

Introduction
As someone who is continually striving to improve and automate my development workflows, I realized that understanding the integration between GitHub and AWS S3 could significantly streamline my projects. But, like many of you, the journey to fully grasp this automation was a blend of research, trial, and error. To save you some time — and to solidify my own understanding — I’ve put together this guide on setting up GitHub Actions for AWS S3 integration.
Pre-requisites
- GitHub Knowledge: An active GitHub account and basic familiarity with Git commands (clone, commit, push, etc.) and GitHub workflows.
- AWS Account: An active AWS account with the S3 service enabled. Familiarity with AWS IAM (for creating roles and permissions) is beneficial.
- S3 Bucket: Ensure you have an S3 bucket set up where you wish to sync your repository content. GitHub Repository: An existing GitHub repository containing the project that you want to integrate with AWS S3.
- AWS CLI: Ensure that the AWS CLI is installed on your machine. This guide assumes you have basic knowledge of running AWS commands.
- Conceptual Knowledge: While not strictly a prerequisite, being familiar with AWS IAM, GitHub workflows, Git repositories, and AWS S3 will help you understand the steps and the reasoning behind them more deeply. #Local Setup In any GitHub Actions workflow, the .github/workflows directory is the heartbeat that orchestrates your automation. This directory is where you'll place the YML configuration files that GitHub uses to understand your automation requirements.
Here, I’ll walk you through the simple steps to create this directory:
- Navigate to your Project: Open the terminal and navigate to your local GitHub project directory using the ‘cd’ command.
cd path/to/your/github/project
- Create
.github/workflowsDirectory: Run the following commands to create the .github and workflows directories.
mkdir -p .github/workflows
The -p flag in the mkdir command ensures that the .github directory and its sub-directory workflows are created in one go.
Now you have a dedicated space to store your GitHub Actions configurations.
Naming Your Configuration File
Naming is more than a label; it’s a signpost for others (or future you) navigating your project. In GitHub Actions, your .yml files should describe the function they serve. For this tutorial, we will use the name sync_to_s3.yml.
Here are the steps to create your .yml configuration file:
- If you’re not already there, navigate to the .github/workflows directory in your project.
- Create the
.ymlFile: Use a text editor to create a new file and save it as file name that makes sense to you. For Ex.sync_to_s3.yml
For Unix-like systems (Linux/Mac):
touch sync_to_s3.yml
For Windows PowerShell:
New-Item -Path .\sync_to_s3.yml -ItemType File
For Windows Command Prompt:
echo. > sync_to_s3.yml
Option 2: Using a Text Editor or IDE Create a new file and save it as sync_to_s3.yml in the .github/workflow directory of your project using your preferred text editor or IDE such as VS Code.
Crafting the .yml File
Now that you’ve set up your workflow directory and named your configuration file, it’s time to dive into the specifics of crafting the .yml configuration. Before we delve into each component, let’s take a look at the complete .yml file for AWS S3 synchronization:
name: Sync to S3
on:
  push:
    branches:
      - main
jobs:
  sync:
    runs-on: ubuntu-latest
    steps:
    - name: Checkout Repository
      uses: actions/checkout@v3

    - name: Configure AWS Credentials
      uses: aws-actions/configure-aws-credentials@v2
      with:
        aws-access-key-id: ${{ secrets.AWS_ACCESS_KEY_ID }}
        aws-secret-access-key: ${{ secrets.AWS_SECRET_ACCESS_KEY }}
        aws-region: us-east-1  # Change this to your region of your bucket

    - name: Sync to S3
      run: aws s3 sync . s3://your-bucket-name # Change this to your bucket name
Understanding GitHub Action Configurations
Each section in the .yml file serves a specific purpose. For example, name provides a label for your workflow, and on specifies the events that trigger the workflow. In this case when a push to the main branch happens the action will trigger.
Integrating AWS CLI Commands
The .yml file also integrates AWS CLI commands, particularly the aws s3 sync command to upload your files to an S3 bucket. Using the AWS CLI allows for more fine-grained control over interactions between GitHub and AWS.
Populating the .yml File
Here, you will input the necessary configurations to make GitHub Actions interact seamlessly with AWS S3.
- Open the File: Open sync_to_s3.yml in a text editor of your choice, such as VS Code, to begin adding configurations. (Note: I will be demonstrating this in VS Code)
- Copying the Configuration: Start by copying the provided code snippet from the guide above. This is the foundation of your GitHub Action setup for S3 syncing.
- Update the AWS Region: Locate the line where aws-region is specified. Replace the placeholder with your desired AWS region.
- For example, if your S3 bucket is in the us-west-1 region, update the line to look like:
aws-region: us-west-1
- Configuring the AWS CLI Command: The action uses the AWS CLI to synchronize files. Update the aws s3 sync command to match your S3 bucket's specifics. For example: Replace your-bucket-name with the name of your S3 bucket.
run: aws s3 sync ./ s3://your-bucket-nam
- Handling Secrets: Never hardcode your AWS credentials. Instead, use GitHub secrets. In the code, you’ll notice references like
${{ secrets.AWS_ACCESS_KEY_ID }}. These placeholders fetch the values from the secrets you set up in your GitHub repository settings. We will cover that in the next section.
Handling AWS Access Keys Securely
When integrating AWS services with external platforms like GitHub, security is paramount. AWS Access Keys, which consist of an Access Key ID and Secret Access Key, allow users to make programmatic calls to AWS. If these keys are exposed, malicious actors can misuse them, potentially leading to financial and data loss.
Recommendations for Key Management:
- Never Hardcode Keys: Never embed your AWS keys directly in your code. If you push these to a public repository, your AWS account could be compromised.
- Use GitHub Secrets: GitHub Actions offers a feature called “secrets” that lets you store sensitive information. You can set up your AWS Access Keys as secrets in your GitHub repository, and then reference them in your GitHub Actions workflow. This way, the keys remain hidden.
- Least Privilege Principle: When creating AWS IAM roles or users, give them only the permissions they need. Avoid using keys with full access unless absolutely necessary.
- Rotate Keys Regularly: Regularly change your access keys, especially if you believe they might have been exposed or compromised.
- Monitor AWS Activity: Keep an eye on AWS CloudTrail or other monitoring tools to track activity in your AWS account. Any unusual behavior can be an indicator of compromised key
Utilizing GitHub Secrets for Security
GitHub Secrets is a feature in GitHub that allows you to store and use sensitive information without exposing it in your workflow files or logs. These secrets are encrypted environment variables that only expose their values to workflows running in the same repository.
How to Set Up GitHub Secrets:
- Navigate to Your Repository: Go to the main page of the GitHub repository where you want to add the secret.
- Access Repository Settings: Click on the settings tab near the top of the screen
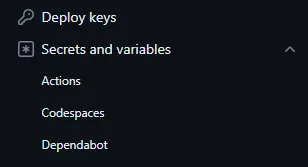
- Secrets Management: On the left sidebar, you’ll see a ‘Secrets and variables’ section. Drop down the menu and click on ‘Actions’
- Add a New Secret: Click on the New repository secret button.
- Name and Value: When prompted to define the secret, ensure the name matches exactly with what you’ve specified in your .yml file.
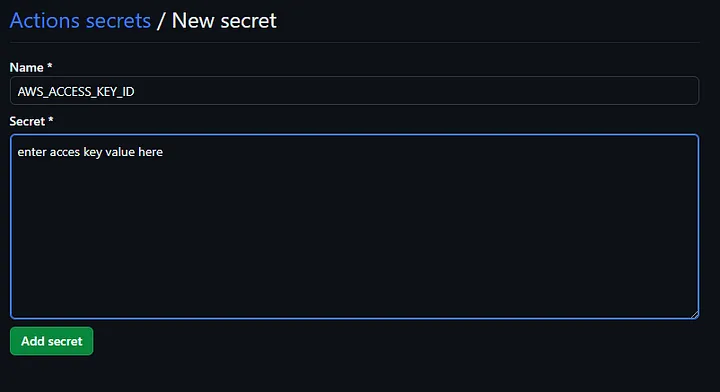
- Create a repository secret:
- Name: AWS_ACCESS_KEY_ID
- Value: Enter the value of your AWS access key.
- Click the ‘Add Secret Button’
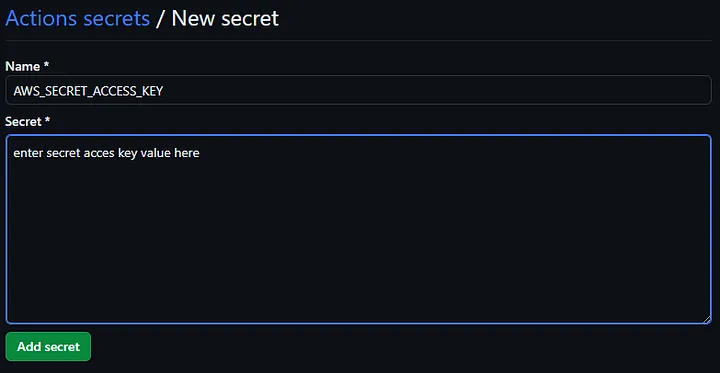
- Similarly, create another secret:
- Name: AWS_SECRET_ACCESS_KEY
- Value: Enter the value of your AWS secret key.
- Click the ‘Add Secret Button’

Remember, the names of the secrets must correspond precisely to their references in your .yml configuration for successful integration.
When you are done it should look like this:
Testing the Workflow
After successfully setting up GitHub Actions and configuring the AWS keys, it’s vital to ensure everything operates smoothly. Follow the steps below to test your workflow:
Triggering the Workflow with a Push:
- Make changes to a file or add a new file in your local repository. THe easiest way to see it is by adding a test file ex. test.html
- Add all the files in your project folder to the Git repository using the command git add . (Don’t forget the period at the end)
- Commit the changes: git commit -m "Your commit message".
- Push the changes to your GitHub repository using: git push.
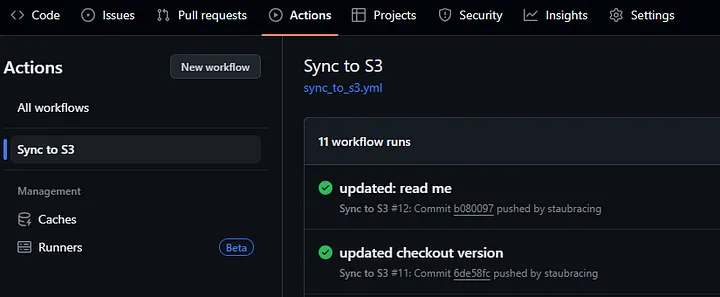
- This push event is what initiates the GitHub Actions workflow you've set up. Expected Outcomes: After pushing the changes, head over to the ‘Actions’ tab in your GitHub repository. Here, you should witness the workflow executing without issues. If the check next to the action is green, it was successful.
Congratulations!
You’ve successfully navigated the intricacies of setting up GitHub Actions to synchronize your repository with an AWS S3 bucket. This is no small feat, and you should be proud of integrating these powerful platforms. With this setup, you’ve taken a significant step towards streamlining your deployment processes, ensuring that your S3 bucket remains updated with the latest changes from your GitHub repository.
This marks my first attempt at crafting an article, and it has been an enlightening journey for me as well. My sincere hope is that this guide has been beneficial for you and has added value to your technical journey. Feedback is the foundation of growth, so I’d greatly appreciate any insights or suggestions you may have to offer.

Posted on March 6, 2024
Join Our Newsletter. No Spam, Only the good stuff.
Sign up to receive the latest update from our blog.


