How I made my first endless runner game in 7 days - Part I (Introduction and Basic Concepts)

Prashanth Vamanan Srinivasan
Posted on May 28, 2021

Introduction
In this post and the upcoming series of posts, I am going to share the technical concepts and development process behind my first Unity2D game which is an endless runner.
A sneak peek into the game
In this game, the objective of the player character is to jump over the spawning obstacles without crashing into them. If the player collides with the obstacles, his health gets reduced by 10% and eventually, the player dies when his health reaches zero.
The ultimate goal behind the game is to survive for as long as possible without dying.
Gameplay
Let's now take a sneak peek into our game before we proceed further.
Gathering the Assets
The game as mentioned is an infinite runner. It consists of a character selection screen at the beginning. To make this game we need the following assets:
Two-Character Sprites - Boy Sprite and Girl Sprite
Background Sprites - Forest Sprites
Ground Sprite and Buttons - Fahir From Awesome Tuts
Health Bar Assets - Assets Owned By Brackeys
Fundamental Concepts
Now that we have the required assets, we need to understand a few fundamental concepts in Unity to further proceed to make our game.
- Game Objects
- Components
- Rigid bodies
- Colliders
- Sprites
- Prefabs
Game Objects
Each entity in our game is called a game object. These are fundamental objects in Unity that can represent pretty much anything ranging from characters, props to the scenery. They can also act as containers for other game objects or components.
Examples:
When we drag and drop a sprite (a graphical image) into our scene a game object is automatically created which represents this sprite.
We may have a ground sprite that is very small in width and we might need to place several of these ground sprites next to each other to form the ground for our game.
In such cases, a parent empty game object is created and all these ground game objects are nested within this parent game object which acts as a container in this case.
Components
Unity is a component-based system. The idea here is that we can attach components to the game objects in our scene to affect both their state (properties) and their behaviour (what they do).
An example is the Transform component which comes by default with every game object. This transform component has Position, Rotation and Scale properties which can be tweaked as per our needs.
Similarly, we have a lot of in-built components in Unity such as AudioSource, Colliders, Rigidbodies, Audio Listener etc. some of which we will see as we build our game.
We can also create our own custom components by writing C# scripts in Unity. Since Unity treats C# scripts also as components, they can be attached to any game object as we would normally do with other components.
A Real-World Example of Components and Game Objects
Television is a game object whose job is to perform visual display. The stereo system and speakers of a TV are game objects themselves individually.
Our stereo system is further composed of components such as Amplifier, radio tuner etc. These components function together inside a single game object (in this case our TV) to do its job.
Rigid Bodies
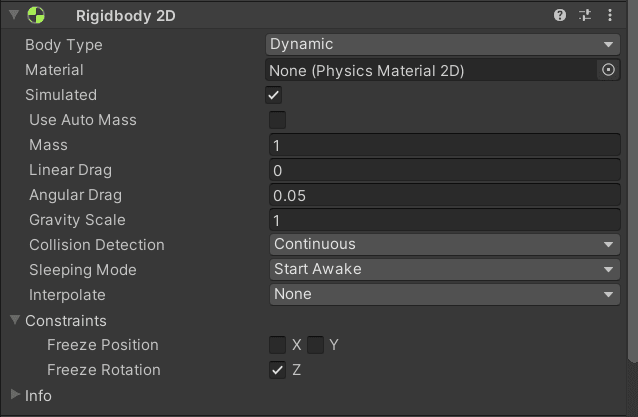
A rigid body is a component which when attached to a game object enables fundamental physics behaviours on it such as force, acceleration, gravity among many others. It is a component that allows the game object to be controlled by physics.
Types of Rigid Bodies
Static: When the body type is static the game object will neither be affected by physics forces nor due to gravity.
Kinematic: When we want the game object to be affected only by forces but not by gravity then we select the body type as Kinematic.
Dynamic: When we want the game object to be affected by both force and gravity then we select Dynamic as the body type.
Rigid bodies also allow us to control the mass of the game object, its angular drag a few of the important properties.
Colliders
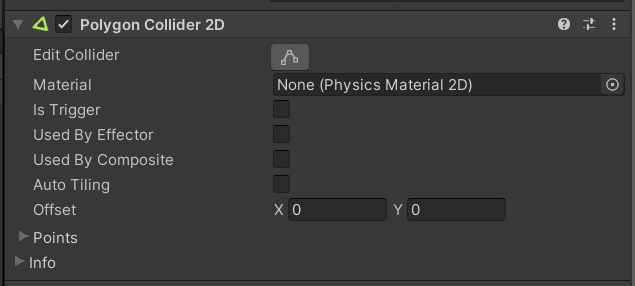
Colliders are the game objects that enable us to detect collisions between game objects and also decide how to resolve these collisions (i.e) what should happen when a collision occurs.
There are various types of collider components available in Unity such as BoxCollider, EdgeCollider, PolygonCollider, CircleCollider, CapsuleCollider etc. What collider to use for a game object depends upon the geometry of it.
Types of Collisions
Collisions can be broadly classified into two categories:
Trigger Collisions - There might be situations in our game where we want to detect collisions between two game objects but we want the colliding game object to be able to pass through the game object being collided with.
In such cases, we use trigger collisions. To enable such a collision we need to check the Is Trigger checkbox shown in the above image.
Examples of Trigger Collisions :
When the player collects a coin, we might need the player to pass through the coin but at the same time detect that he has collided with the coin so that it can be destroyed
When the player passes through a door, we might want the boss of that level to appear. In this case, also we need to detect the collision of the player with the door but allow the player to pass through the door
Solid Collisions - This is the default behaviour we get whenever we attach a collider component to a game object. In this type of collision, the colliding game object will be stopped from passing through by the game object being collided with.
Examples of Solid Collision:
Player colliding with obstacles in the game area
Player colliding with enemies as a result of which the player's health gets reduced.
C# Methods used to detect Collisions
Unity Engine's API provides us with two separate methods (note: these methods will be covered in detail in the next series of posts) to detect the two types of collisions we discussed above
Trigger Collisions - OnTriggerEnter2D()
Solid Collisions - OnCollisionEnter2D()
Sprites
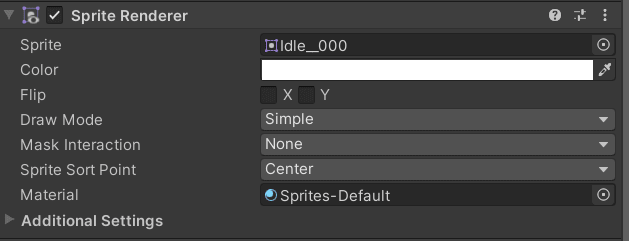
Sprites are graphical assets or images that we include in our game.
A sprite can be a single image or single frame or a set of images or frames (sprite sheets or sprite strips). If it is a set of images or frames then usually they are used to create the animations as well.
Sprites in our games are rendered using the SpriteRenderer2D component.
- It is generally recommended to have sprite sheets rather than having individual images to represent the different states of the game object (such as walking, running etc.) since this is efficient both in terms of memory and performance.
Prefabs
A prefab is a prefabricated game object. In other words, a game object which we have configured the way we want it.
This is useful because once a game object is configured with all of its necessary components such as colliders, rigid bodies, sprite renderers, custom scripts etc. it is easier to add instances of these game objects directly in our game.
This is done by just dragging and dropping the prefab into the scene to create a new instance of it rather than going through the process of attaching all of these components again to create a new instance of this game object.
Example of Prefab
We might want to spawn multiple instances of enemies in our game at repeated intervals. Rather than creating an enemy each time from scratch by attaching all the required components manually, we can create this enemy once and make it a prefab.
Then whenever we need to create an instance of the enemy we can just instantiate this prefab so that the enemy is spawned in the scene.
Conclusion
In this post, we have seen the required assets to make our game. We also learnt about the basic concepts in Unity needed to make our game.
In the next post we will dive into the development of our game starting with the Player characters, their movement, jumping, animations as well as spawning obstacles.
Until next time, stay safe and cheers :)
If you would like to follow me on Twitter please feel free to do so. I write about web development, game development and football ;)

Posted on May 28, 2021
Join Our Newsletter. No Spam, Only the good stuff.
Sign up to receive the latest update from our blog.


