Archiving all bookmarks using the Pocket Developer API

John Smith
Posted on June 8, 2020
Background
Today I wanted to clean up my Pocket account, I had thousands of unread articles in my inboxand while their web interface allows you to bulk edit your bookmarks it would have taken days to archive all of them thatway.
So, instead of spending days to do this, I used their API and ran aquick and dirty script to archive bookmarks going back to 2016!
Here be dragons!
Now, since I ran this script I found a handy dandy page that would have done the job for me although instead of archivingall my bookmarks it would have deleted them so I am pleased I used my script instead.
If you want to clear you Pocket account without deleting your account head over to this page:
https://getpocket.com/privacy_clear
To be clear this will delete ALL your bookmarks and there is no going back
So, If like me you want to archive all your content carry on reading
Onwards!
To follow along you will need Visual Studio Code and a marketplace plugin calledRest Client which allows you to interact withAPI’s nicely.
I will not be using it to its full potential as it supports variables and such like so I will leave that for an exercisefor the reader to refactor away.
So, to get started create a working folder, 2 files to work with and then open Visual Studio Code
mkdir pocket-api
cd pocket-api
touch api.http
touch api.js
code .
Step 1: Obtain a Pocket platform consumer key
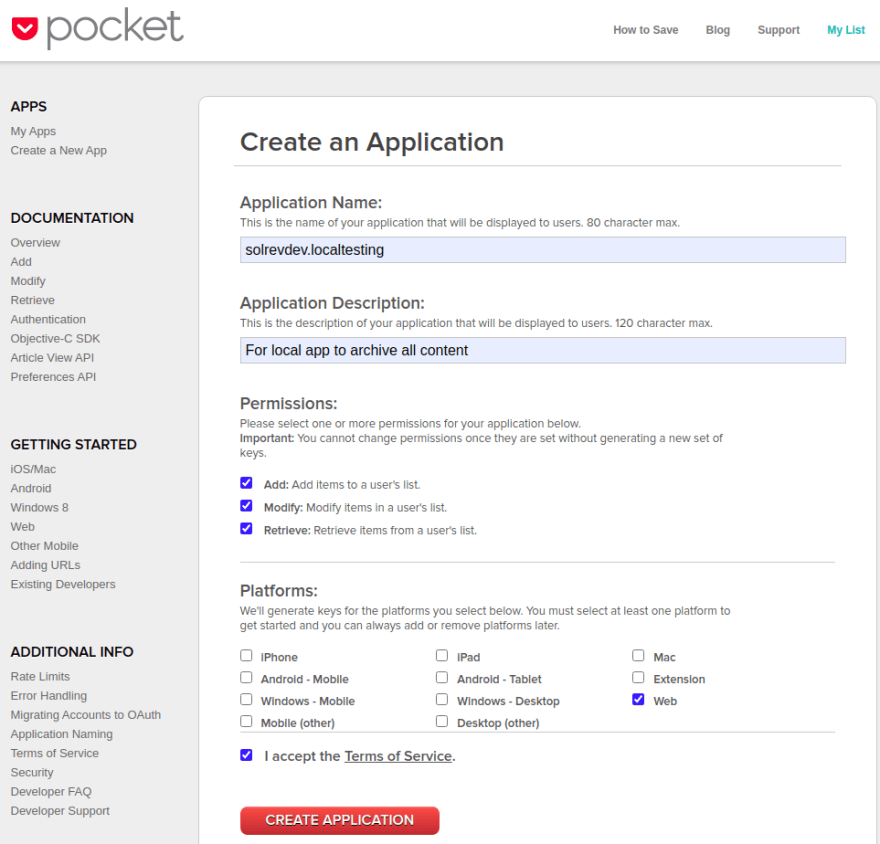
Create a new application over at https://getpocket.com/developer/apps/newand make sure you select all of the Add/Modify/Retrieve permissions and choose Web as the platform.
Make a note of the consumer_key that is created.
You can also find it over at https://getpocket.com/developer/apps/
Step 2: Obtain a request token
To begin the Pocket authorization process, our script must obtain a request token from Pocket by making a POST request.
So in api.http enter the following
### Step 2: Obtain a request token
POST https://getpocket.com/v3/oauth/request HTTP/1.1
Content-Type: application/json; charset=UTF-8
X-Accept: application/json

{
    "consumer_key":"11111-1111111111111111111111",
    "redirect_uri":"https://solrevdev.com"
}
This redirect_uri does not matter. You can enter anything here.
Using the Rest Client Send Request feature you can make the request and get the response in the right-hand pane.
You will get a response that gives you a code that you need for the next step so make sure you make a note of it
{
  "code":"111111-1111-1111-1111-111111"
}
Step 3: Redirect user to Pocket to continue authorization
Take your code and redirect_url from Step 2 above and replace in the URL below and copy and paste the below URL in to a browser and follow the instructions.
https://getpocket.com/auth/authorize?request_token=111111-1111-1111-1111-111111&redirect_uri=https://solrevdev.com
Step 4: Receive the callback from Pocket
Pocket will redirect you to the redirect_url you entered in step 3 above.
This step authorizes the application giving it the add/modify/delete permissions we asked for in step 1.
Step 5: Convert a request token into a Pocket access token
Now that you have given your application the permissions it needs you can now get an access_token to make further requests.
Enter the following into api.http replacing consumer_key and code from Steps 1 and 2 above.
POST https://getpocket.com/v3/oauth/authorize HTTP/1.1
Content-Type: application/json; charset=UTF-8
X-Accept: application/json

{
    "consumer_key":"11111-1111111111111111111111",
    "code":"111111-1111-1111-1111-111111"
}
Again, using the fantastic Rest Client send the request and make a note of the access_token in the response
{
  "access_token": "111111-1111-1111-1111-111111",
  "username": "solrevdev"
}
Make some requests
Now we have an access_token we can make some requests against our account, take a look at the documentation for more information on what can be done with the API
We can view all pockets:
### get all pockets
POST https://getpocket.com/v3/get HTTP/1.1
Content-Type: application/json; charset=UTF-8
X-Accept: application/json

{
    "consumer_key":"1111-1111111111111111111111111",
    "access_token":"111111-1111-1111-1111-111111",
    "count":"100",
    "detailType":"simple",
    "state": "unread"
}
We can modify pockets:
### modify pockets
POST https://getpocket.com/v3/send HTTP/1.1
Content-Type: application/json; charset=UTF-8
X-Accept: application/json

{
    "consumer_key":"1111-1111111111111111111111111",
    "access_token":"111111-1111-1111-1111-111111",
    "actions" : [
                    {
                        "action": "archive",
                        "item_id": "82500974"
                    }
                ]
}
Generate Code Snippet
I used the Generate Code Snippet feature of the Rest Client Extension to get me someboilerplate code which I extended to loop until I had no more bookmarks left archiving them in batches of 100.
To do this once you’ve sent a request as above, use shortcut Ctrl+Alt+C or Cmd+Alt+C for macOS, or right-click in the editor and then select Generate Code Snippet in the menu, or press F1 and then select/type Rest Client: Generate Code Snippet, it will show the available languages, Select JavaScript then enter and your code will appear in a right-hand pane.
Below is that code slightly modified to iterate all unread items then archive them until all complete.
You will need to replace consumer_key and access_token for the values you noted earlier.
let keepGoing = true;

while (keepGoing) {
    let response = await fetch('https://getpocket.com/v3/get', {
        method: 'POST',
        headers: {
            'content-type': 'application/json; charset=UTF-8',
            'x-accept': 'application/json'
        },
        body:
            '{"consumer_key":"1111-1111111111111111111111111","access_token":"111111-1111-1111-1111-111111","count":"100","detailType":"simple","state": "unread"}'
    });

    let json = await response.json();
    //console.log('json', json);

    let list = json.list;
    //console.log('list', list);

    let actions = [];

    for (let index = 0; index < Object.keys(list).length; index++) {
        let current = Object.keys(list)[index];

        let action = {
            action: 'archive',
            item_id: current
        };
        actions.push(action);
    }

    //console.log('actions', actions);

    let body =
        '{"consumer_key":"1111-1111111111111111111111111","access_token":"111111-1111-1111-1111-111111","actions" : ' +
        JSON.stringify(actions) +
        '}';

    //console.log('body', body);

    response = await fetch('https://getpocket.com/v3/send', {
        method: 'POST',
        headers: {
            'content-type': 'application/json; charset=UTF-8',
            'x-accept': 'application/json'
        },
        body: body
    });

    json = await response.json();

    console.log('http post json', json);

    let status = json.status;

    if (status !== 1) {
        console.log('done');
        keepGoing = false;
    } else {
        console.log('more items to process');
    }
}
Run in Chrome’s console window
And so the quick and dirty solution for me was to take the above JavaScript and in a Chrome console window past and run.
It took a while as I had content going back to 2016 but once it was finished I had a nice clean inbox again!
Success 🎉

Posted on June 8, 2020
Join Our Newsletter. No Spam, Only the good stuff.
Sign up to receive the latest update from our blog.

