Creating a Restaurant Receptionist BOT from LEVEL 0 by SilvenLEAF

SilvenLEAF
Posted on December 4, 2021

Ahoy there! Let's create a fully functional Restaurant Receptionist BOT using the Botonic Framework!! A framework powered by React and Tensorflow!!
We'll be going from LEVEL 0. So as long as you know the basics for JavaScript, hop on!! Who's excited?
Step 0: Project Setup
First let's install the botonic cli globally.
npm install -g @botonic/cli
Now we are ready to go!! Let's go create a folder called "Bots" and open our terminal there!!
I'm storing all my bots in this folder, you can choose any folder you like!
Step 1: Create a blank bot
Type the following command to start creating the bot
botonic new YourBotName
I'm giving my bot name as "Chihuo" because in Chinese it means "Foodie" haha. You can name whatever you want. So my command will be this
botonic new Chihuo
Now it'll show us a list of available templates. I'm gonna choose the Blank (TypeScript) one, but you can choose any of those, be it typescript or javascript.
(To navigate on those templates, use up or down arrow and when you select your favorite template, click enter to create it)
After selecting your favorite template, click enter. It'll take a while, let's wait
Once done, open our project in your favorite text editor.
Mine is VS Code, so I'm gonna use the following command to open it in VS Code
code Chihuo
You'll see that these files and folders were created.

By the way, unlike react, it did not init the git repo, so let's init it first.
git init
And also create a ".gitignore" file and write the following content to ignore these from being tracked
dist
node_modules
Now you can commit the changes so far if you like!
Anyway, let's run our Bot!!
npm start
And then go to this url "http://localhost:8080/"
You'll see our bot running live!!
Click on that bottom right button to open the bot!
Yay!! Now let's get to the fun stuff!! Let's make the bot alive!!
Step 2: Creating a Simple Functional Bot
Currently whatever you type, bot will not understand you. Because just like a new born baby, our little bot is naive and innocent. We have to train her to learn more and be an amazing Receptionist.
Open "routes.ts" file and write the content in it
import React from 'react'
import { Route, Text, Reply } from '@botonic/react'

export const routes: Route[] = [
  {
    path: 'initial',
    text: /hi/i,
    action: () => (
      <>
        <Text>Hello! Nice to meet you</Text>
        <Text>
          How can I help you?
          <Reply payload="order">Place an order</Reply>
          <Reply payload="question">Have a question</Reply>
        </Text>
      </>
    )
  }
]
You now have to rename this file as "routes.tsx" because it contains jsx and TypeScript will throw error if you not rename it as ".tsx".
Now you type "Hi" to your bot and see it's working.
Great! Now we know the basic workflow to train our bot. So let's jump into the more sophisticated way to continue improving our bot.
Step 3: Sophisticated way to develop the bot
Normally we'll keep the actions and routes seperate, just like how we seperate controllers and api routes in our Serverside application.
So inside the "actions" folder, we'll create all those actions, and importing it inside the "routes.ts" file.
Look, we'll not write any JSX inside the "routes.tsx" file anymore, so rename it back to "routes.ts".
Anyway, let's create the FULLY FUNCTIONAL BOT!!
Step 4: Create the Receptionist
Inside the actions folder, create these files
ROOT REPO
├── src
│   ├── actions (it's a folder)
│   │   ├── .gitkeep (it was already there)
│   │   ├── Welcome.tsx
│   │   ├── PlaceAnOrder.tsx
│   │   ├── VegOrNonVeg.tsx
│   │   ├── OrderDone.tsx
│   │   ├── HaveAQuestion.tsx
│   │   ├── ContactDelivery.tsx
│   │   └── ContactManager.tsx
│   ├── routes.ts
│   └── other stuff
│
├── package.json
├── .gitignore
└── other stuff
Once that done, we'll fill them up with the following content
1. Welcome.tsx
import React from 'react';
import { Text, Reply } from '@botonic/react';


const Welcome = () => (
  <>
    <Text>
      Hello! Nice to meet you.
      How can I help you?
      <Reply payload="order">Place an order</Reply>
      <Reply payload="question">Have a question</Reply>
    </Text>
  </>
);

export default Welcome;
2. PlaceAnOrder.tsx
import React from 'react';
import { Text, Reply } from '@botonic/react';

const PlaceAnOrder = () => (
  <>
    <Text>
      Nice, what do you want to eat today?
      <Reply payload="hamburger">Hamburger</Reply>
      <Reply payload="pizza">Pizza</Reply>
      <Reply payload="sandwich">Sandwich</Reply>
      <Reply payload="taco">Taco</Reply>
      <Reply payload="burrito">Burrito</Reply>
    </Text>
  </>
)

export default PlaceAnOrder;
3. VegOrNonVeg.tsx
import React from 'react';
import { Text, Reply } from '@botonic/react';

const VegOrNonVeg = () => (
  <>
    <Text>
      Nice, do you want Veg or Non-veg?
      <Reply payload="veg">Veg</Reply>
      <Reply payload="nonveg">Non-Veg</Reply>
    </Text>
  </>
)

export default VegOrNonVeg;
4. OrderDone.tsx
import React from 'react';
import { Text, Reply } from '@botonic/react';

const VegOrNonVeg = () => (
  <>
    <Text>
      Thanks for your order. Delivery boy will knock your door within 30mins.
      Here's his contact, name: "Manash Sarma" and phone: "+91 9876543210".
    </Text>
    <Text>
      For contacting our manager,
      Here's his contact, name: "SilvenLEAF" and phone: "+91 0123456789".
      <Reply payload="contact">Contact Delivery Boy</Reply>
      <Reply payload="contact">Contact Manager</Reply>
    </Text>
  </>
)

export default VegOrNonVeg;
5. HaveAQuestion.tsx
import React from 'react';
import { Text, Reply } from '@botonic/react';

const HaveAQuestion = () => (
  <>
    <Text>
      Nice, what question do you have?
      <Reply payload="order">See the food menu</Reply>
      <Reply payload="contactDelivery">Where is my order?</Reply>
      <Reply payload="contactDelivery">Track my order</Reply>
      <Reply payload="contactManager">I want to contact the delivery boy</Reply>
      <Reply payload="contactManager">I want to contact the manager</Reply>
      <Reply payload="contactDelivery">I have a complaint</Reply>
    </Text>
  </>
)

export default HaveAQuestion;
6. ContactDelivery.tsx
import React from 'react';
import { Text, Reply } from '@botonic/react';

const ContactDelivery = () => (
  <>
    <Text>
      I've informed our delivery boy, he'll call you back within 5 mins.
      If not, you can contact him here

      Here's his contact, name: "Manash Sarma" and phone: "+91 9876543210".
    </Text>
    <Text>
      Thanks, wish you a delicious day!!
      <Reply payload="mainMenu">Go to main menu</Reply>
      <Reply payload="foodMenu">See food menu</Reply>
    </Text>
  </>
)

export default ContactDelivery;
7. ContactManager.tsx
import React from 'react';
import { Text, Reply } from '@botonic/react';

const ContactManager = () => (
  <>
    <Text>
      I've informed our manager, he'll call you back within 5 mins.
      If not, you can contact him here

      Here's his contact, name: "SilvenLEAF" and phone: "+91 0123456789".
    </Text>
    <Text>
      Thanks, wish you a delicious day!!
      <Reply payload="mainMenu">Go to main menu</Reply>
      <Reply payload="foodMenu">See food menu</Reply>
    </Text>
  </>
)

export default ContactManager;
After all that done, update the "routes.ts" with this following content
8. routes.tsx
import React from 'react'
import { Route, Text, Reply } from '@botonic/react'
import Welcome from './actions/Welcome'
import HaveAQuestion from './actions/HaveAQuestion'
import PlaceAnOrder from './actions/PlaceAnOrder'
import VegOrNonVeg from './actions/VegOrNonVeg'
import OrderDone from './actions/OrderDone'
import ContactDelivery from './actions/ContactDelivery'
import ContactManager from './actions/ContactManager'


const vegOrNonVegRoutes: Route[] = [
  {
    path: 'order-done',
    payload: 'veg',
    action: OrderDone,
  },
  {
    path: 'order-done',
    payload: 'nonveg',
    action: OrderDone,
  },
]

export const routes: Route[] = [
  {
    path: 'initial',
    text: /hi/i,
    action: Welcome,

    childRoutes: [
      {
        path: 'have-a-question',
        text: /question/gi,
        payload: 'question',
        action: HaveAQuestion,
      },
      {
        path: 'place-an-order',
        payload: 'order',
        action: PlaceAnOrder,

        childRoutes: [
          {
            path: 'veg-or-nonveg',
            payload: 'hamburger',
            action: VegOrNonVeg,

            childRoutes: vegOrNonVegRoutes,
          },
          {
            path: 'veg-or-nonveg',
            payload: 'pizza',
            action: VegOrNonVeg,

            childRoutes: vegOrNonVegRoutes,
          },
          {
            path: 'veg-or-nonveg',
            payload: 'sandwich',
            action: VegOrNonVeg,

            childRoutes: vegOrNonVegRoutes,
          },
          {
            path: 'veg-or-nonveg',
            payload: 'taco',
            action: VegOrNonVeg,

            childRoutes: vegOrNonVegRoutes,
          },
          {
            path: 'veg-or-nonveg',
            payload: 'burrito',
            action: VegOrNonVeg,

            childRoutes: vegOrNonVegRoutes,
          },
        ]
      },
    ]
  },
  {
    path: 'contact-manager',
    text: /(contact)*(manager)/gi,
    payload: 'contactManager',
    action: ContactManager,
  },
  {
    path: 'contact-delivery',
    payload: 'contactDelivery',
    text: /((contact)*(delivery)|(where is my order|track my order))/gi,
    action: ContactDelivery,
  },
  {
    path: 'go-to-main-menu',
    text: /main menu/gi,
    payload: 'mainMenu',
    redirect: 'initial'
  },
  {
    path: 'go-to-food-menu',
    text: /(what|what's)*(food)?(menu)/gi,
    payload: 'foodMenu',
    redirect: 'place-an-order',
  },
  {
    path: 'place-an-order',
    payload: 'order',
    text: /(make|place)?(an)?(order)/gi,
    action: PlaceAnOrder,

    childRoutes: [
      {
        path: 'veg-or-nonveg',
        payload: 'hamburger',
        action: VegOrNonVeg,

        childRoutes: vegOrNonVegRoutes,
      },
      {
        path: 'veg-or-nonveg',
        payload: 'pizza',
        action: VegOrNonVeg,

        childRoutes: vegOrNonVegRoutes,
      },
      {
        path: 'veg-or-nonveg',
        payload: 'sandwich',
        action: VegOrNonVeg,

        childRoutes: vegOrNonVegRoutes,
      },
      {
        path: 'veg-or-nonveg',
        payload: 'taco',
        action: VegOrNonVeg,

        childRoutes: vegOrNonVegRoutes,
      },
      {
        path: 'veg-or-nonveg',
        payload: 'burrito',
        action: VegOrNonVeg,

        childRoutes: vegOrNonVegRoutes,
      },
    ]
  },
]
Yay!! With all that done our bot is ready to take orders!! Go and enjoy playing with the bot!!
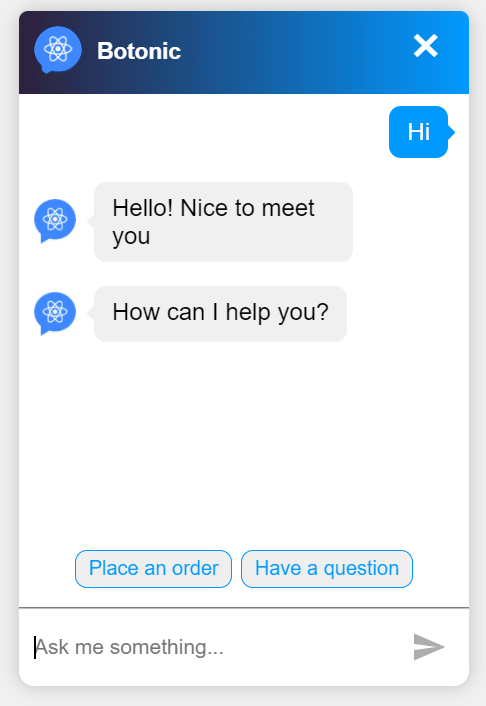
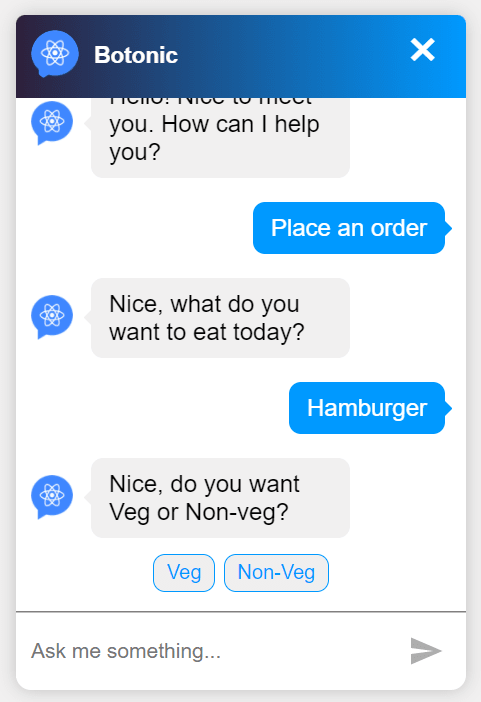
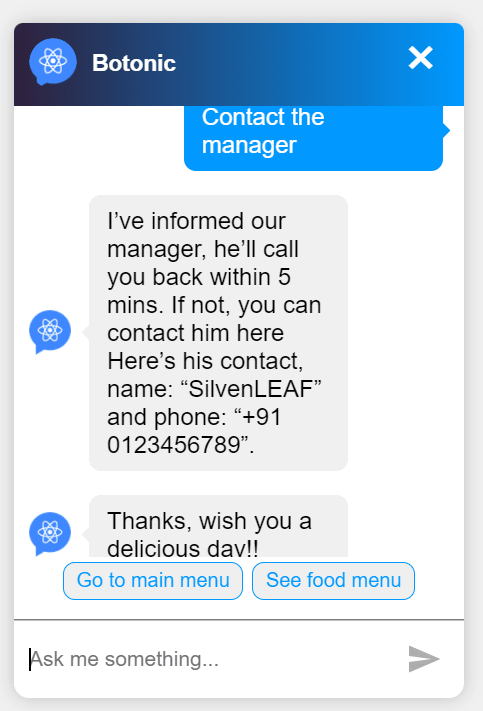
Final BOT Screenshots
Step 5: Making the bot Production Level
You can make it dynamic and production level like this...
- Retrive the food menu from your Backend Server, and show it dynamically
- When the user places an order, make a Backend request and handle the order
- You can ask for the user's contact information and contact him
- Show the prices for the orders as well
- You can integrate LUIS (Language Understanding Inteligence) and understand what the user is trying to say more accurately for whatever input they give
- You can integrate QnAMaker to make the bot answer any question the user asks
- You can also use Botonic's own NLU (Natural Language Understanding) instead of LUIS
Anyway, integrating Backend and with the unlimited power of TypeScript/JavaScript, you can literally do anything with your user
So have fun!! Did you enjoy it? Let me know in the comments. Also let me know if you want more of these kinds of project oriented blogs.
Step 6: Where to test this bot?
Here is the github repo, you can clone it and run, or you can try using this following link to test it live.
Github REPO:
https://github.com/SilvenLEAF/RestaurantReceptionistBOT
Test it LIVE
Currently Botonic has a bug in their CLI and not letting us depoy it, once the bug is fixed, I'll deploy and update this blog.
[LIVE Link will come here]
Anyway, if you are curious on how to deploy it, the process is like this
Step 7: How to deploy the bot?
From your project terminal type this
botonic deploy
If you already have a "HubType" account, select "Login". But I don't have it yet, so let's create one
I'll select "Signup". After selecting "Signup" and clicking enter, it'll ask for your email, aftering entering your email, it'll ask you to enter your password.
Then you'll see this
Once you select your bot, it'll be deployed.
NOTE: Currently there is a bug here. We can not select any bot, also we can not type a bot name here.
You can also try this command alternatively
botonic deploy -b YOUR_BOT_NAME
Normally it should work, but due to current bug, it will throw this error
Bot YOUR_BOT_NAME doesn't exist
HERE is the Github issue Link
Here is the link for the bug issue that is still open
https://github.com/hubtype/botonic/issues/1811
But anyway, don't let this little thing stop you from exploring this amazing framework.
It's relatively new and still in its development stage, so it's expectable. But it sure is amazing. You can try it yourself!!
Wish this little bug gets resolved soon!!
Hope you liked this. Let me know in the comments. Also let me know if you want more of these kinds of project oriented blogs.
What's NEXT?
1. More on Chatbots
2. More on DevOps
3. Improved AI BOT that can do anything
4. Insane stuff with JavaScript/TypeScript
5. Debugging TypeScript with VS Code Debugger
6. Writing Automated Tests for any Server
7. How to create an Android APP with NO XP
(including apk generating)

Posted on December 4, 2021
Join Our Newsletter. No Spam, Only the good stuff.
Sign up to receive the latest update from our blog.


