How to connect Nodejs to Mongodb Database (Two methods)

Shubham Athawane
Posted on February 16, 2023

Node.js is an open-source and cross-platform runtime environment built on Chrome’s V8 JavaScript engine for executing JavaScript code outside of a browser.
MongoDB, the most popular NoSQL database, is an open-source document-oriented database. The term ‘NoSQL’ means ‘non-relational’.
So let’s come on the matter, We will connect our NodeJS app with MongoDB using two methods:
- With Localhost MongoDB compass
- With MongoDB Atlas [online database]
Prerequisites:
- NodeJS and any package manager [npm / yarn]
- MongoDB Compass
- Any Code Editor
Method 1: With Localhost MongoDB compass
Step 1: Initialise the Node in your project Directory:
npm init
Step 2: Create an Index.js file in the initialize project directory:
touch index.js
Step 3: Installing Mongoose, express, and nodemon Library. Write the below command in the terminal to install all of it:
npm install express mongoose nodemon
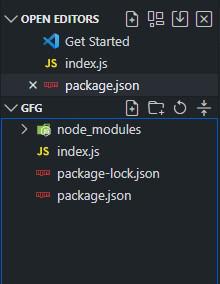
Project Structure: Your folder structure will look like this:
Folder Structure
Step 4: Configure the package.json file to add Nodemon
- Inside the script, add Nodemon to start the script, so that you don't need to start the server again and again!
- It will automatically start the server after changes are made in the Index.js file
// package.js
"start": "nodemon index.js",
- After all installation and changes, your 'package.json' file should look like this:
//package.json
{
    "name": "node-mongodb-connection",
    "version": "1.0.0",
    "description": "",
    "type": "module",
    "main": "index.js",
    "scripts": {
        "start": "nodemon index.js",
        "test": "echo \"Error: no test specified\" && exit 1"
},
    "keywords": [],
    "author": "",
    "license": "ISC",
    "dependencies": {
        "dotenv": "^16.0.2",
        "express": "^4.18.1",
        "mongoose": "^6.5.4",
        "nodemon": "^2.0.19"
    }
}
Step 5: Import all packages and create an express instance, In the index.js:
const express = require('express')
const mongoose = require('mongoose')
- Create the instance of the express app
const app = express();
- Allocate the port to your express app
port = 3001
NOTE: Although it’s not a good practice to directly show your port [you can use dotenv library to hide your credentials].
- We’ve allocated the port, Now make the port listen to the requests by passing a port parameter to the app.listen() method:
app.listen(port, (req, res) => {
    console.log(`Server is running on port ${port}`);
})
Step 6: Creating a mongoose connection:
- Create a variable URL to store the local database URL. In index.js:
const URL = "mongodb://localhost:27017/node_mongodb_connection"
- Now use this URL variable with mongoose.connect() method:
mongoose
    .connect(URL, {
        config: { autoIndex: true },
    })
    .then(console.log("Database Connected!"))
    .catch((err) => console.log(err));
Final Code: Your index.js file will look like this:
Javascript
const express = require("express");
const mongoose = require("mongoose");

const app = express();
const URL = "mongodb://localhost:27017/node_mongodb_connection"
const port = 3001;

// added additional code here

app.use(express.json());
app.use(express.urlencoded({ extended: true }));
mongoose.set("strictQuery", false);

// Database connectivity
mongoose
    .connect(port, {
        useNewUrlParser: true,
        useUnifiedTopology: true,
    })
    .then(() => console.log("DB connected.."))
    .catch((err) => console.error(err));

// Listening on port 3001
app.listen(URl, (req, res) => {
    console.log(`Server is running on ${port}`);
});
Here we pass the useNewUrlParser: true. to mongoose.connect() to avoid the DeprecationWarning.
Step 7: Finally, run your app
- Run your app using the terminal using:
npm start
Congratulations! You have successfully connected the NodeJS app to the MongoDB database
Method 2: Using an online MongoDB database
In method 1 we have connected the node app with the local database. Here we have used MongoDB local database, But when it comes to hosting your app on the web local database won't work.
So, let's see how to connect the node app with the MongoDB atlas, it's pretty easy and simple:
Step 1: Creating MongoDB Database Cloud Cluster:
- Go to MongoDB. website, Create an account if you don't have one, and then sign in
- Create a free instance of the atlas
- After creating the cluster, Move to the Home screen. On the Home screen of Atlas click on New Project:
altas home screen
- Create your Atlas Cluster and get URI for connection
Now you just need to replace the link we copied from the MongoDB atlas with our old local host link:
- Instead of:
const URL = "mongodb://localhost:27017/node_mongodb_connection"
- We will use:
const URL  = "mongodb-srv://project-name:password@cluster0.gkcptov.mongodb.net/?
retrywrites=true&w=najority"
Replace the project-name and password field with your own project-name and password.
Final Code: New Index.js will look like this:
Javascript
const express = require("express");
const mongoose = require("mongoose");

const app = express();
const URL = "mongodb-srv://project-name:password@cluster0.gkcptov.mongodb.net/?
retrywrites = true & w=najority"
const port = 3001;

// added additional code here

app.use(express.json());
app.use(express.urlencoded({ extended: true }));
mongoose.set("strictQuery", false);

// Database connectivity
mongoose
    .connect(port, {
        useNewUrlParser: true,
        useUnifiedTopology: true,
    })
    .then(() => console.log("Atlas DB connected.."))
    .catch((err) => console.error(err));

// Listening on port 3001
app.listen(URl, (req, res) => {
    console.log(`Server is running on ${port}`);
});
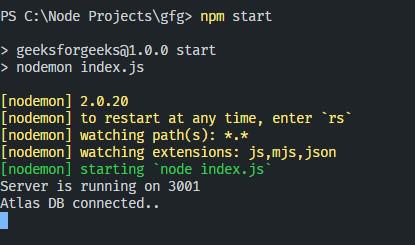
Now Run your node application using:
npm start
Connected to atlas
Atlas DB connected! You have successfully connected the NodeJS app to the MongoDB database
Remember: You need to add your IP to the atlas whenever it gets reset.

Posted on February 16, 2023
Join Our Newsletter. No Spam, Only the good stuff.
Sign up to receive the latest update from our blog.


